Jira (with Xray and Zephyr support)#
Jira is a powerful work management tool for all kinds of use cases, from requirements and test case management to agile software development.
Zebrunner supports integration with both Cloud and Server/DC Jira distributions. Integration allows users to:
- Link issues to failed tests, allowing to track those as known issues in consequential runs
- Automatically unlink from tests issues closed in Jira
- View history of issues, linked to a particular test
- Track test executions in Jira (Xray and Zephyr only)
Note: integration is supported on a per-project basis, meaning that different projects in Zebrunner can be connected to different Jira instances.
Preconditions#
Your Zebrunner account should have Administrator role within a project, where integration needs to be enabled.
Jira Cloud configuration#
The following steps needs to be completed to configure Jira integration:
- Log in to your Atlassian account and go to API tokens management view of Security section
- Click the Profile and Settings icon located in the top right corner of the screen and choose Account settings
- Go to Security section and click on Create API token
- Give token a label (e.g.
zebrunner) and press Create. Copy generated token - Log in to your Zebrunner account and go to Integrations section of a project, where integration needs to be configured
- In the grid of available integrations find Jira tile and click on it
- Select Cloud in Jira type switcher, enter your Jira hostname, username (or email) and API token generated to the corresponding fields and hit Save
Integration is now configured. You can check if Jira is configured properly and reachable by clicking on Test button. Additionally, it can be enabled or disabled if needed by clicking power icon in the upper right corner.
Note: Zebrunner will perform a requests to Jira API on behalf of the user, whose username and token where used for configuration. Make sure that user has sufficient read permissions within Jira workspace and project(s) for integration to work correctly.
Optional: configuring Xray#
If you are using Xray Jira plugin for test case management, it is possible to connect it to Zebrunner by completing the steps below.
It is assumed, that you already have Jira configured as described above.
- Log in to your Jira workspace
-
Go to Apps in the header and select Manage your apps section in the dropdown
Note: if you can't see Manage apps section, you probably lack permissions. If that's the case please contact your Jira administrator if that's your case
-
In the left sidebar find Xray section and click on API Keys.
- Press Create API Key button. In the pop-up pick a user, for whom key will be generated and press Generate. Copy generated Client Id and Client Secret
- Log in to your Zebrunner account and go to Integrations section of a project, where integration needs to be configured
- In the grid of available integrations find Jira tile and click on it
- Tick Enable Xray checkbox and select Xray from dropdown menu on the right side
- Enter
https://xray.cloud.getxray.apphostname (regardless of your Jira host), Client Id and Client Secret to corresponding fields and hit Save
Integration is now configured. Test button will now check state of both Jira itself and Xray.
Optional: configuring Zephyr Squad#
If you are using Zephyr Squad Jira plugin for test case management, it is possible to connect it to Zebrunner by completing the steps below.
It is assumed, that you already have Jira configured as described above.
- Log in to your Jira workspace
- Select project with configured Zephyr Squad
- From expand menu on the left side click Zephyr Squad button
- In the Integrations section click API keys
- Copy generated Access Key and Secret Key
- Click the Profile and Settings icon located in the top right corner of the screen and choose Profile
- From browser address bar copy your account id. Url will have the following format:
https://<yourJira>.atlassian.net/jira/people/<accountId> - Log in to your Zebrunner account and go to Integrations section of a project, where integration needs to be configured
- In the grid of available integrations find Jira tile and click on it
- Tick Enable TCM checkbox and select Zephyr from dropdown menu on the right side
- Paste copied account id, access key and secret key
Optional: configuring Zephyr Scale#
If you are using Zephyr Scale Jira plugin for test case management, it is possible to connect it to Zebrunner by completing the steps below.
It is assumed, that you already have Jira configured as described above.
- Log in to your Jira workspace
-
Click the Profile and Settings icon located in the top right corner of the screen and choose Zephyr Scale API Access Tokens
Note: if you can't see Zephyr Scale API Access Tokens section, you probably lack permissions. Please contact your Jira administrator if that's your case
-
Click Create access token button
- Copy generated token
- Log in to your Zebrunner account and go to Integrations section of a project, where integration needs to be configured
- In the grid of available integrations find Jira tile and click on it
- Tick Enable TCM checkbox and select Zephyr from dropdown menu on the right side
- Paste copied token and enter appropriate Jira project key which indicates where to push results
Jira Server configuration#
In order to configure integration please complete the following steps:
- Log in to your Zebrunner account and go to Integrations section of a project, where integration needs to be configured
- In the grid of available integrations find Jira tile and click on it
-
Select Server/DC in Jira type switcher, enter your Jira hostname, username (or email) and password and hit Save
Note: Server/DC Jira deployment doesn't provide the possibility to generate API token for authentication, so Jira password has to be used instead.
Integration is now configured. You can check if Jira is configured properly and reachable by clicking on Test button. Additionally, it can be enabled or disabled if needed by clicking power icon in the upper right corner.
Optional: configuring Xray#
If you have Xray for Jira Server installed, it will be configured automatically - no additional steps required.
Optional: configuring Zephyr#
Not supported
Adding references to test cases in your test code#
Xray #
For successful upload of test run results in Xray two steps must be performed: 1) Xray integration is configured and enabled in Zebrunner project 2) Xray configuration is performed on the tests side
Configuration#
Zebrunner Java Agents has a special Xray class with a bunch of methods to control results upload:
#setExecutionKey(String)- mandatory. The method sets Xray execution key. This method must be invoked before all tests. Thus, it should be invoked from@BeforeSuitemethod. If your suite is composed of multiple suites, you should invoke this method only for the first sub-suite;#setTestKey(String)or@XrayTestKey(array of Strings)- mandatory. Using these mechanisms you can set test keys associated with specific automated test. It is highly recommended using the@XrayTestKeyannotation instead of static method invocation. Use the static method only for special cases;#disableSync()- optional. Disables result upload. Same as#setExecutionKey(String), this method must be invoked before all tests;#enableRealTimeSync()- optional. Enables real-time results upload. In this mode, result of test execution will be uploaded immediately after test finish. Same as#setExecutionKey(String), this method must be invoked before all tests.
By default, results will be uploaded to Xray on test run finish.
Example#
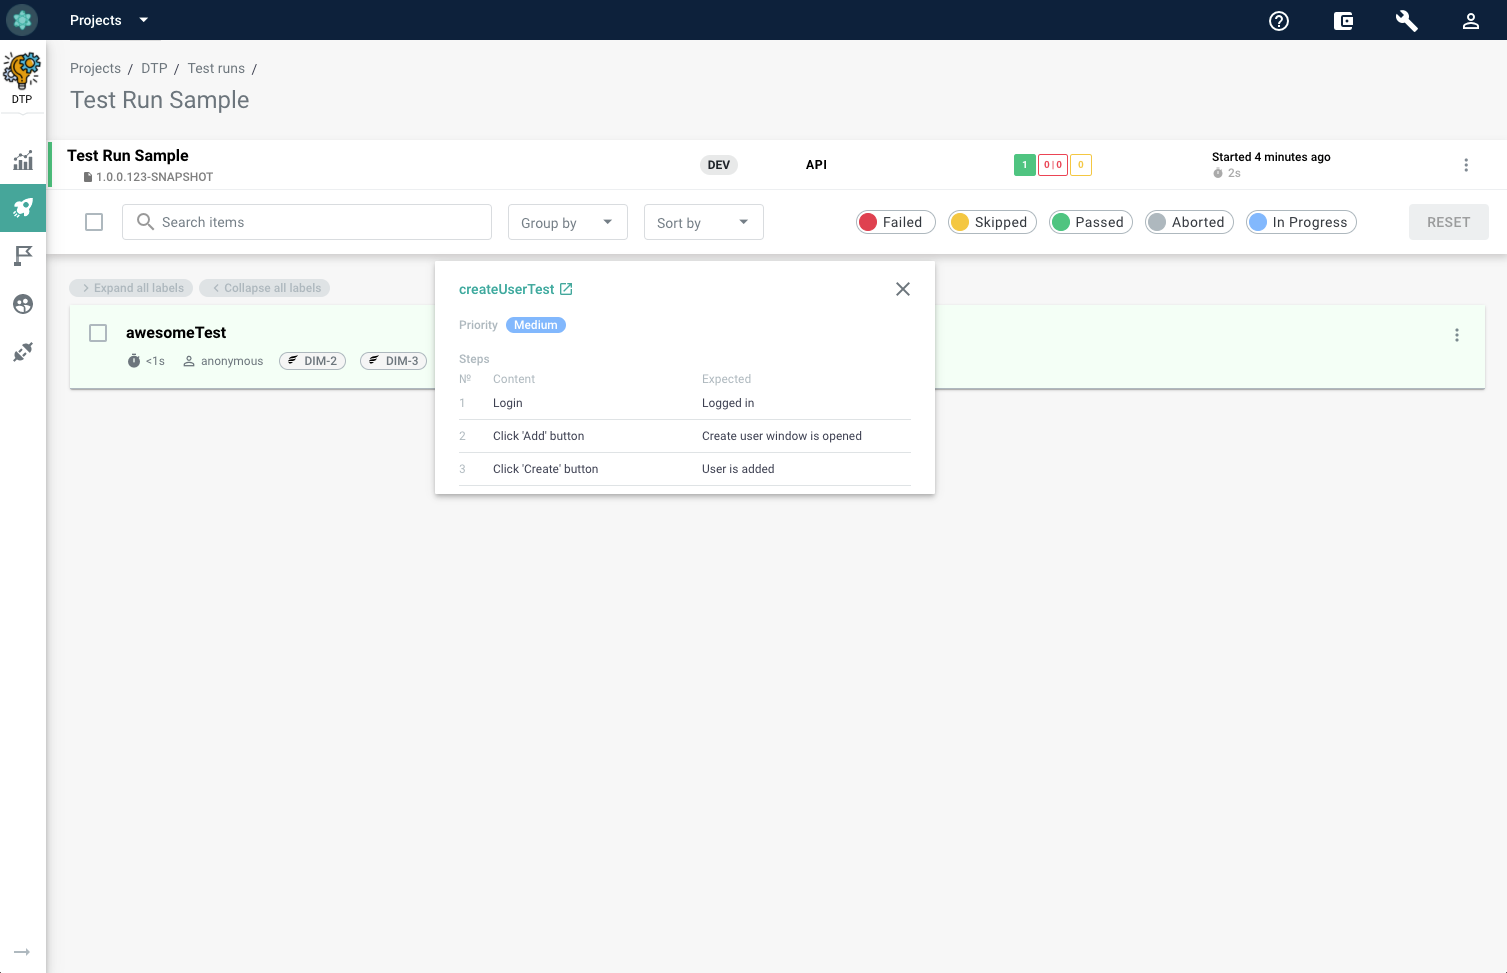
In the example below, results will be uploaded to execution with key ZBR-42. Results of the awesomeTest1 will be uploaded as result of tests with key ZBR-10000, ZBR-10001, ZBR-10002. Results of the awesomeTest2 will be uploaded as result of test with key ZBR-20000.
import com.zebrunner.agent.core.annotation.XrayTestKey;
import com.zebrunner.agent.core.registrar.Xray;
import org.testng.annotations.BeforeSuite;
import org.testng.annotations.Test;

public class AwesomeTests {

    @BeforeSuite
    public void setUp() {
        Xray.setExecutionKey("ZBR-42");
    }

    @Test
    @XrayTestKey("ZBR-10000")
    @XrayTestKey({"ZBR-10001", "ZBR-10002"})
    public void awesomeTest1() {
        // some code here
    }

    @Test
    public void awesomeTest2() {
        // some code here
        Xray.setTestKey("ZBR-20000");
        // meaningful assertions
    }

}
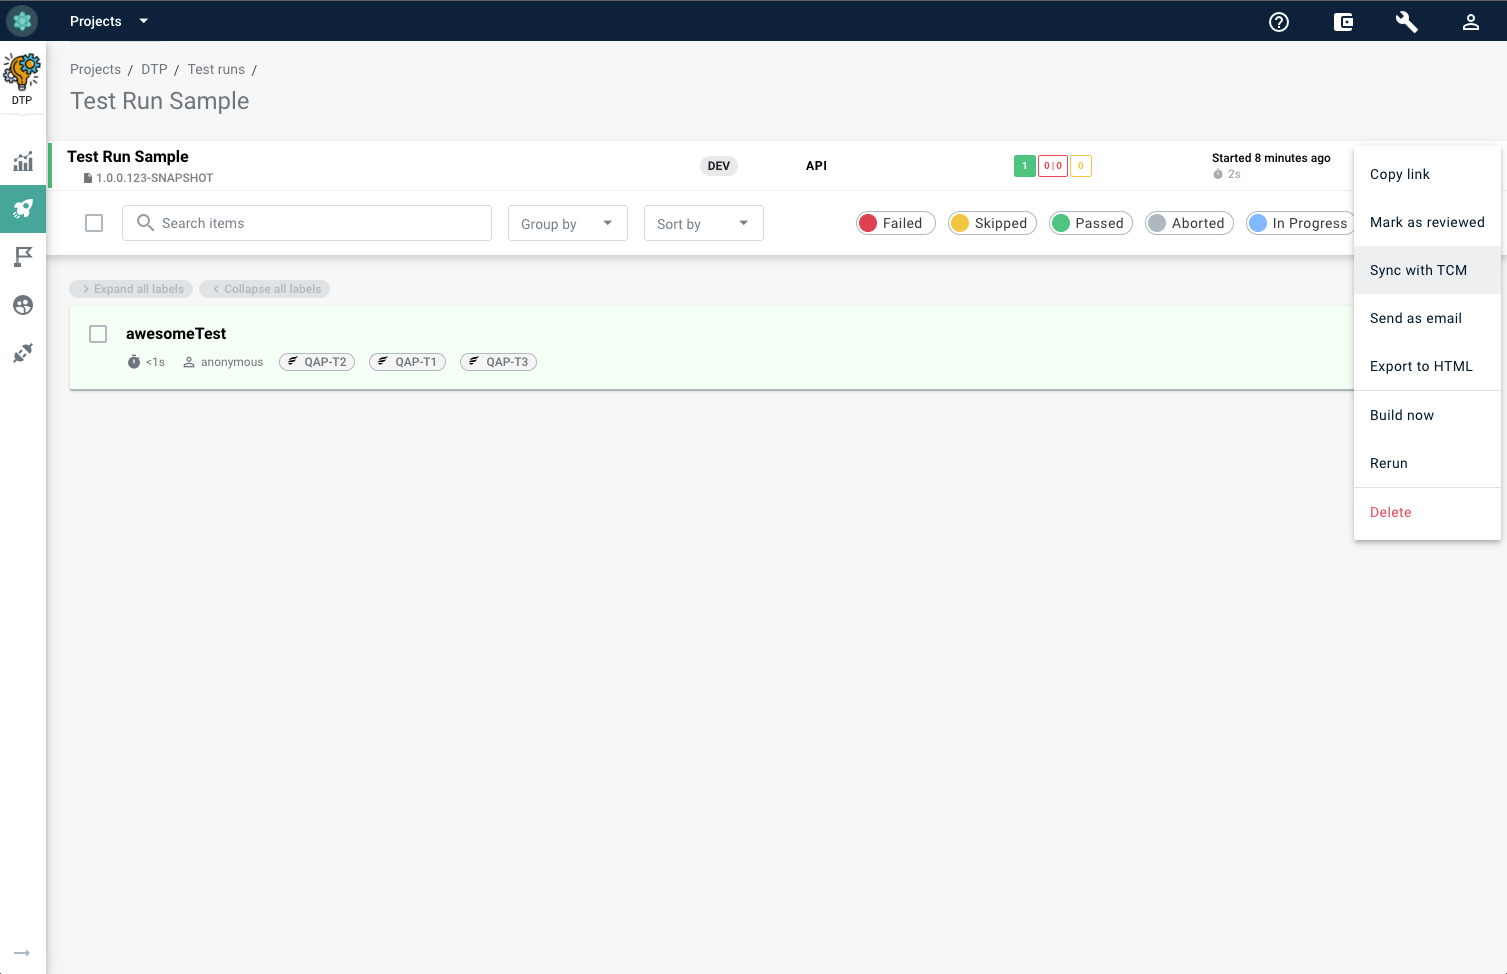
Implying integration is correct, results of test run will be available in Xray on test run finish (by default)
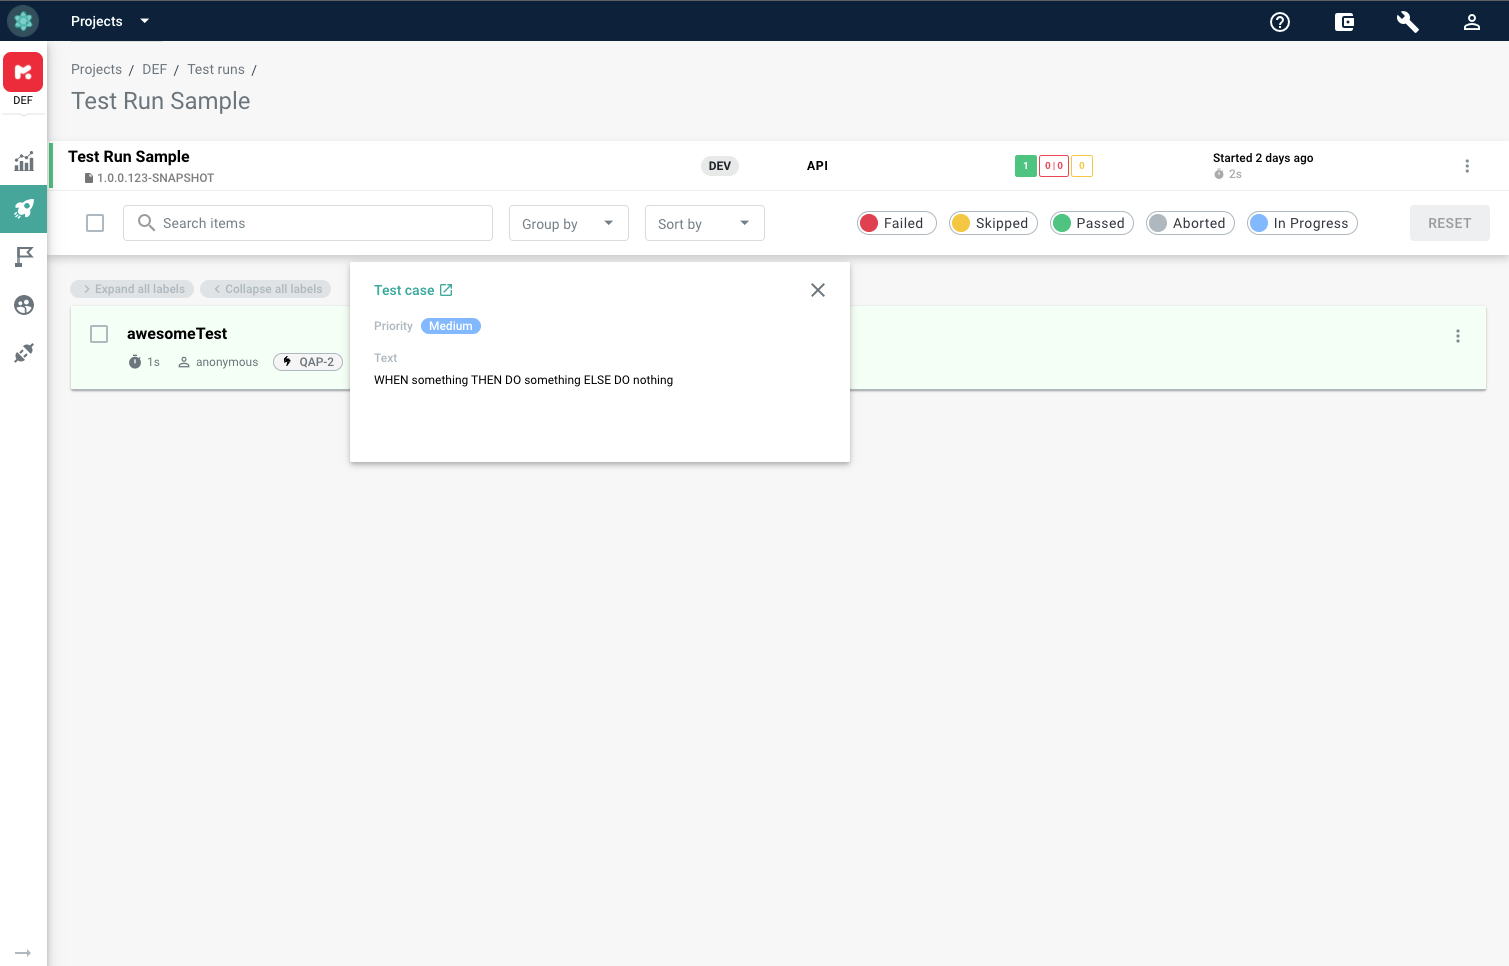
The values of attached labels will be displayed in Zebrunner under the name of a corresponding test. Also it will be possible to preview test cases in Zebrunner UI by clicking on label icon.
Zephyr Squad#
For successful upload of test run results in Zephyr two steps must be performed: 1) Zephyr integration is configured and enabled in Zebrunner project 2) Zephyr configuration is performed on the tests side
Configuration#
Zebrunner Java Agents has a special Zephyr class with a bunch of methods to control results upload:
#setTestCycleKey(String)- mandatory. The method sets Zephyr test cycle key. This method must be invoked before all tests. Thus, it should be invoked from@BeforeSuitemethod. If your suite is composed of multiple suites, you should invoke this method only for the first sub-suite;#setJiraProjectKey(String)- mandatory. Sets Zephyr Jira project key. Same as#setTestCycleKey(String), this method must be invoked before all tests;#setTestCaseKey(String)or@ZephyrTestCaseKey(array of Strings)- mandatory. Using these mechanisms you can set test case keys associated with specific automated test. It is highly recommended using the@ZephyrTestCaseKeyannotation instead of static method invocation. Use the static method only for special cases;#disableSync()- optional. Disables result upload. Same as#setTestCycleKey(String), this method must be invoked before all tests;#enableRealTimeSync()- optional. Enables real-time results upload. In this mode, result of test execution will be uploaded immediately after test finish. Same as#setTestCycleKey(String), this method must be invoked before all tests.
By default, results will be uploaded to Zephyr on test run finish.
Example#
In the example below, results will be uploaded to test cycle with key ZBR-R42 from project with key ZBR. Results of the awesomeTest1 will be uploaded as result of tests with key ZBR-T10000, ZBR-T10001, ZBR-T10002. Results of the awesomeTest2 will be uploaded as result of test with key ZBR-T20000.
import com.zebrunner.agent.core.annotation.ZephyrTestCaseKey;
import com.zebrunner.agent.core.registrar.Zephyr;
import org.testng.annotations.BeforeSuite;
import org.testng.annotations.Test;

public class AwesomeTests {

    @BeforeSuite
    public void setUp() {
        Zephyr.setTestCycleKey("ZBR-R42");
        Zephyr.setJiraProjectKey("ZBR");
    }

    @Test
    @ZephyrTestCaseKey("ZBR-T10000")
    @ZephyrTestCaseKey({"ZBR-T10001", "ZBR-T10002"})
    public void awesomeTest1() {
        // some code here
    }

    @Test
    public void awesomeTest2() {
        // some code here
        Zephyr.setTestCaseKey("ZBR-T20000");
        // meaningful assertions
    }

}
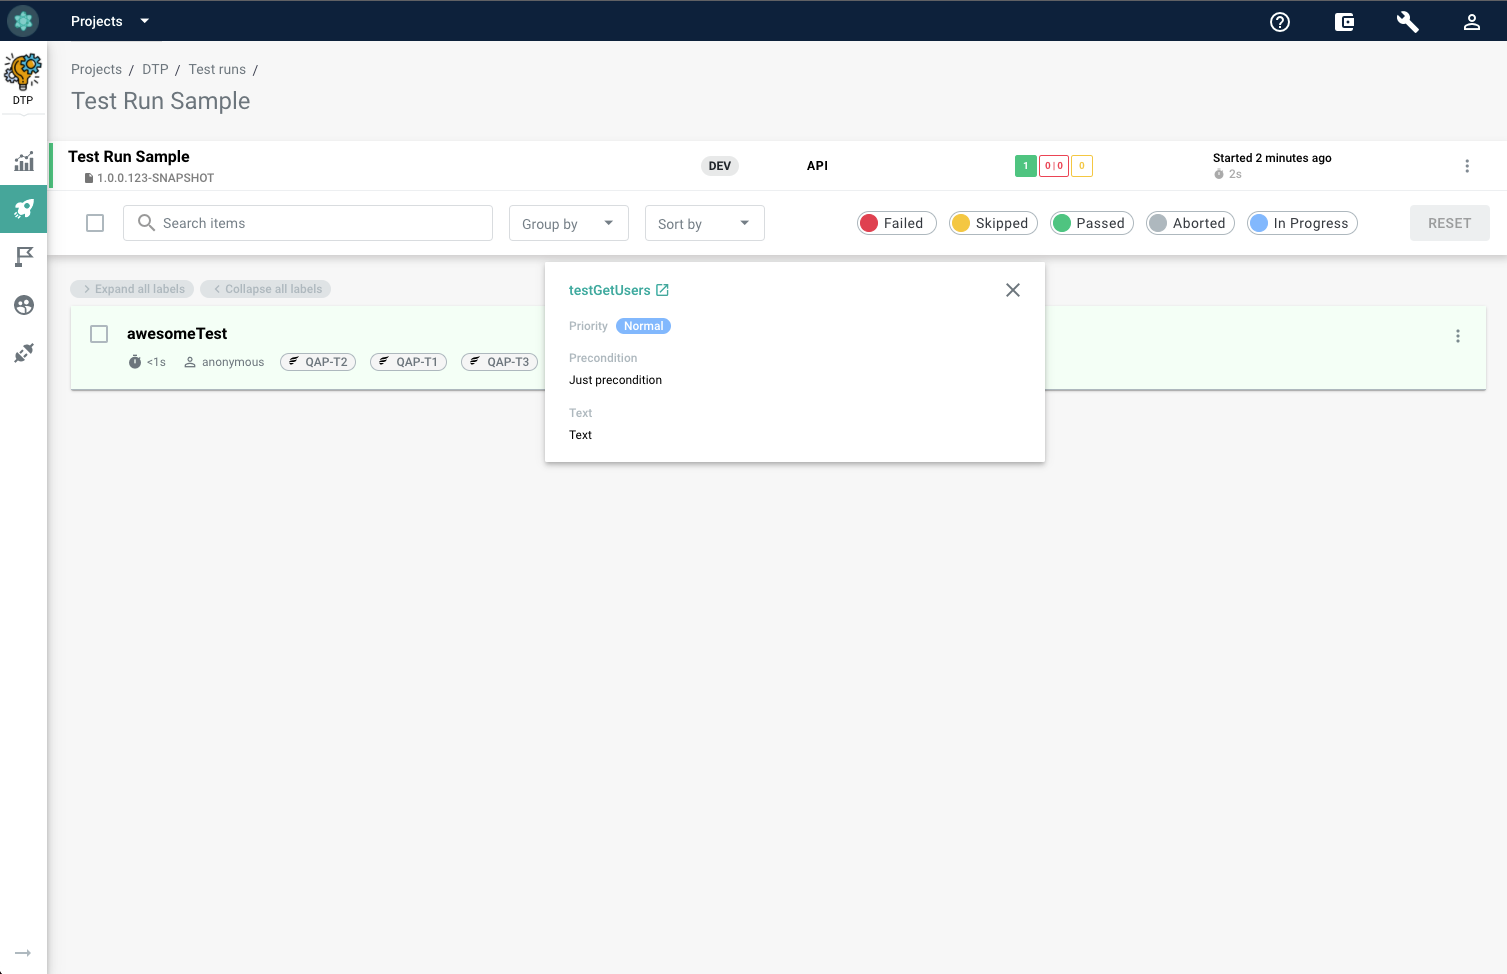
Implying integration is correct, results of test run will be available in Zephyr on test run finish (by default)
The values of attached labels will be displayed in Zebrunner under the name of a corresponding test. Also it will be possible to preview test cases in Zebrunner UI by clicking on label icon.
Zephyr Scale#
For successful upload of test run results in Zephyr two steps must be performed: 1) Zephyr integration is configured and enabled in Zebrunner project 2) Zephyr configuration is performed on the tests side
Configuration#
Zebrunner Java Agent has a special Zephyr class with a bunch of methods to control results upload:
#setTestCycleKey(String)- mandatory. The method sets Zephyr test cycle key. This method must be invoked before all tests. Thus, it should be invoked from@BeforeSuitemethod. If your suite is composed of multiple suites, you should invoke this method only for the first sub-suite;#setJiraProjectKey(String)- mandatory. Sets Zephyr Jira project key. Same as#setTestCycleKey(String), this method must be invoked before all tests;#setTestCaseKey(String)or@ZephyrTestCaseKey(array of Strings)- mandatory. Using these mechanisms you can set test case keys associated with specific automated test. It is highly recommended using the@ZephyrTestCaseKeyannotation instead of static method invocation. Use the static method only for special cases;#disableSync()- optional. Disables result upload. Same as#setTestCycleKey(String), this method must be invoked before all tests;#enableRealTimeSync()- optional. Enables real-time results upload. In this mode, result of test execution will be uploaded immediately after test finish. Same as#setTestCycleKey(String), this method must be invoked before all tests.
By default, results will be uploaded to Zephyr on test run finish.
Example#
In the example below, results will be uploaded to test cycle with key ZBR-R42 from project with key ZBR. Results of the awesomeTest1 will be uploaded as result of tests with key ZBR-T10000, ZBR-T10001, ZBR-T10002. Results of the awesomeTest2 will be uploaded as result of test with key ZBR-T20000.
import com.zebrunner.agent.core.annotation.ZephyrTestCaseKey;
import com.zebrunner.agent.core.registrar.Zephyr;
import org.testng.annotations.BeforeSuite;
import org.testng.annotations.Test;

public class AwesomeTests {

    @BeforeSuite
    public void setUp() {
        Zephyr.setTestCycleKey("ZBR-R42");
        Zephyr.setJiraProjectKey("ZBR");
    }

    @Test
    @ZephyrTestCaseKey("ZBR-T10000")
    @ZephyrTestCaseKey({"ZBR-T10001", "ZBR-T10002"})
    public void awesomeTest1() {
        // some code here
    }

    @Test
    public void awesomeTest2() {
        // some code here
        Zephyr.setTestCaseKey("ZBR-T20000");
        // meaningful assertions
    }

}
Implying integration is correct, results of test run will be available in Zephyr on test run finish (by default)
The values of attached labels will be displayed in Zebrunner under the name of a corresponding test. Also it will be possible to preview test cases in Zebrunner UI by clicking on label icon.
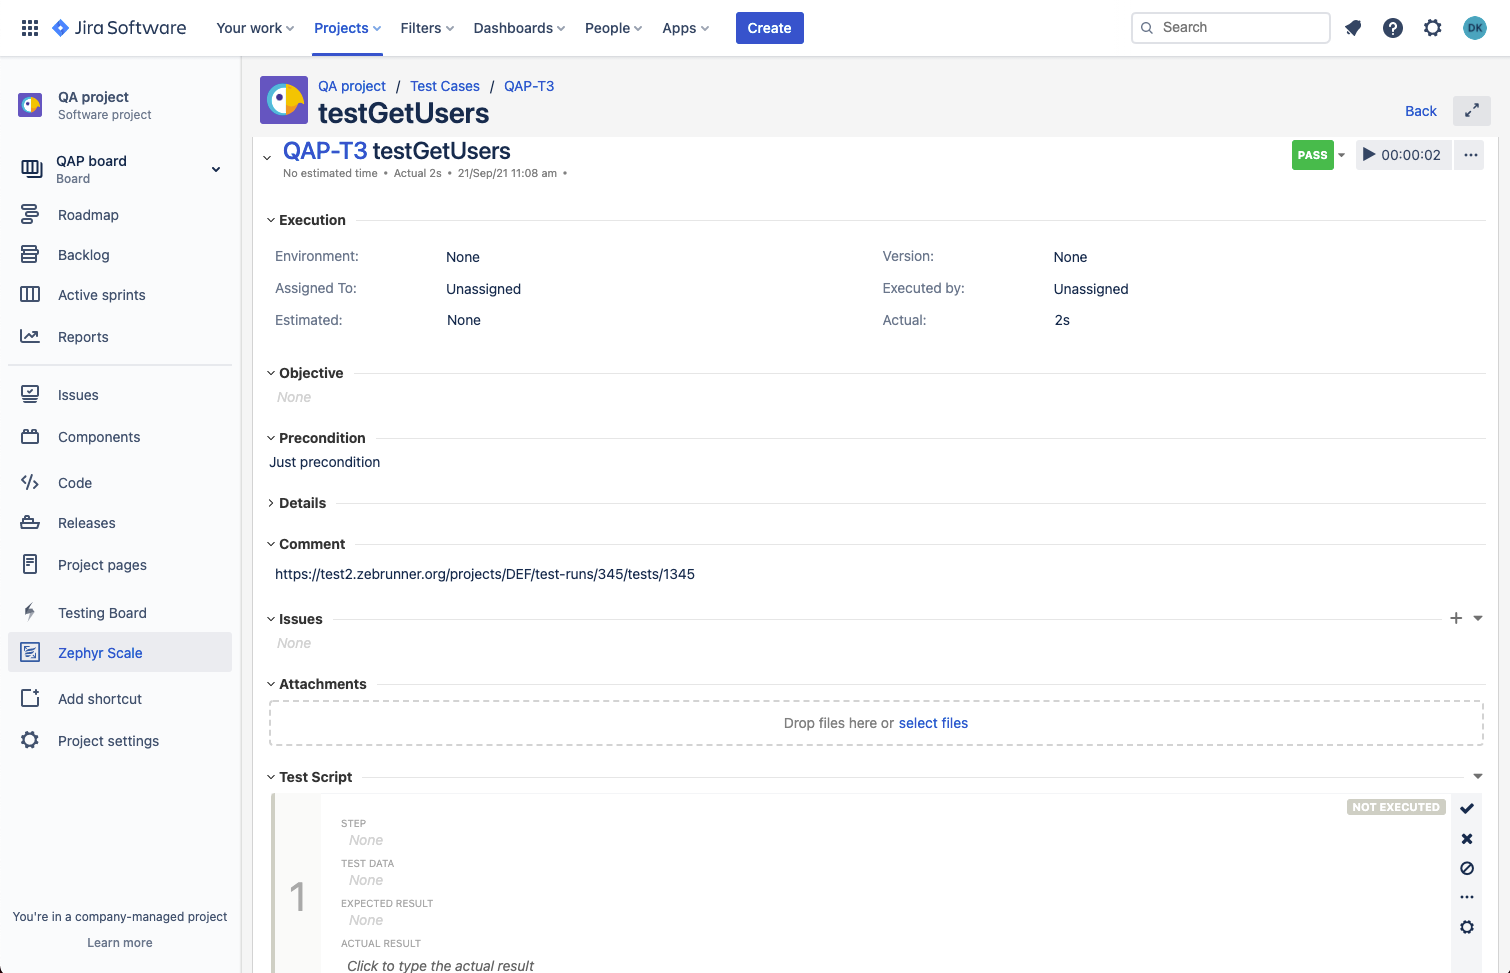
NOTE: To re-sync test results with the test case management system configured for your Zebrunner project (ex. results have changed after run finish: tests are marked as passed/failed, or have new issues attached), open 3-dot menu in test run view and click Sync with TCM button.