Launchers#
Launcher is a user-friendly interface allowing to perform parametrized executions of tests from connected test repositories.
Motivation#
Nowadays, more and more companies have teams of test automation engineers. The primary responsibility of these specialists is to automate the execution of test cases using a programming language. But having suites of automated tests is only part of the story. The most important part is to execute those tests regularly to get immediate feedback on the quality of the target software.
At the first glance, it might seem like executing these tests is an easy task — you just launch the tests and check the results. But everything is not so simple.
At the minimum, this requires a configured environment for the programming language the tests are written in. As the number of automated tests grows, test suites begin to take longer and longer to execute, requiring some kind of scaling for the execution environment. At the extreme case, this leads to establishing a TestOps team which will constantly maintain the execution environment.
Zebrunner eliminates the need to worry about the execution environment and allows the teams of automation engineers to focus on the test automation.
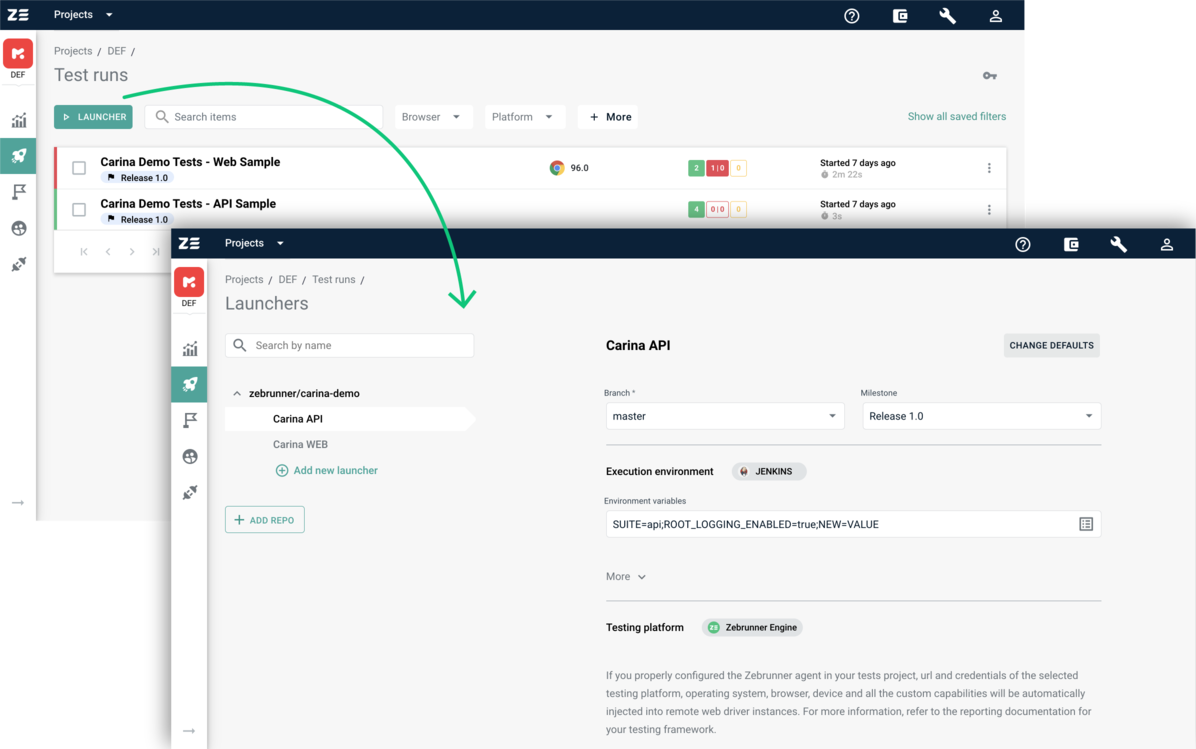
Zebrunner Launcher is a tool that you can use to execute your test suites stored in a Git repository and get comprehensive reporting at the same time. Furthermore, it allows you to run tests by schedule and plug tests execution into your CI/CD pipeline with help of Webhooks.
Overview#
If your automated tests reside in a Git repository, you can run them using Zebrunner Launcher in a few steps:
- Integrate Zebrunner reporting agent into your test project
- Connect a Git repository where your tests are located
- Create a Launcher for tests from the repository
- Launch your tests using the Launcher
You can find more information about steps 2-4 below.
Connecting a Git repository#
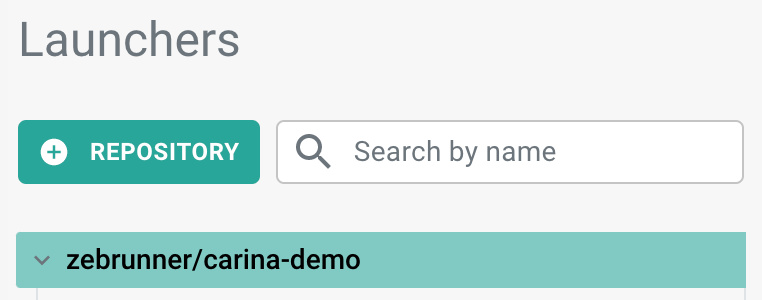
In order to add a Git repository into Zebrunner, you first need to navigate to the Launchers page and click the +Repository button which is placed above the list of already added repositories.
Note
By default, only the Default project has pre-created demo launchers for zebrunner/carina-demo repository. Any other project will not have a pre-created launcher
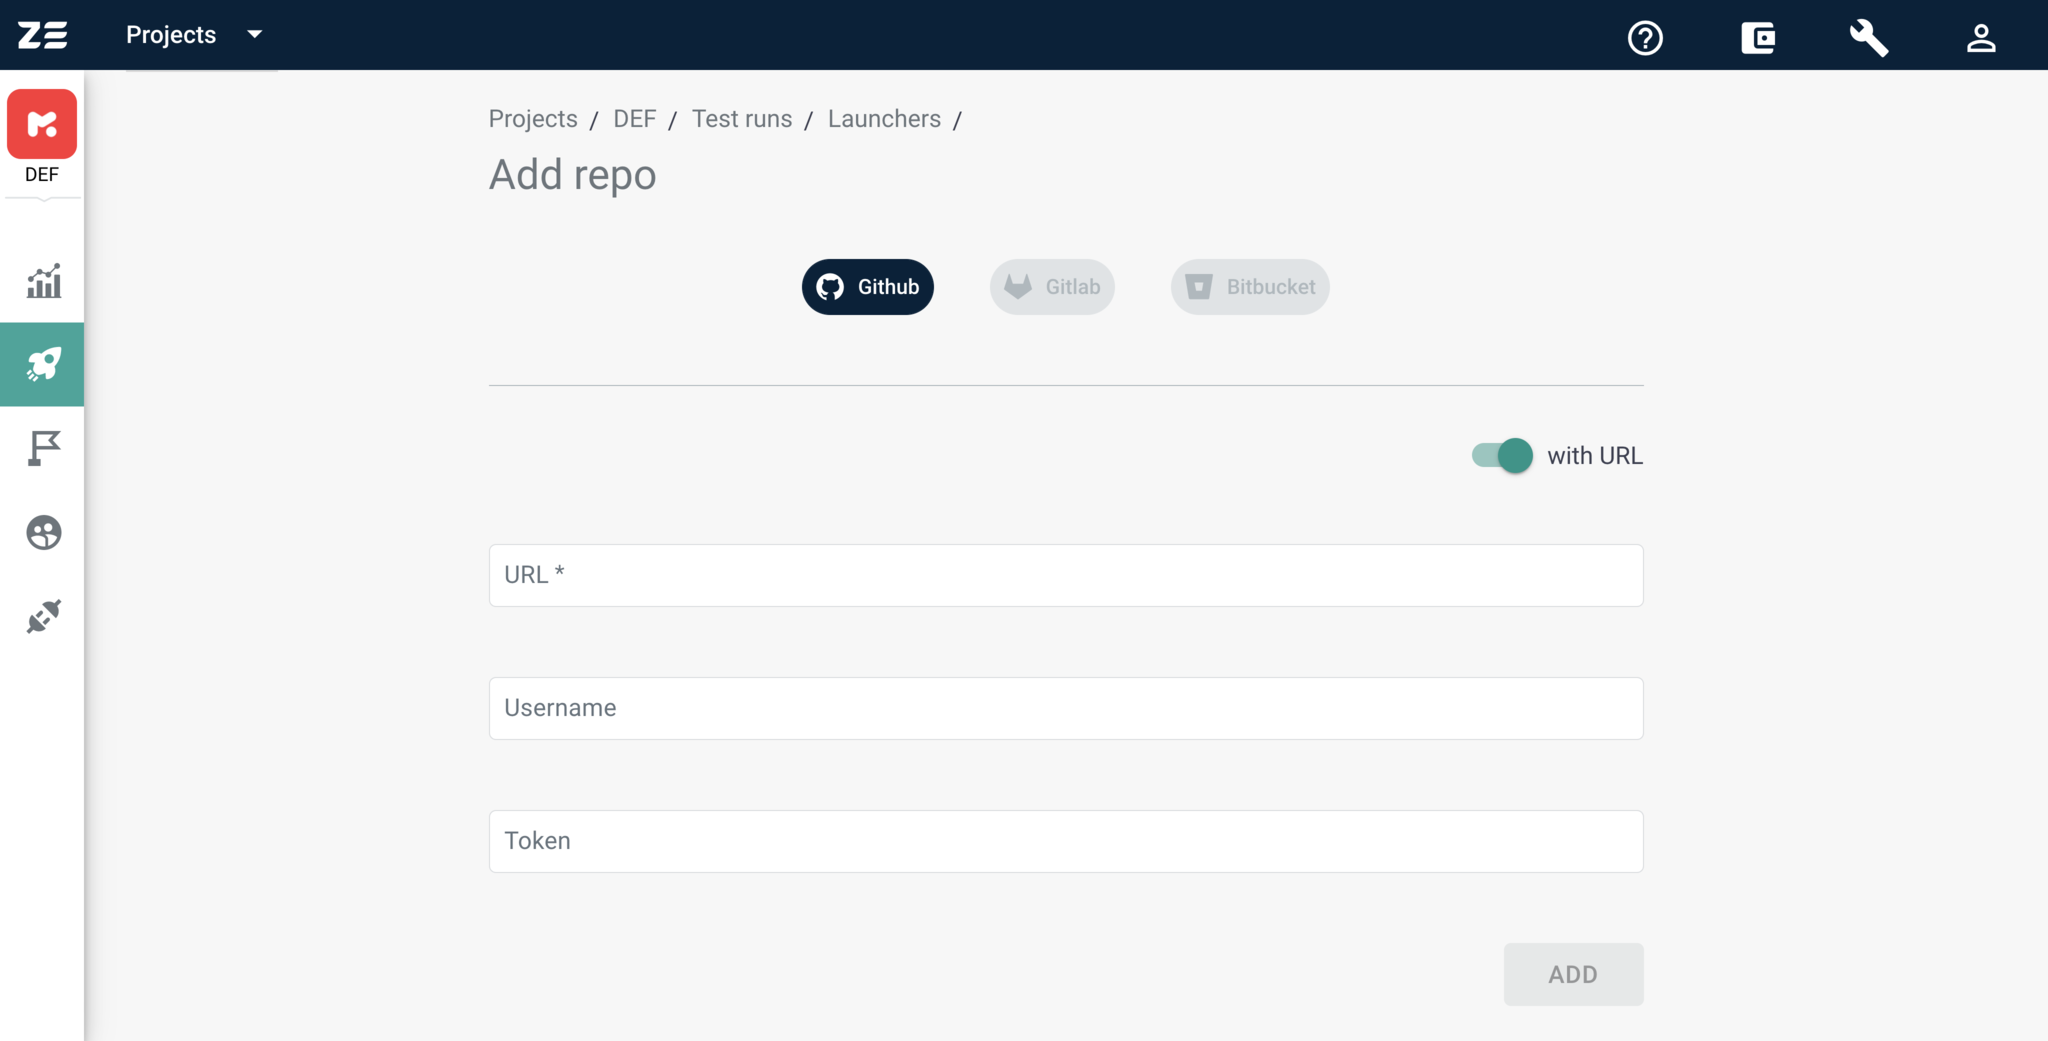
You will then need to select your Git provider. Currently, Zebrunner supports only GitHub, Gitlab and Bitbucket.
GitHub#
There are two ways in which you can add your GitHub repository into Zebrunner:
- Granting access to your GitHub account. With this approach, you give access to all the repos you have access to
- By providing URL, username and password for the repository
Note
If access to a GitHub account has already been granted for your Zebrunner user, after clicking the Add Repo button, you will see the list of accessible GitHub repositories instead of the options depicted on the screenshot above. If you intend to add a repository using its URL and credentials, you need to switch the with URL toggle
Option 1: Granting access to GitHub account#
Granting access to your GitHub account is the most convenient way to operate with your repositories. With this approach, you grant access only for the first time and then Zebrunner will use the same permission to add other repositories to Zebrunner project.
In order to grant access to your GitHub account, you need to click on the Login with GitHub button. At this point, you need to be signed in to GitHub. If you don't, GitHub will show you the sign-in form.
Then you will be asked for consent to grant Zebrunner access to your account. Zebrunner requests only the minimal set of permission to execute tests.
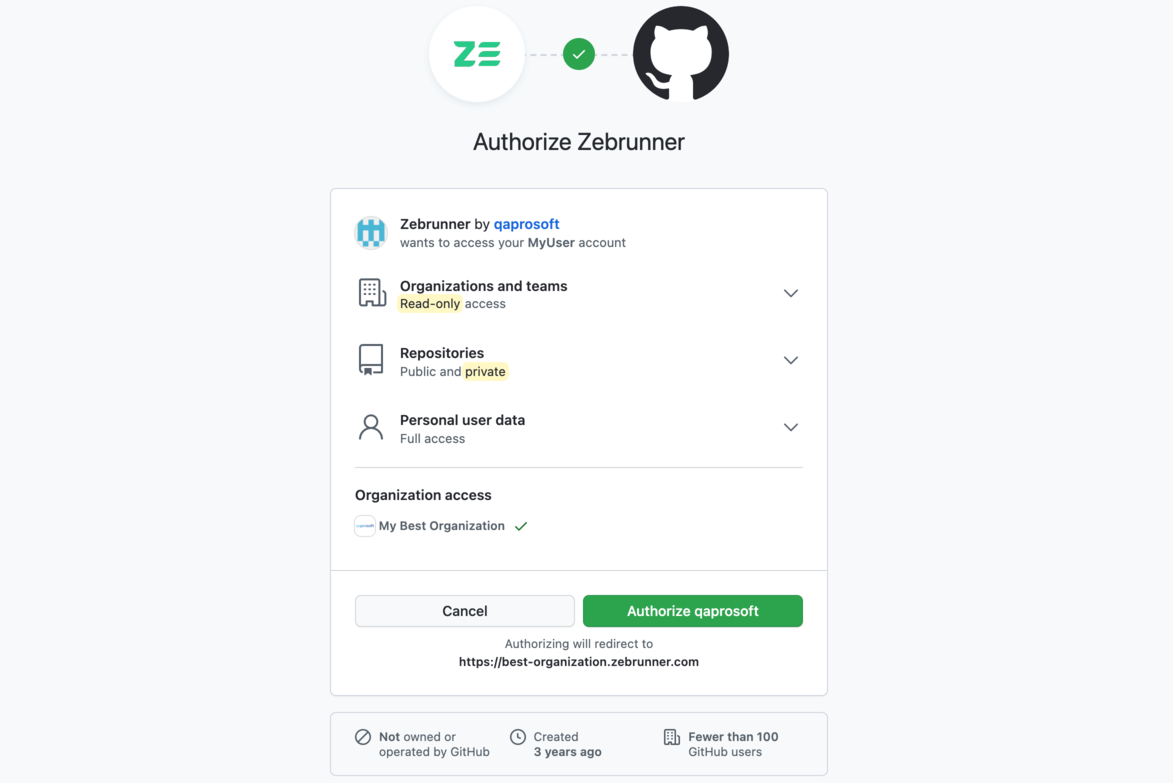
After granting the access rights, you will be redirected back to Zebrunner. Now you should see the list of repositories accessible to your GitHub account.
Note
The credentials which Zebrunner obtains to access GitHub on your behalf are securely encrypted
If either you don't have access to any GitHub repository or all the accessible repositories have been added to the Zebrunner project, you will see the corresponding message.
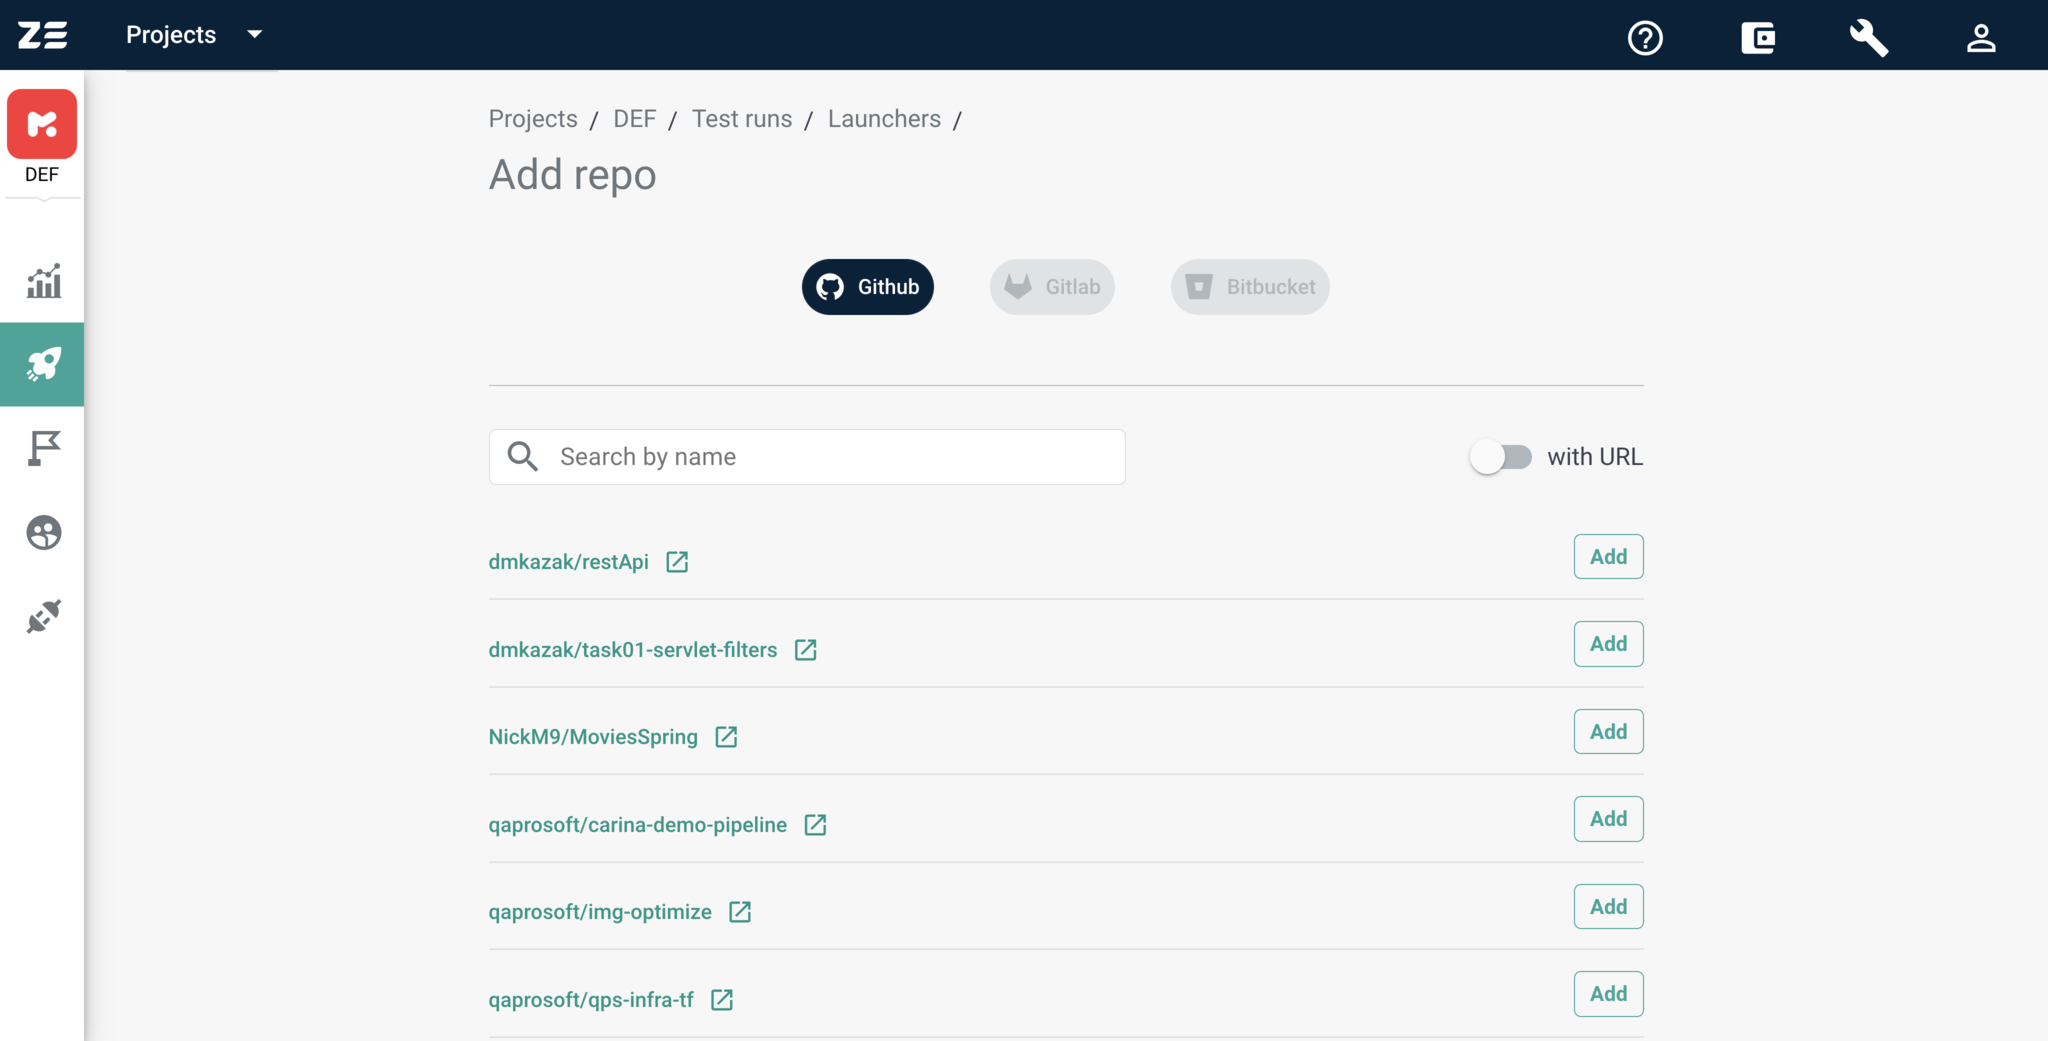
In order to add a repository from the list, you need to click the Add button next to the name of desired repository. At this point, if you want to add a repository using its URL and credentials, you need to switch the with URL toggle.
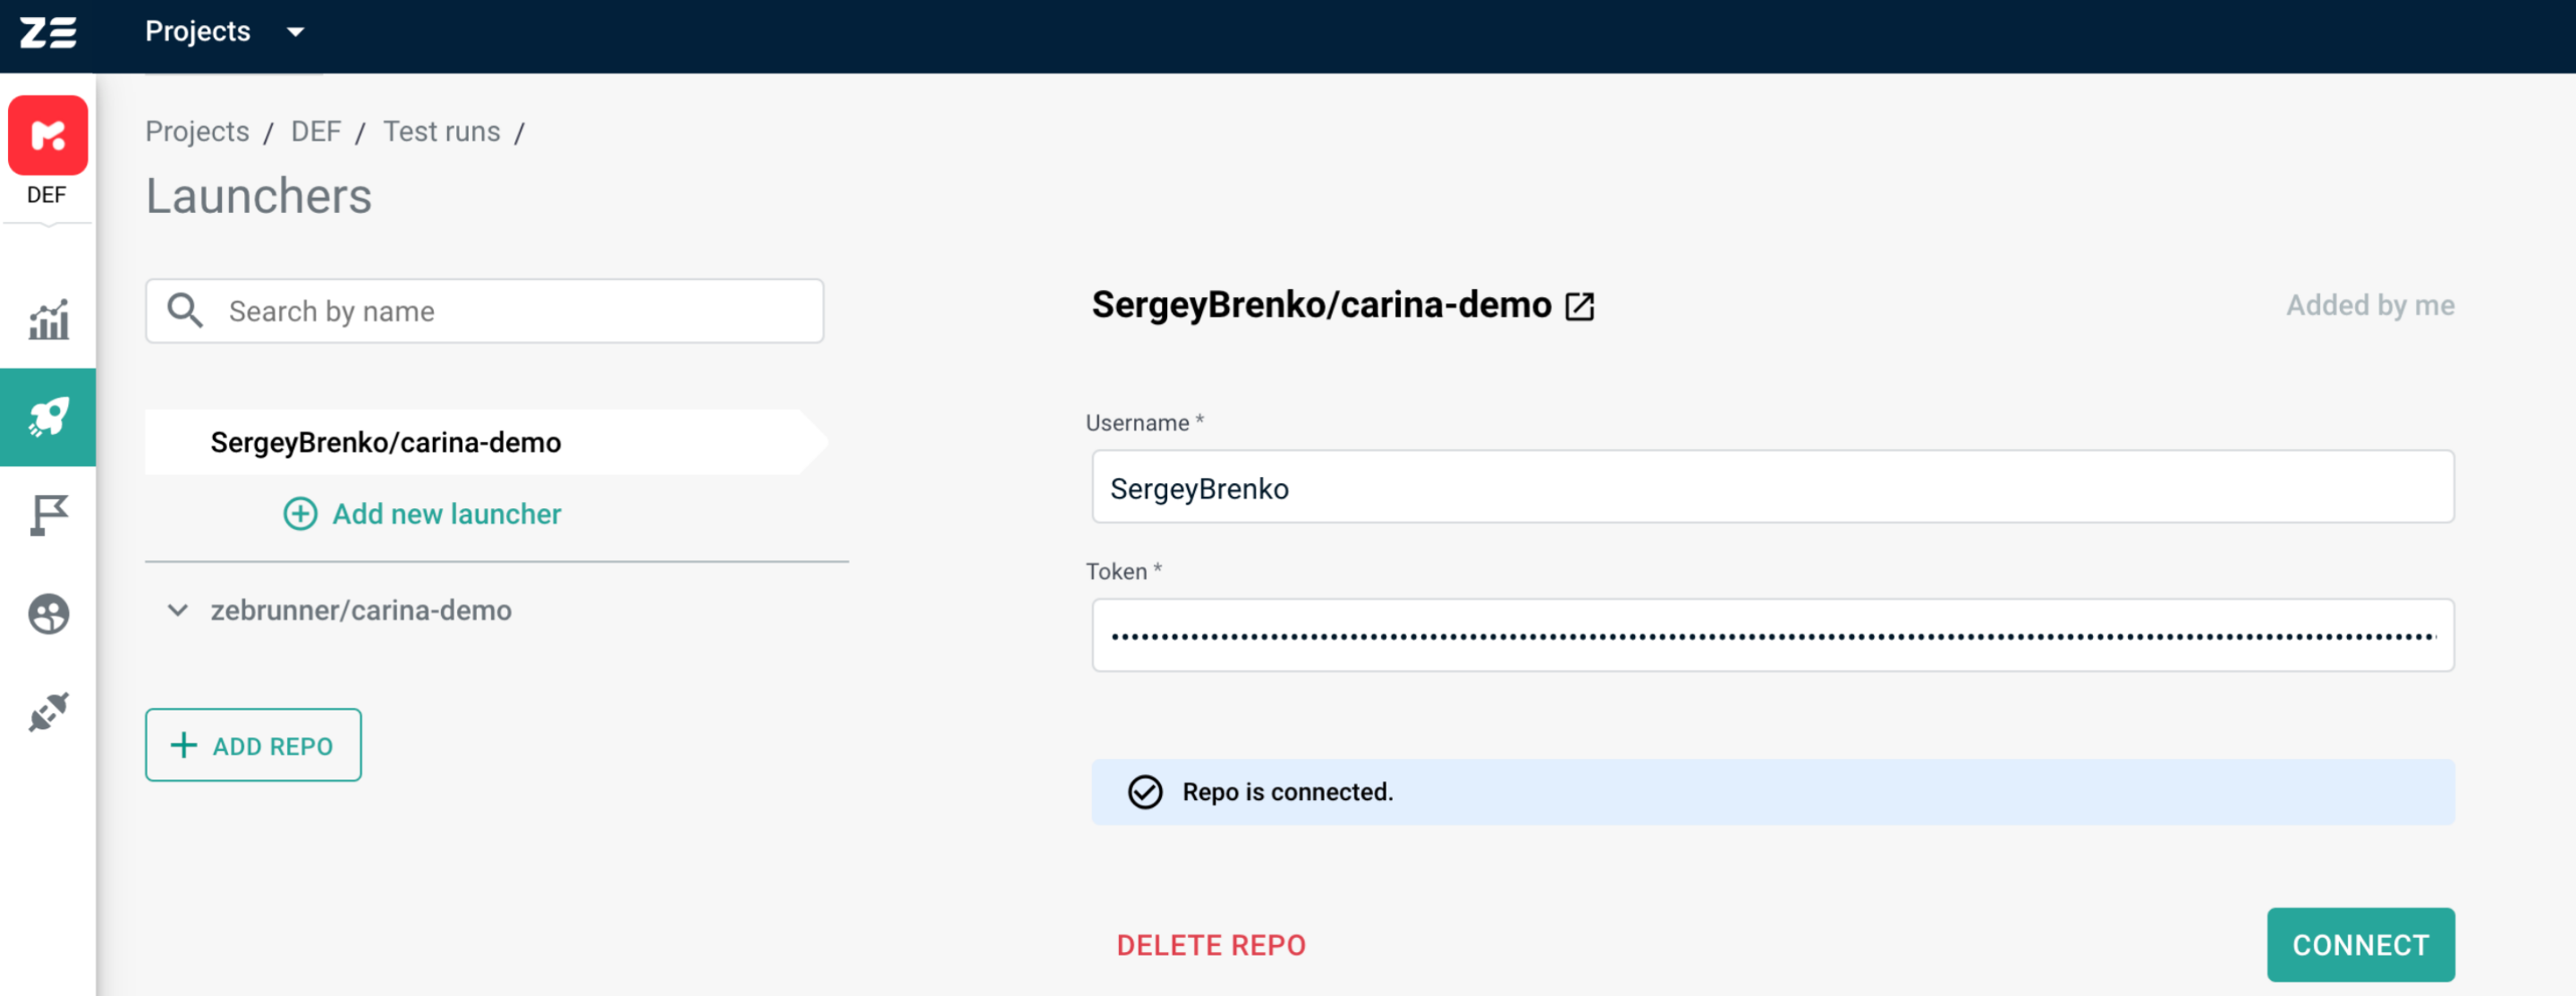
A repository added by clicking the Add button will appear in the list of repositories. The note under the Login with GitHub button at the center of the screen should state Repo is connected. If it says that there was an error connecting to the repository, you should double-check if your GitHub user still has access to this repository.

If you click the Add Repo button again, you should see the list of repositories available to your user, but without already added ones.
Info
If you would like to revoke access granted to Zebrunner, you can do so directly from GitHub.
Navigate to Settings → Applications → Authorized OAuth Apps → click More Options next to the Zebrunner app → Revoke → I understand, revoke access.
Zebrunner will then not be able to access GitHub on your behalf, including pulling the repository and executing tests
Option 2: Adding repository by URL#
Adding a repository by URL and credentials is not as convenient as adding via GitHub authentication. This requires specifying an URL and credentials for each repository. On the other hand, this allows you to have separate credentials for every repository, which is good in terms of security and traceability.
The repository URL must be either an HTTPS browser link like https://github.com/zebrunner/carina-demo or .git HTTPS URL like https://github.com/zebrunner/carina-demo.git.
If the repository you intend to add is publicly available, you are free to not specify username and token. Every private repository must have username and token specified, otherwise GitHub will not allow to pull it.
In order to generate access token for repository complete the following steps:
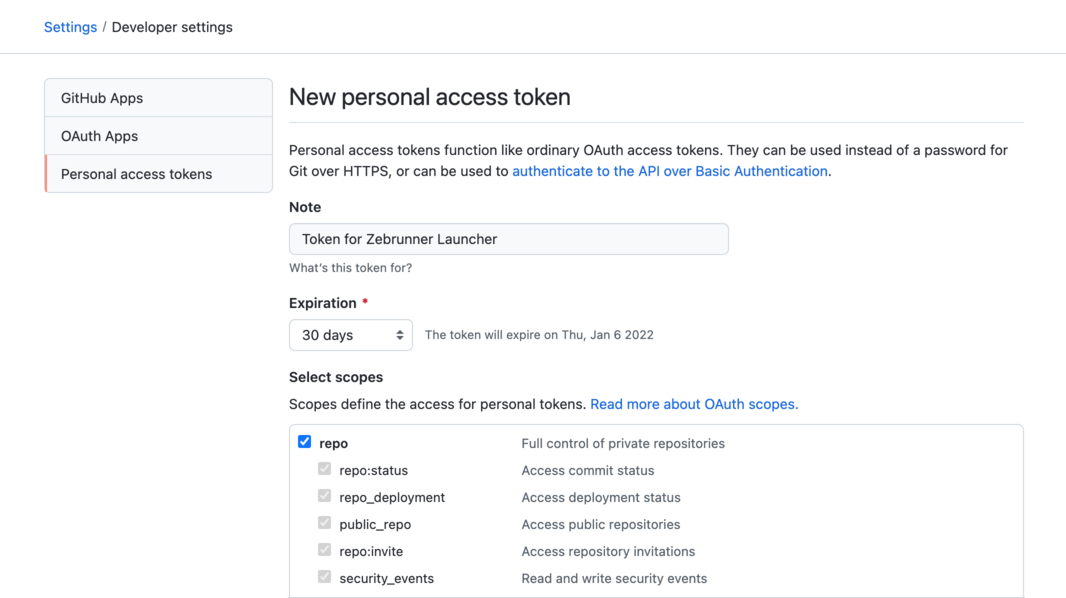
- Go to Settings → Developer settings → Personal access tokens → Generate new token
- In the Note field, provide a meaningful description and set the desired Expiration
- Grant Full control of private repositories permission by checking the
reposcopes for the token - Click Generate token button at the bottom of the page
Token expiration
Note, that after the expiration date, Zebrunner will lose access to all repositories associated with the token, so don't forget to regularly renew the token in repository settings in Zebrunner. As an alternative to rotating tokens manually, you can issue a token without expiration date, but this is not a good security practice.
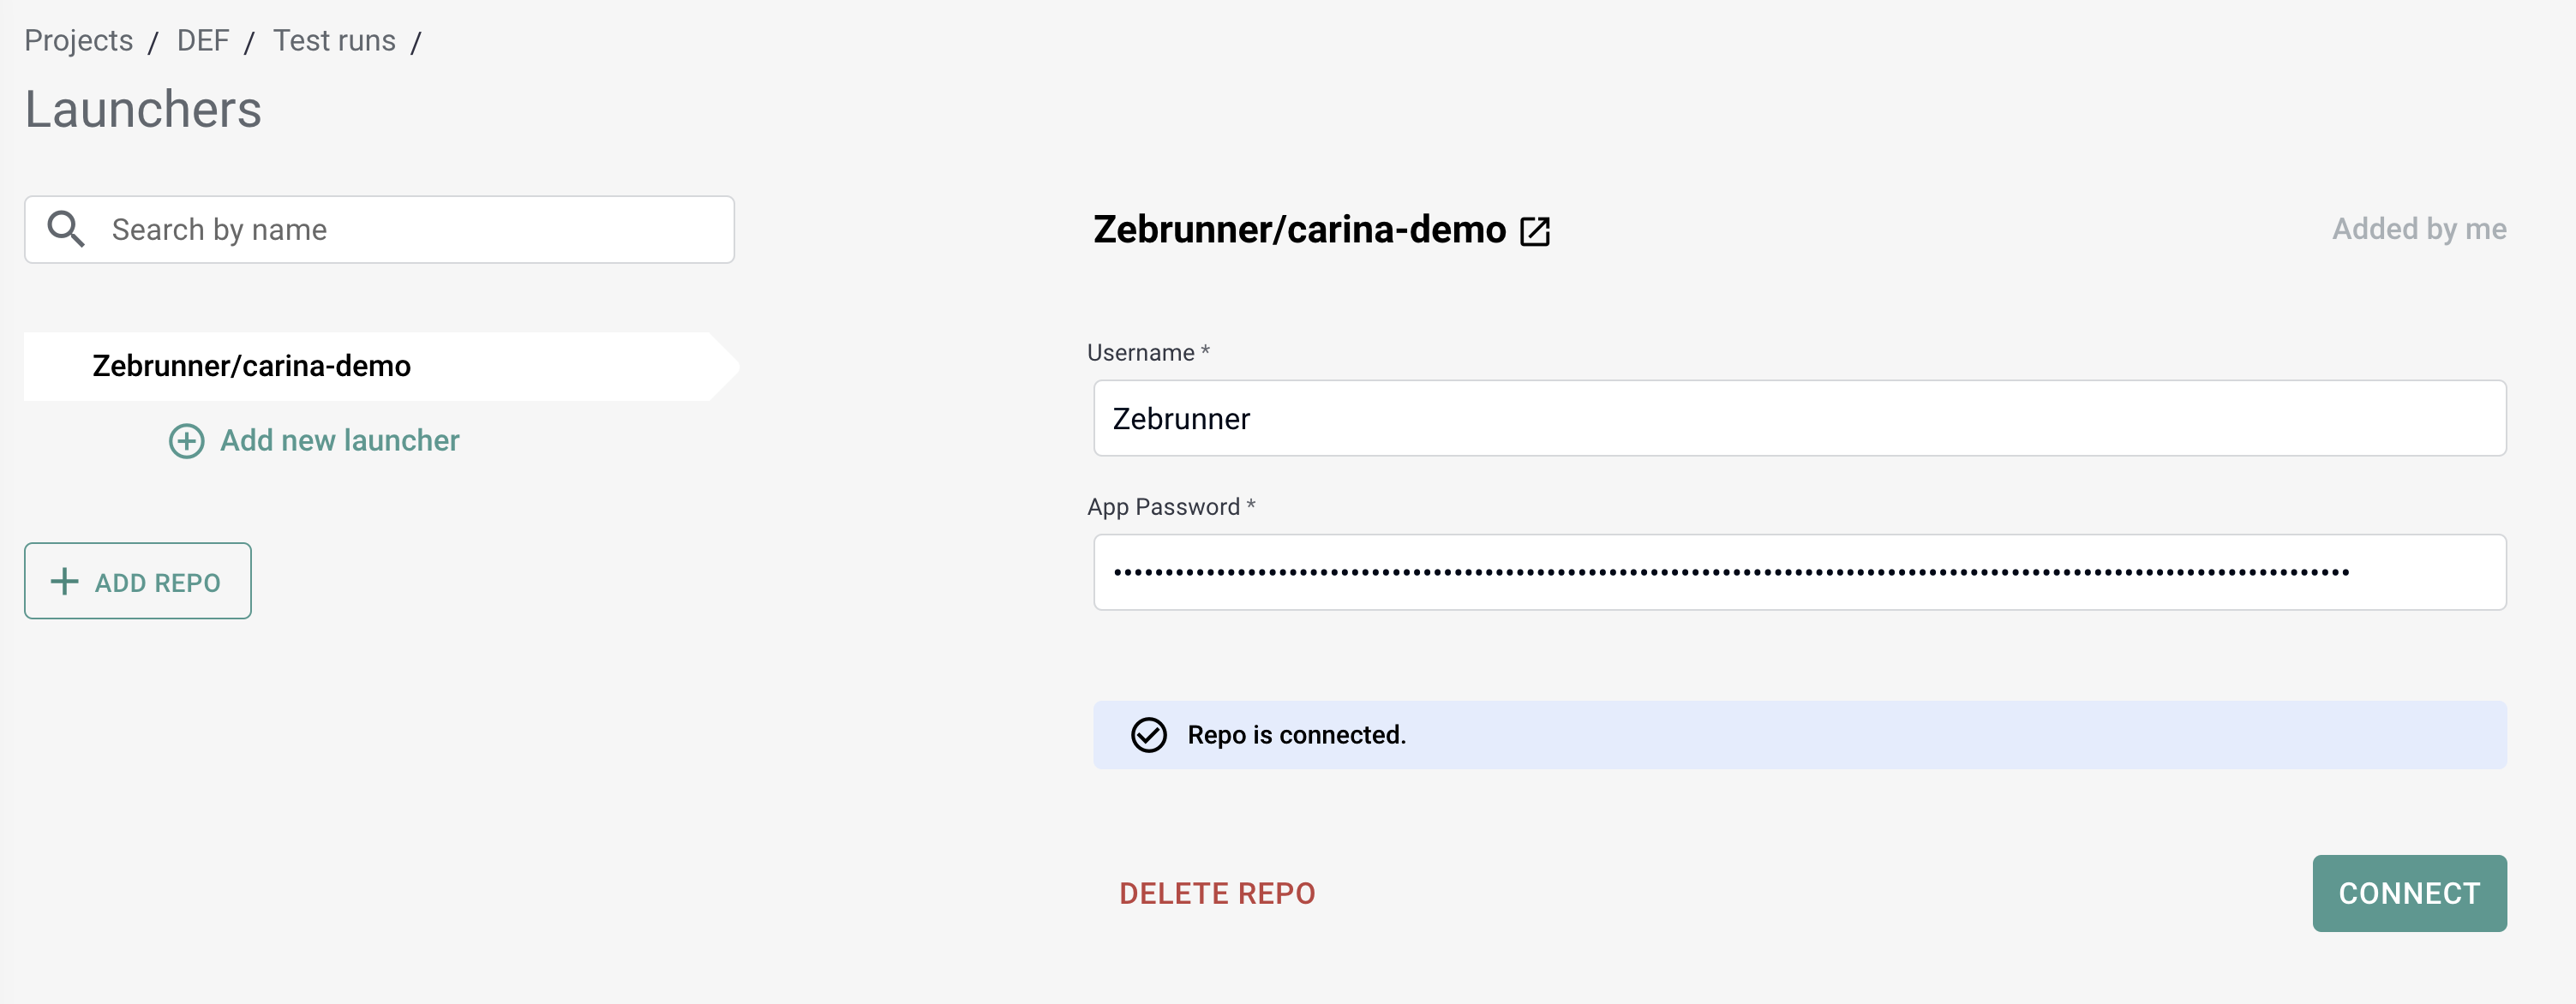
By clicking on the Add button, Zebrunner will verify that the provided credentials (if any) are valid for the repository. If a connection to the repository can be established, you will be redirected to the repository information page. On this page, you can change the credentials and check if Zebrunner has access to the repository.
Note
Any provided credentials are securely encrypted by Zebrunner
Info
The generated token can be manually deleted on the Personal access tokens page in GitHub
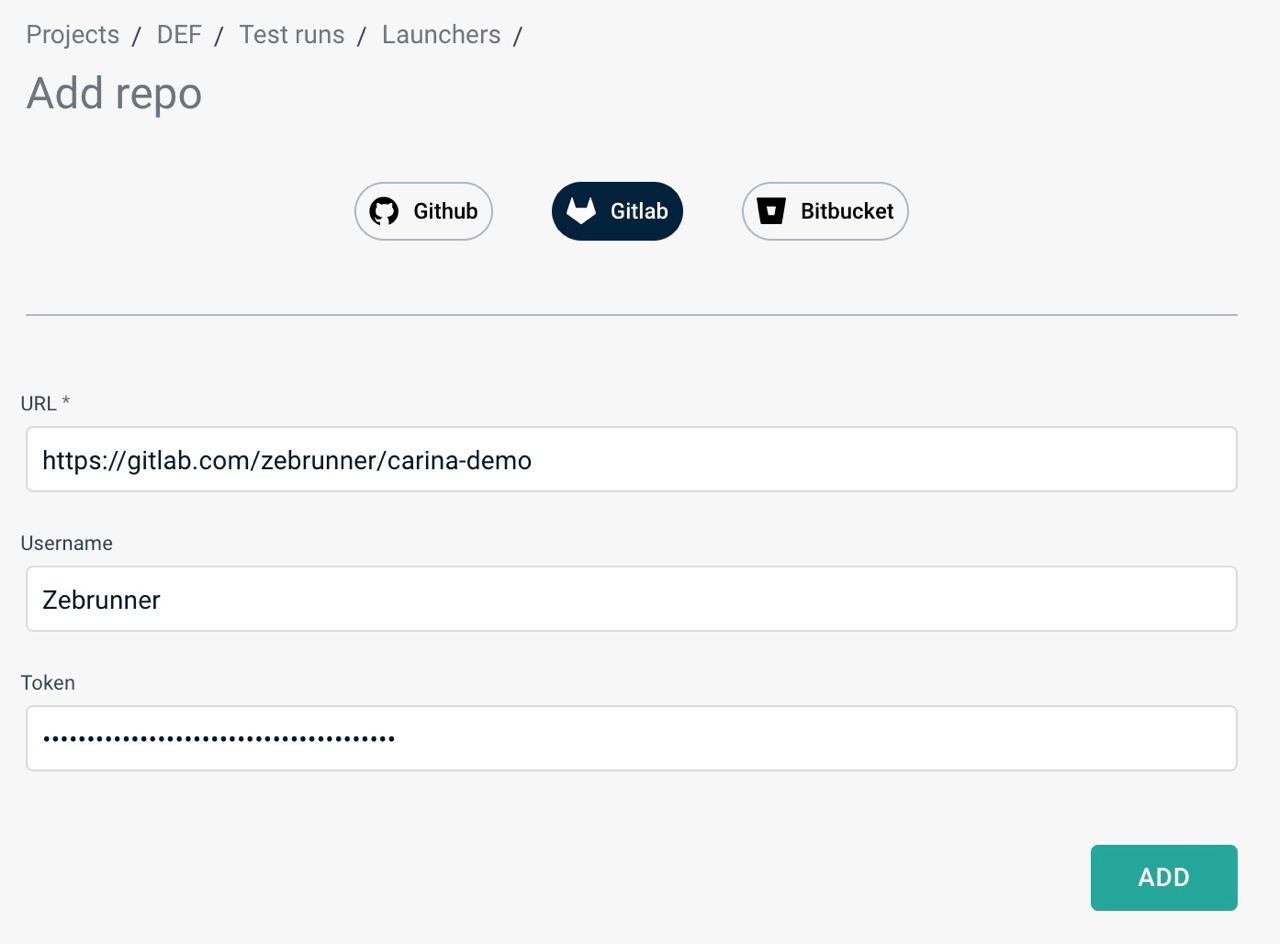
Gitlab#
Adding Gitlab repository requires specifying a URL and credentials for each repository.
The repository URL must be either an HTTPS browser link like https://gitlab.com/zebrunner/carina-demo or .git HTTPS URL like https://gitlab.com/zebrunner/carina-demo.git.
If the repository you intend to add is publicly available, you are free to not specify username and token. Every private repository must have username and token specified, otherwise Gitlab will not allow to pull it.
In order to generate access token for repository complete the following steps:
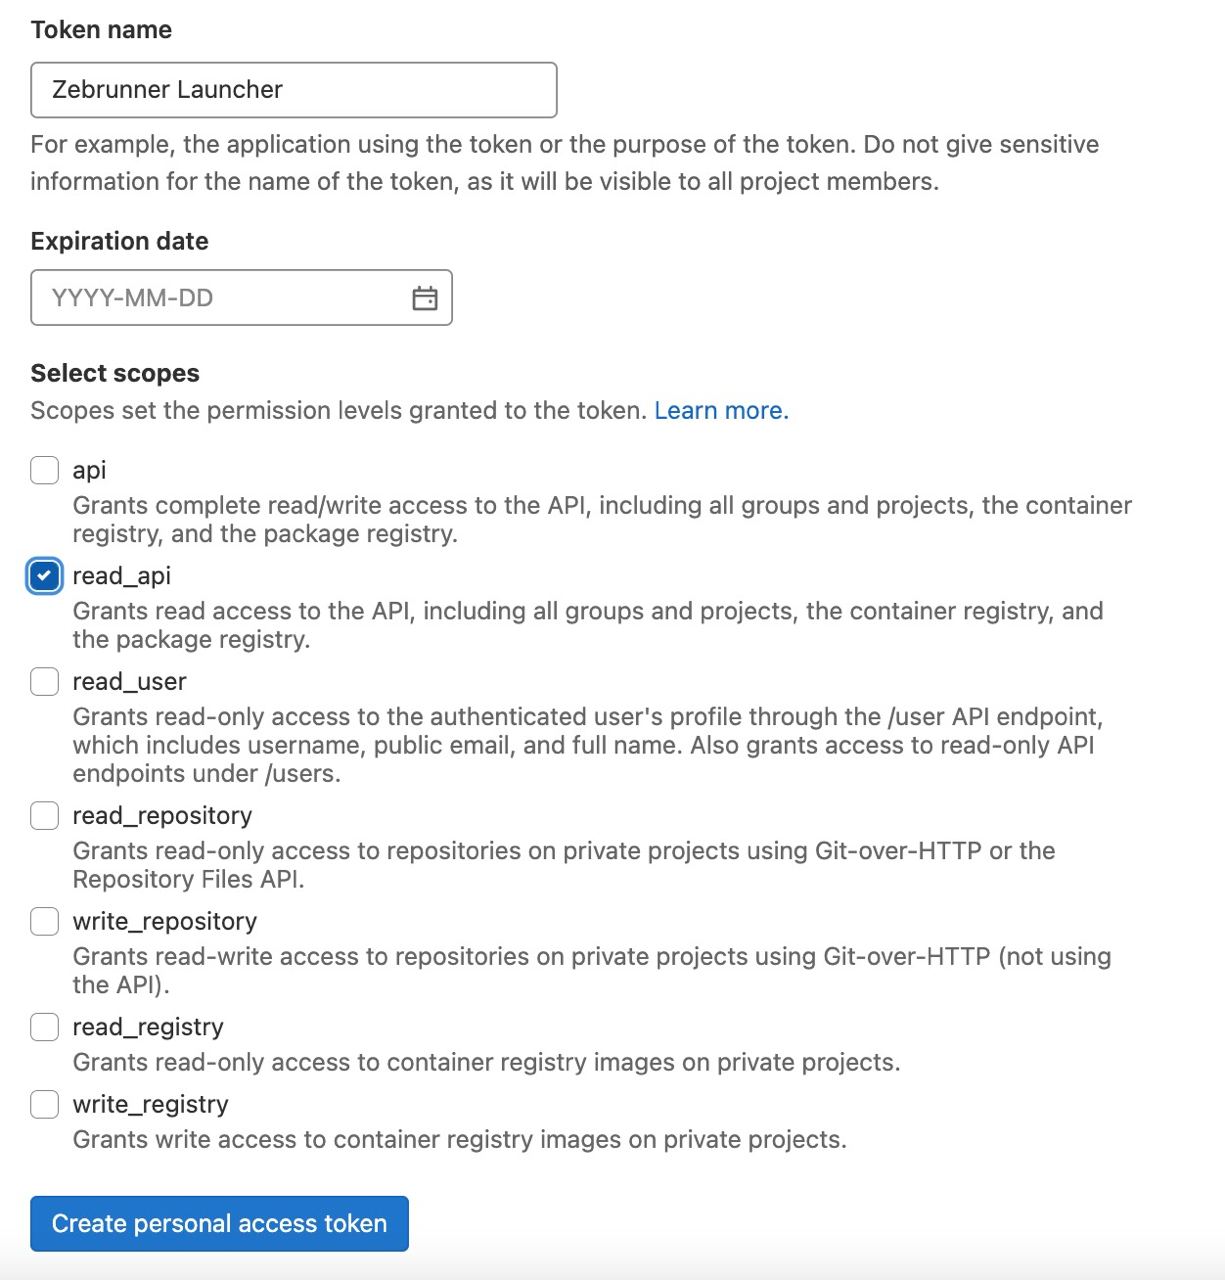
- Click on user icon in the top upper corner of the page → Edit profile → Access Tokens
- In the Token name field, provide a meaningful name for the access token and set the desired Expiration
- Grant read_api permission for the token
- Click Create personal access token button under scopes list
Gitlab will show you a new Access token at the top of the page. Copy this value and paste it together with your Gitlab username into corresponding field in Zebrunner.
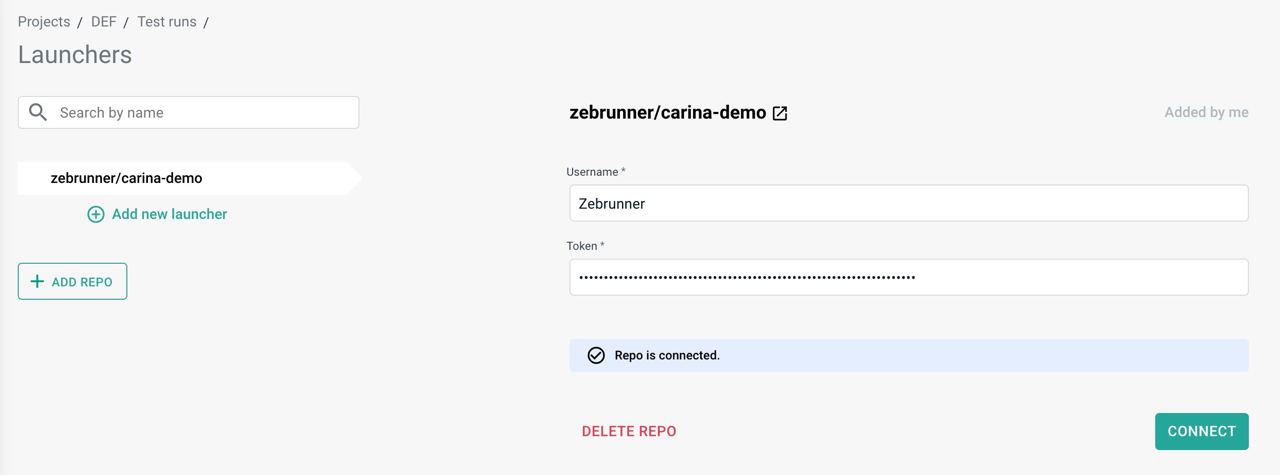
By clicking on the Add button, Zebrunner will verify that the provided credentials (if any) are valid for the repository. If a connection to the repository can be established, you will be redirected to the repository information page. On this page, you can change the credentials and check if Zebrunner has access to the repository.
Note
Any provided credentials are securely encrypted by Zebrunner
Info
The created Access token can be manually deleted in Gitlab settings. To do this, click on user icon in the top upper corner of the page → Edit profile → Access Tokens → click Revoke button next to the Access token you want to delete.
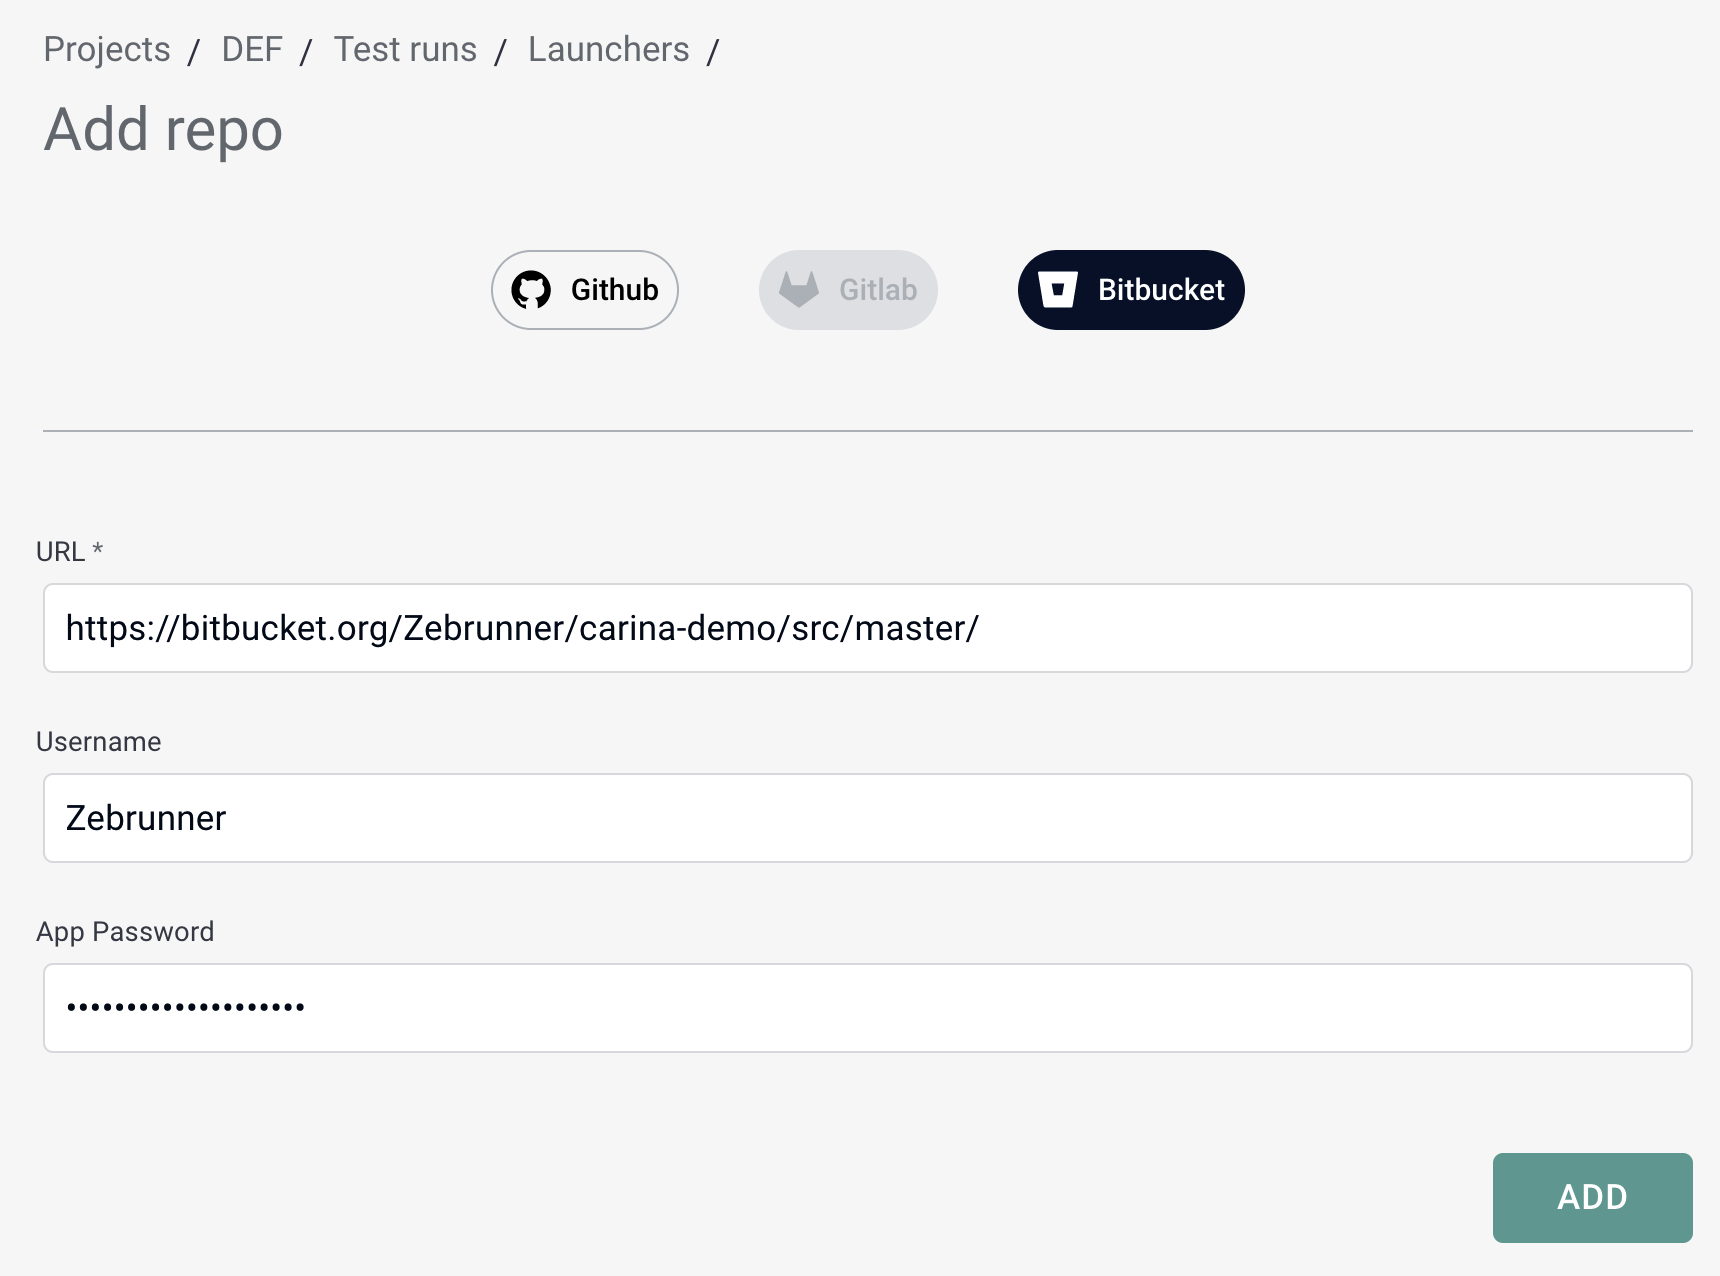
Bitbucket#
Adding Bitbucket repository requires specifying a URL and credentials for each repository.
The repository URL must be either an HTTPS browser link like https://bitbucket.org/Zebrunner/carina-demo/src/master/ or .git HTTPS URL like https://Zebrunner@bitbucket.org/Zebrunner/carina-demo.git.
If the repository you intend to add is publicly available, you are free to not specify username and token. Every private repository must have username and token specified, otherwise Bitbucket will not allow to pull it.
In order to generate access token for repository complete the following steps:
- Сlick on user icon in the top upper corner of the page → Personal settings → App passwords → click Create app password button
- In the Label field, provide a meaningful description for the app password
- Grant Repositories - Read permission for the token
- Click Create button at the bottom of the page
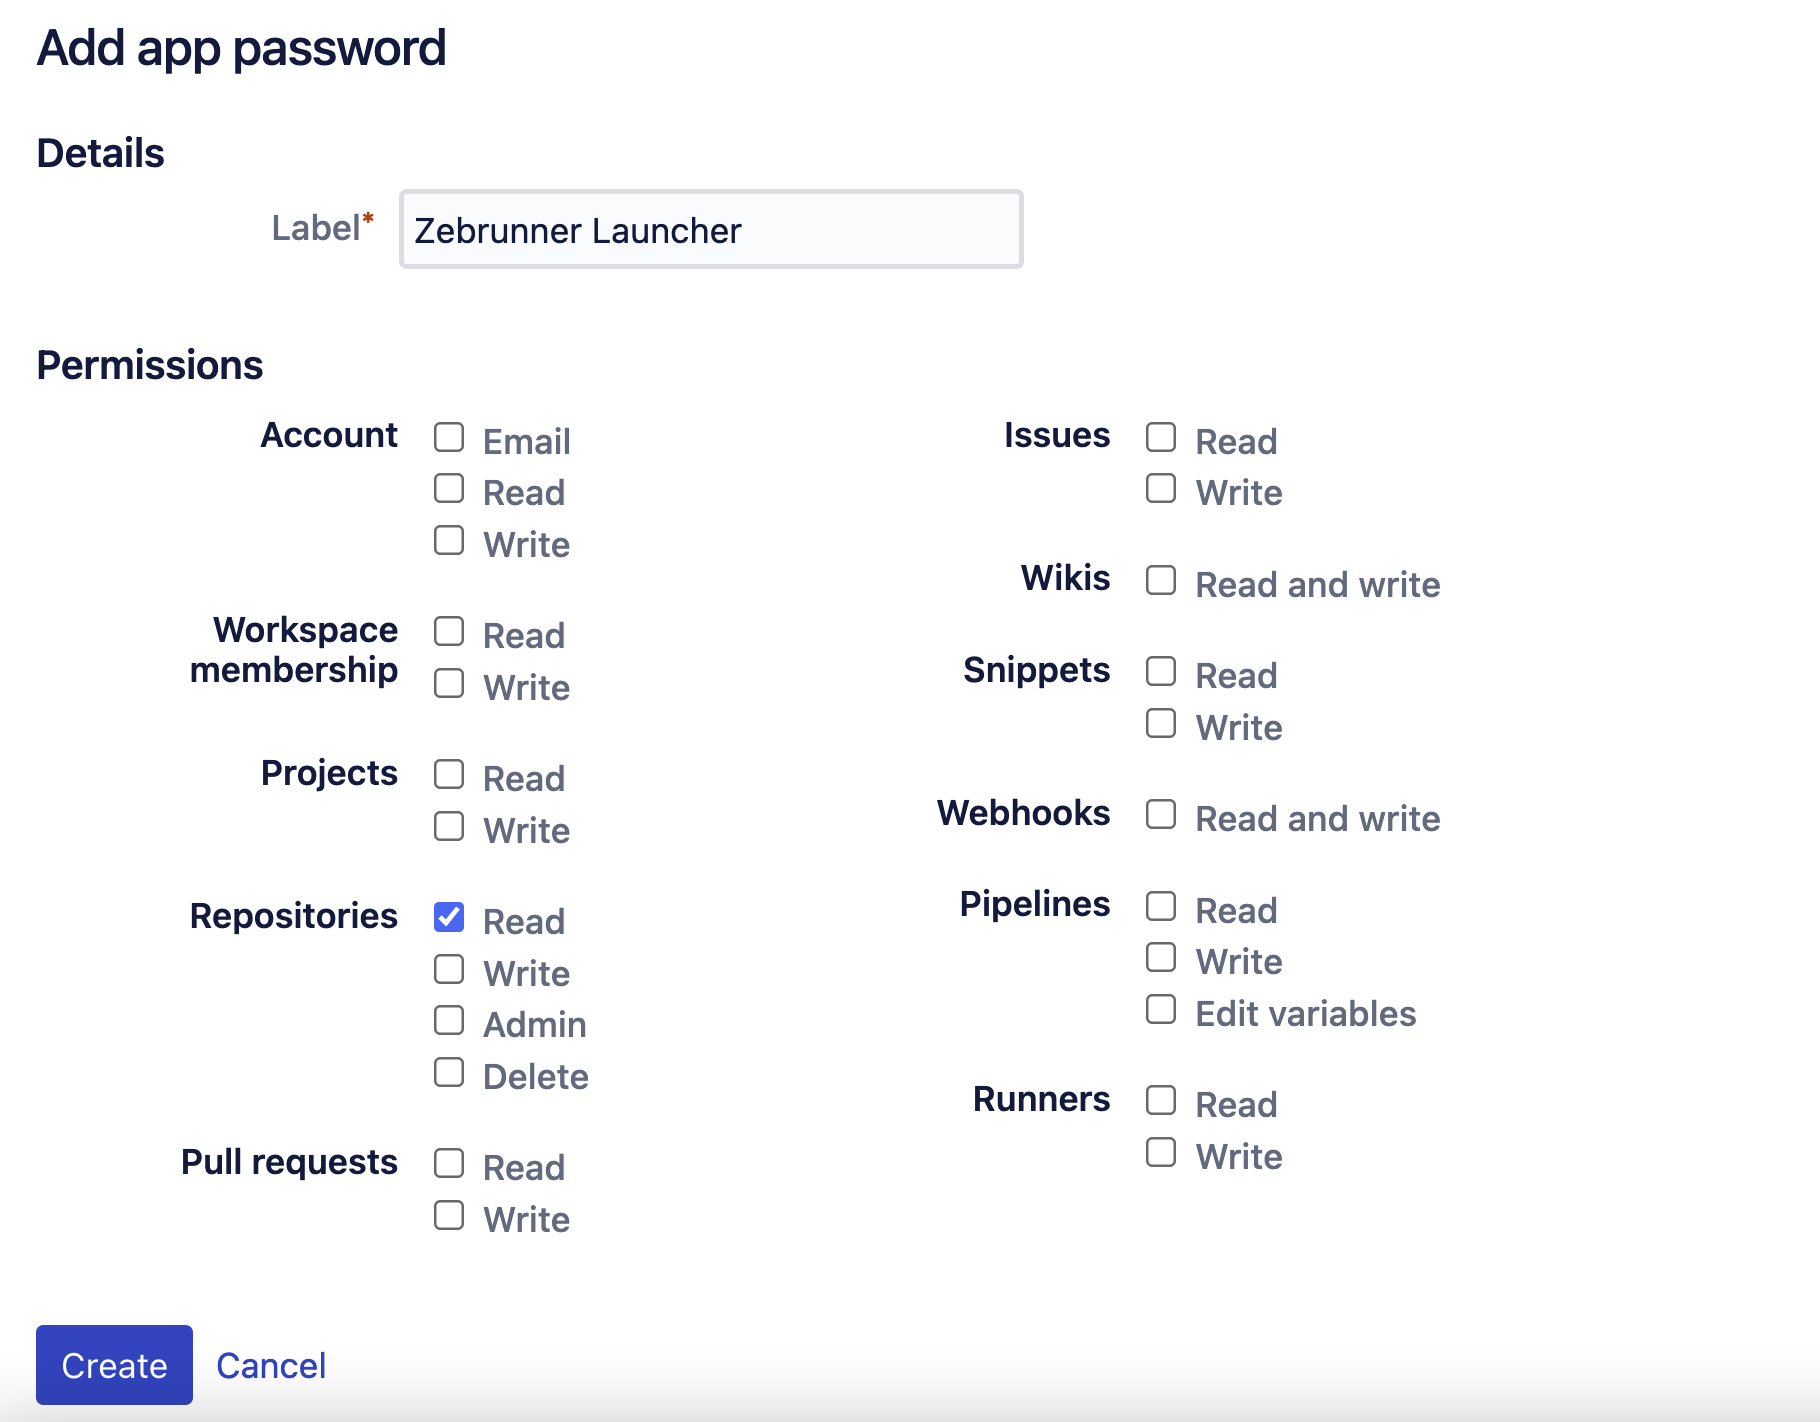
Bitbucket will show you a pop-up with the new App password. Copy this value and paste it together with your Bitbucket username into corresponding field in Zebrunner.
By clicking on the Add button, Zebrunner will verify that the provided credentials (if any) are valid for the repository. If a connection to the repository can be established, you will be redirected to the repository information page. On this page, you can change the credentials and check if Zebrunner has access to the repository.
Note
Any provided credentials are securely encrypted by Zebrunner
Info
The created App password can be manually deleted in Bitbucket settings. To do this, click on user icon in the top upper corner of the page → Personal settings → App passwords → click Revoke button next to the App password you want to delete.
Adding a Launcher#
Launcher is a pre-defined configuration for launching tests which are resided in a particular Git repository. Under the hood, Zebrunner uses Docker containers to execute your tests. This allows you to reproduce any desired execution environment and provides an ability to customize it using environment variables.
Info
Launcher can be added only as a child item of a Git repository. To learn more about connecting a Git repository, refer to Connecting a Git repository guide
To add a new launcher for repository, you need to click the Add new launcher button which is placed as a child item of the target repository. A click on this button opens Launcher Constructor. Every launcher must have a name, Git branch to pull tests from, execution environment, testing platform for web or mobile tests, set of web driver capabilities, and notification channels.
After providing all the launcher configs, you need to click the Add button. Zebrunner does not automatically verify if the tests can actually be launched with the given config. You should deliberately choose the Docker image, the launch command, and the rest of configs.
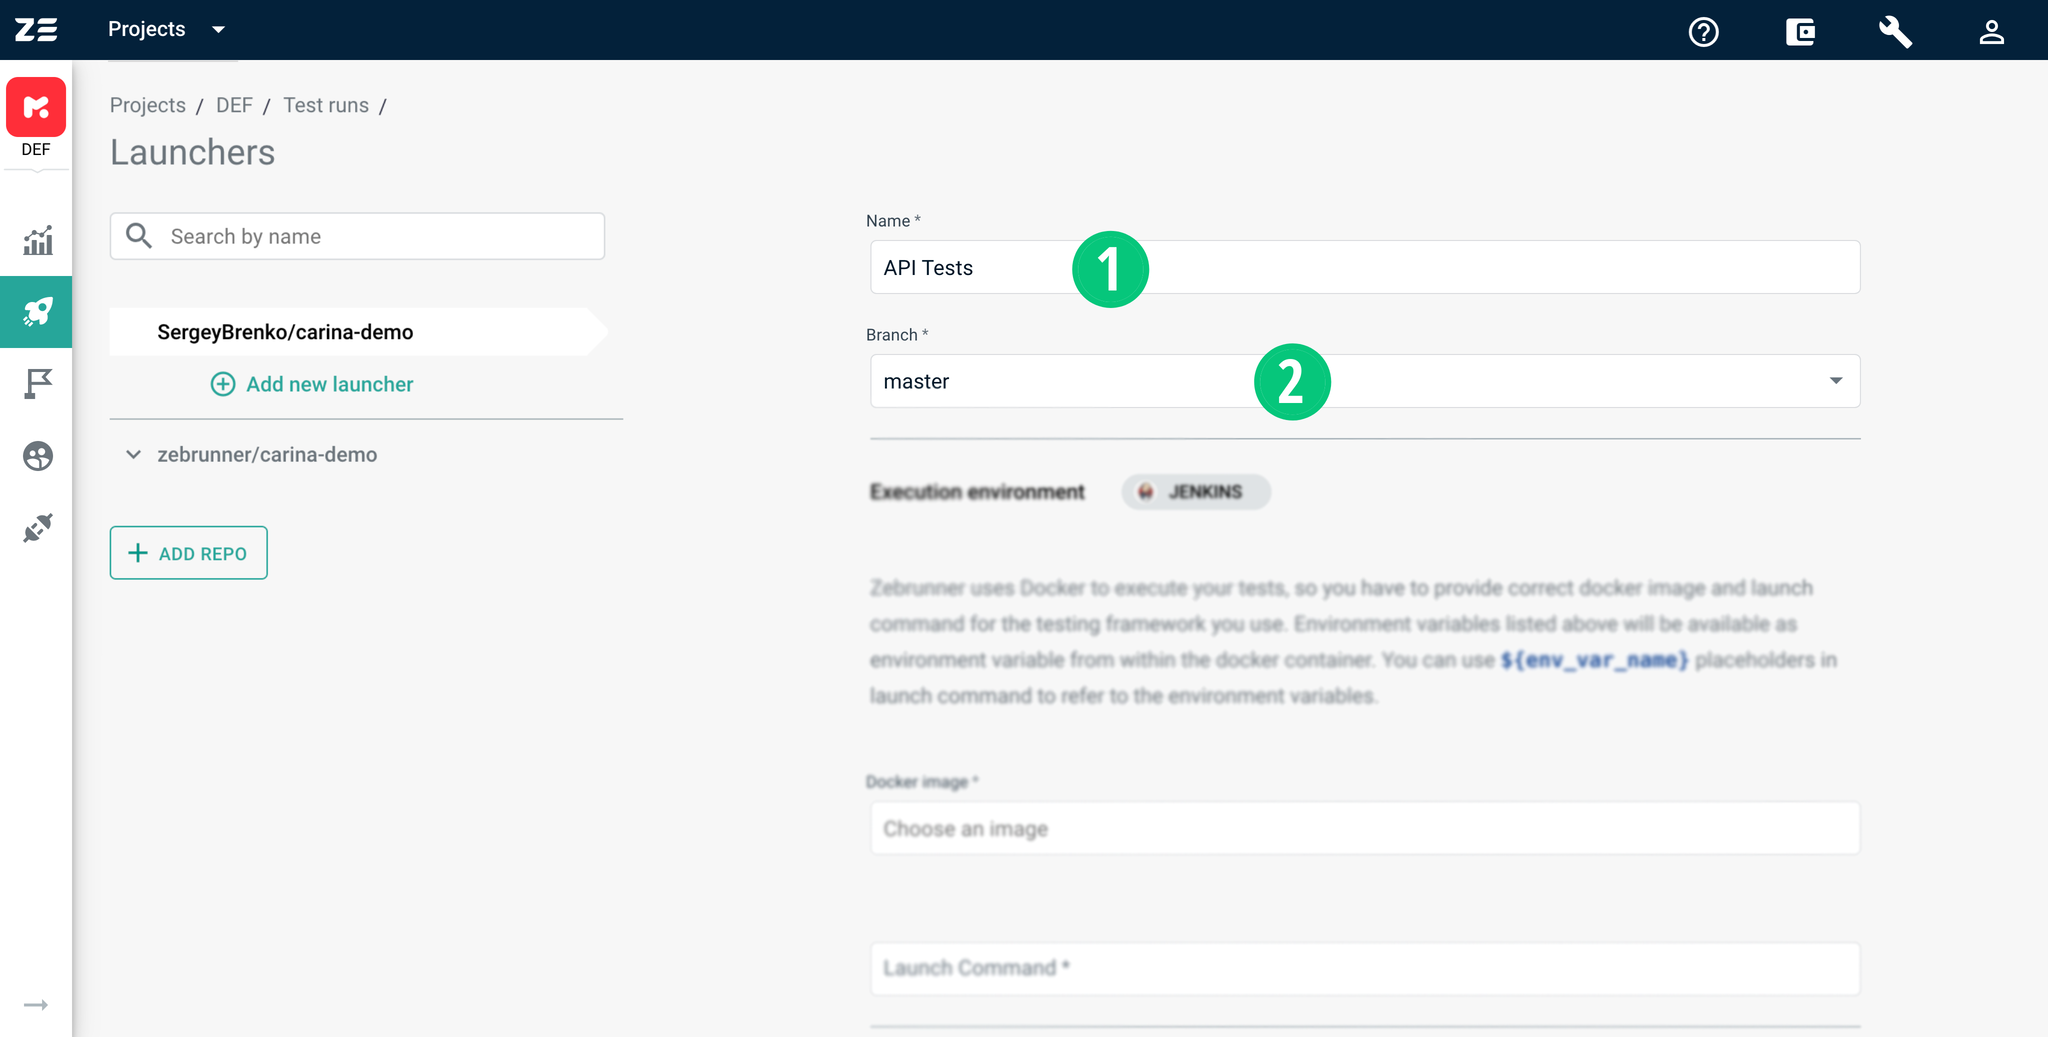
Basic information#
Basic information consists of launcher's name and Git branch. The name must be unique within the Git repository. The branch selector fetches currently available branches for the Git repository.
Execution environment#
Execution environment consists of Docker image, launch command to be executed inside the container, instance type and an optional set of environment variables. By default, Zebrunner offers a few Docker images and their corresponding basic launch commands. You are free to choose a Docker image from the list or provide another one. The launch command will be executed inside the Docker container created from the given Docker image, so it must use only processes available inside the container. Also, you can use the ${env_var_name} placeholders in the launch command to refer to the environment variables.
Note
If you want to use a custom Docker image from a private Docker registry, you need to configure integration with the registry. This functionality is not currently available from Zebrunner UI, but you can contact Zebrunner support for assistance
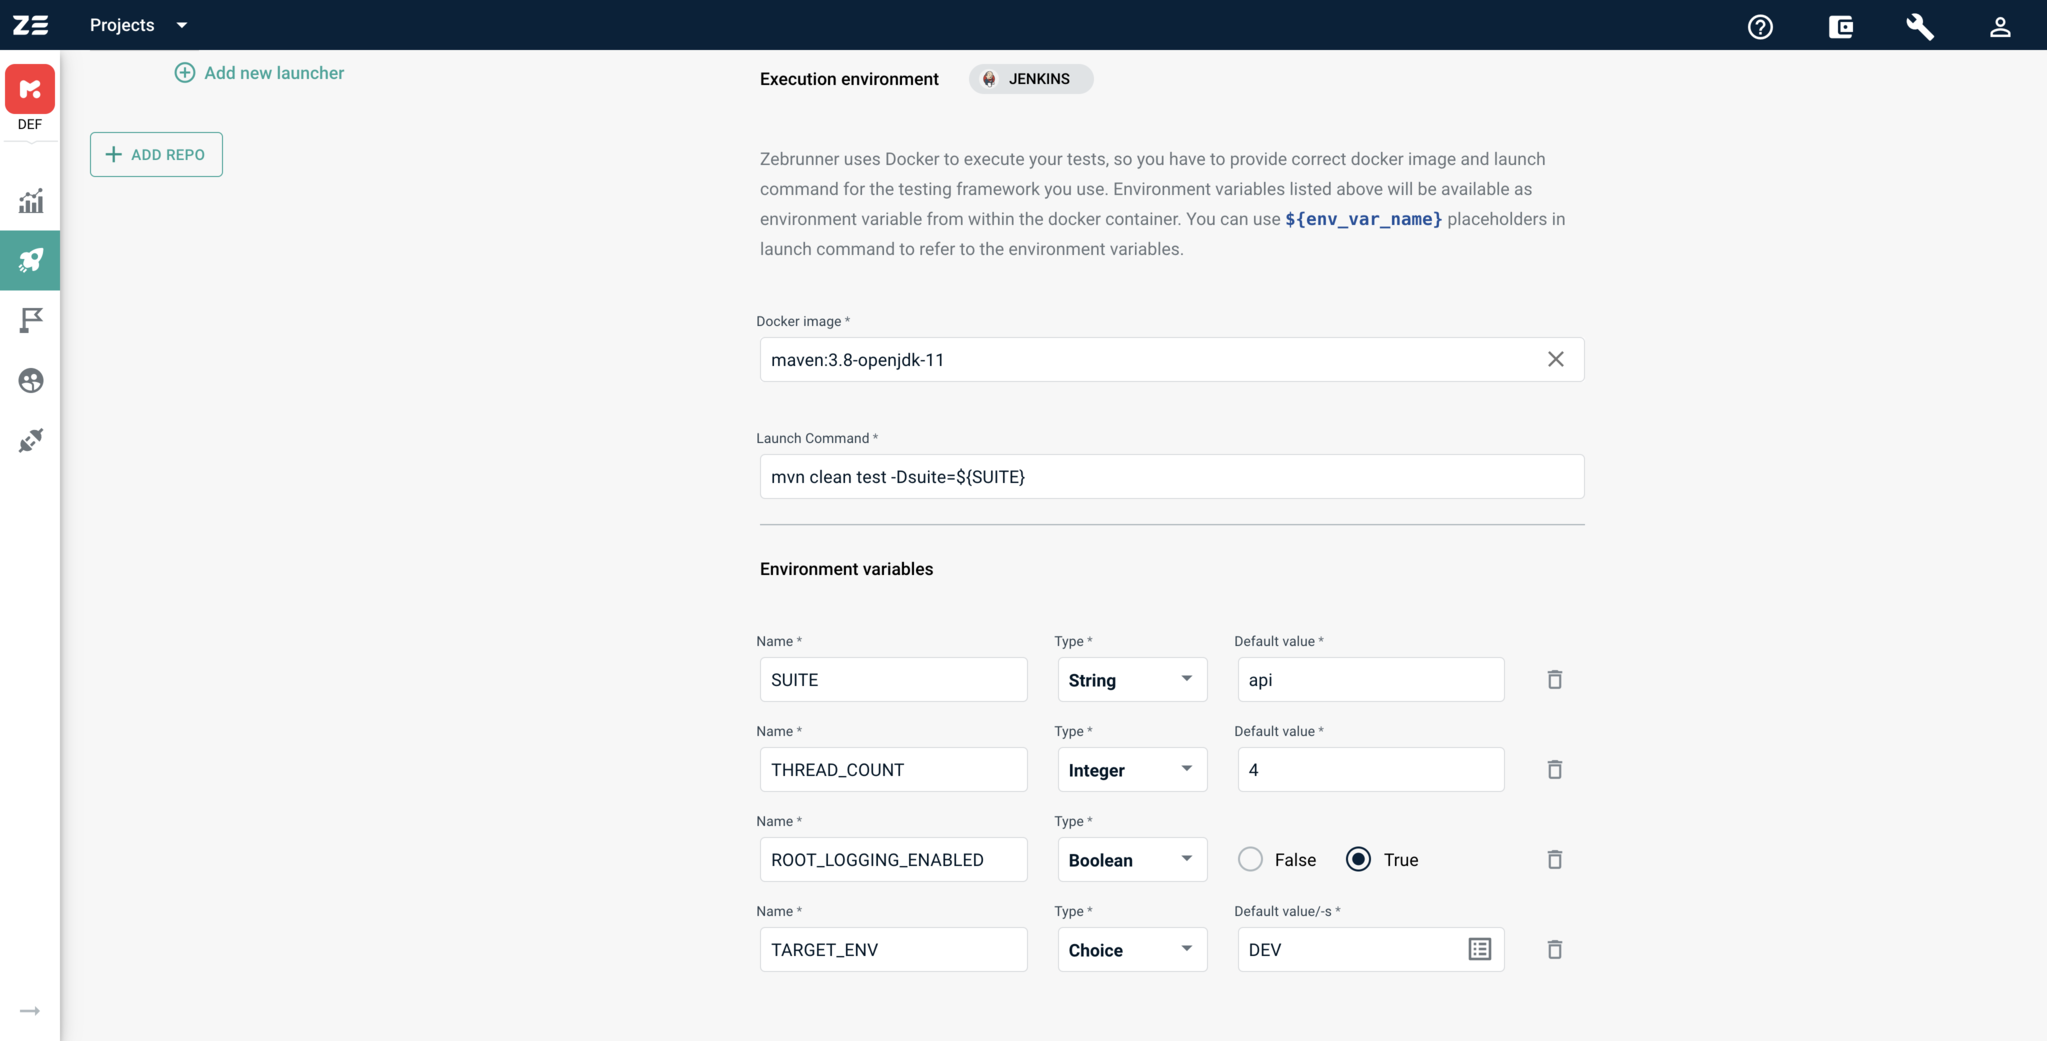
Environment variables#
Environment variables are regular OS environment variables that are available at container runtime. Each variable has a name, type, and default value. Type of variable constrains possible inputs. Currently, we support Strings, Integers, Booleans, and Choice of Strings.
Choice of Strings works as a usual Strings input field, but allows providing a list of suggestions. To change the list of suggestions, you need to click on icon that is placed on the right side of the input for default value. This will open a dialogue with a test area. Each row of the text area specifies a separate suggestion value. The first value is considered a default one.
Value of an environment variable will be passed to container runtime as a string value, regardless of it type.

Instance type#
An instance type defines the amount of CPU and memory available at tests runtime. The following screenshot depicts the available instance types.
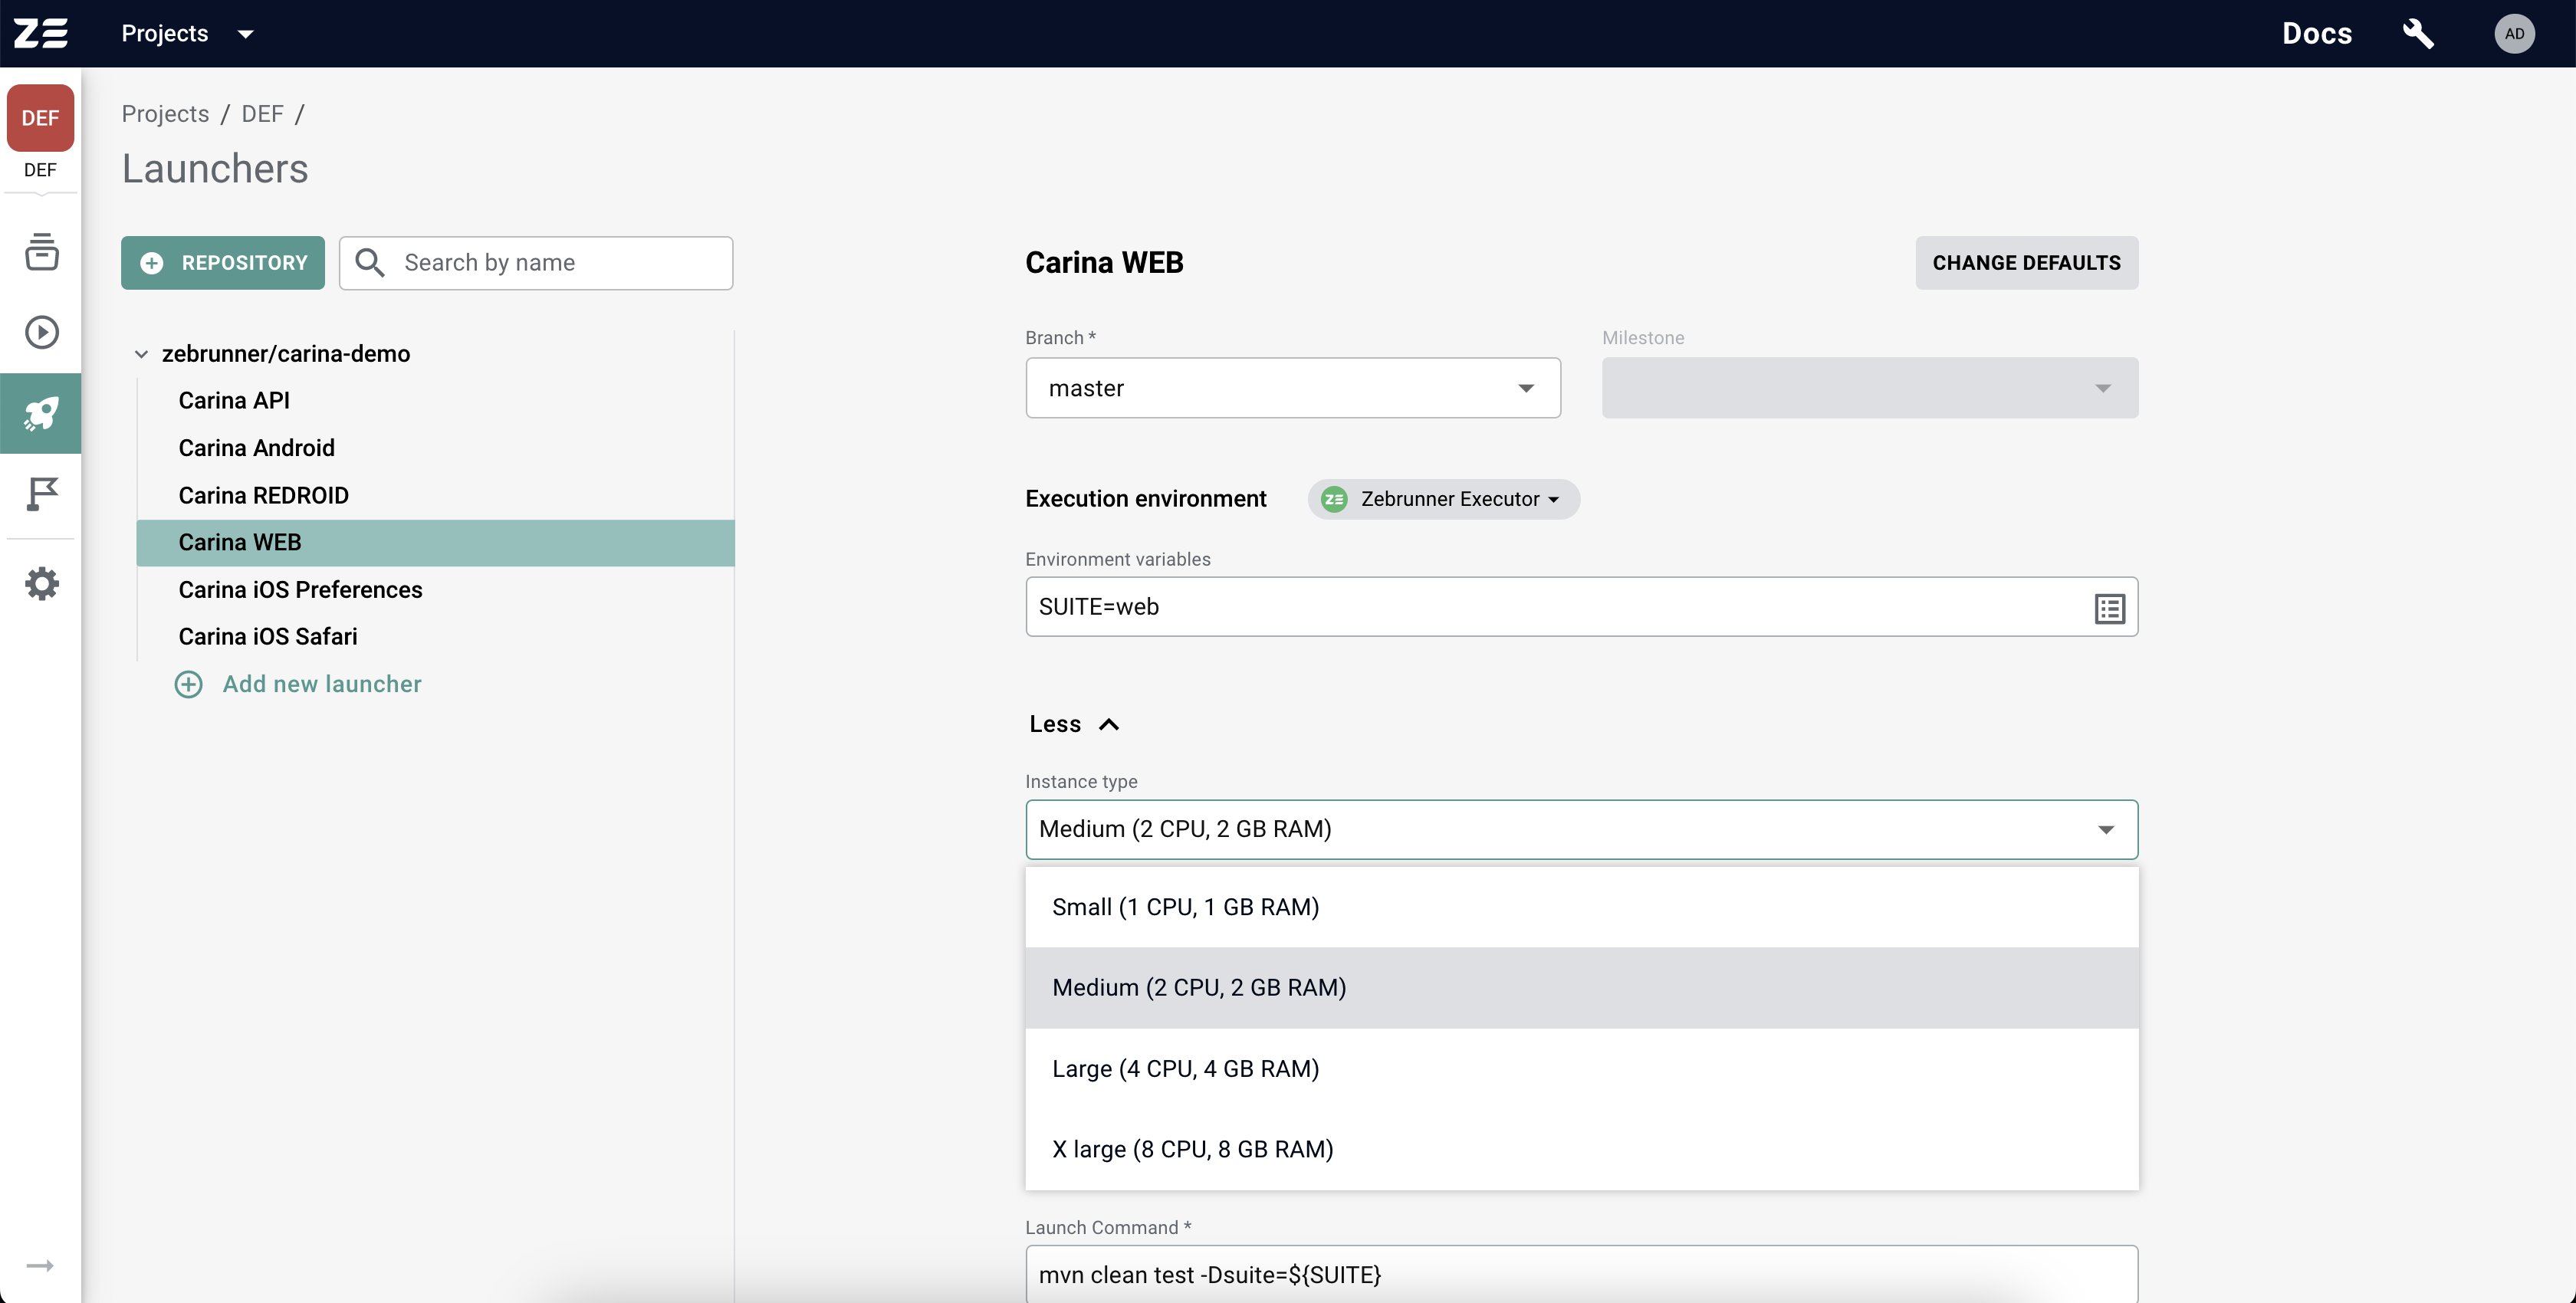
By default, Zebrunner offers 2 CPU and 2 GiB of memory for every Launcher and Preset - the Medium instance type. This should be sufficient for most testing workloads. If you are sure that your tests require fewer resources, you can use the Small instance type and save execution credits. If your tests require more resources to run reliably, you can switch to the Large or X-Large instance type, but be aware that this will incur higher credits consumption. If your tests are highly resource intensive and require even more than 8 CPU or more than 8 GiB of memory, please contact Zebrunner support for further assistance.
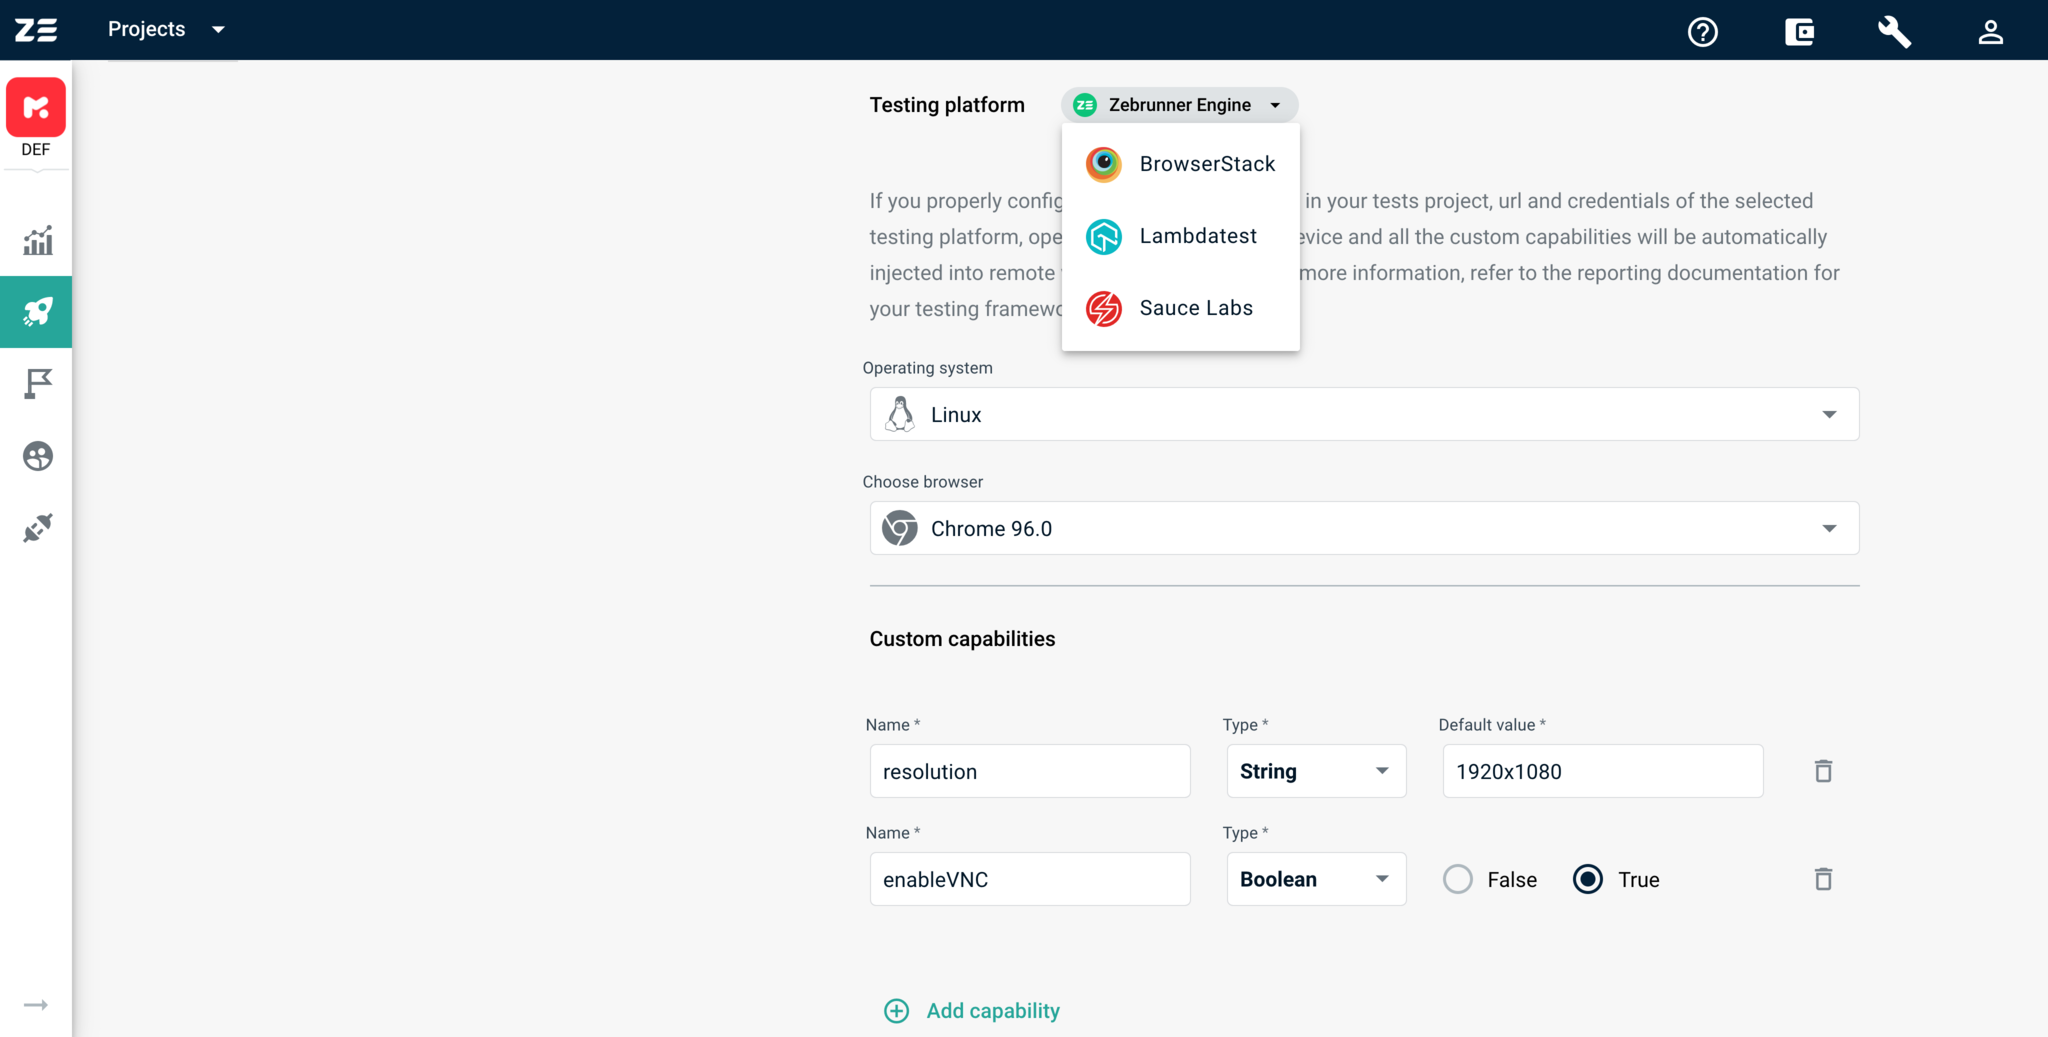
Testing platform#
Testing platform section specifies Selenium Grid and a set of capabilities that will be automatically used when a new instance of RemoteWebDriver gets created. Zebrunner Selenium Grid is available by default for all projects, but you can provide credentials and use any supported Selenium Grid.
After choosing a testing platform, you can select an OS, device, browser, and so on, which will be used by web driver instances. The allowed values are obtained directly from the Selenium Grid provider and are regularly updated. Hence, you can use the newest device or browser as soon as it is available for Selenium Grid.
If OS, device, and browser are not the only capabilities you want to use with web driver instances, you can provide custom ones with the constructor of custom capabilities. The constructor works in the same way as the constructor for environment variables (for more information, refer to Environment variables). The only difference is that the type of a capability also determines its type in the source code of tests.
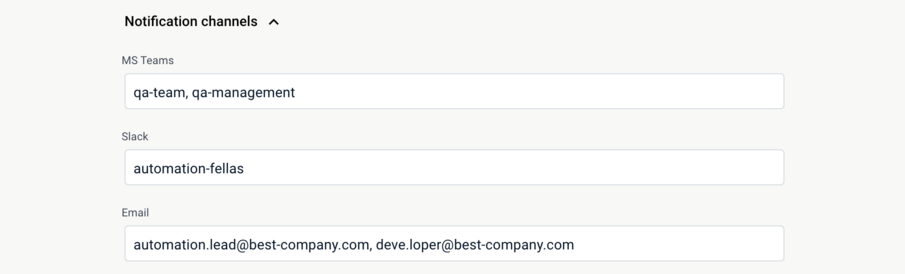
Notification channels#
Notification channels determine where to send messages when a test suite execution is finished. The notification contains brief information about the results of the suite execution, such as its name, the number of passed and failed tests.
Zebrunner supports sending notifications to Microsoft Teams, Slack and email. For the Teams and Slack notifications to work, you must provide a valid Integration configuration.
The list of target channels or emails must be presented as a comma-separated string with an optional whitespace between items. If the string contains a non-existent channel or email, or a not-configured Teams channel, it will be skipped.
Launching tests#
After connecting a Git repository and creating a launcher for it, you can launch the tests from the repository.
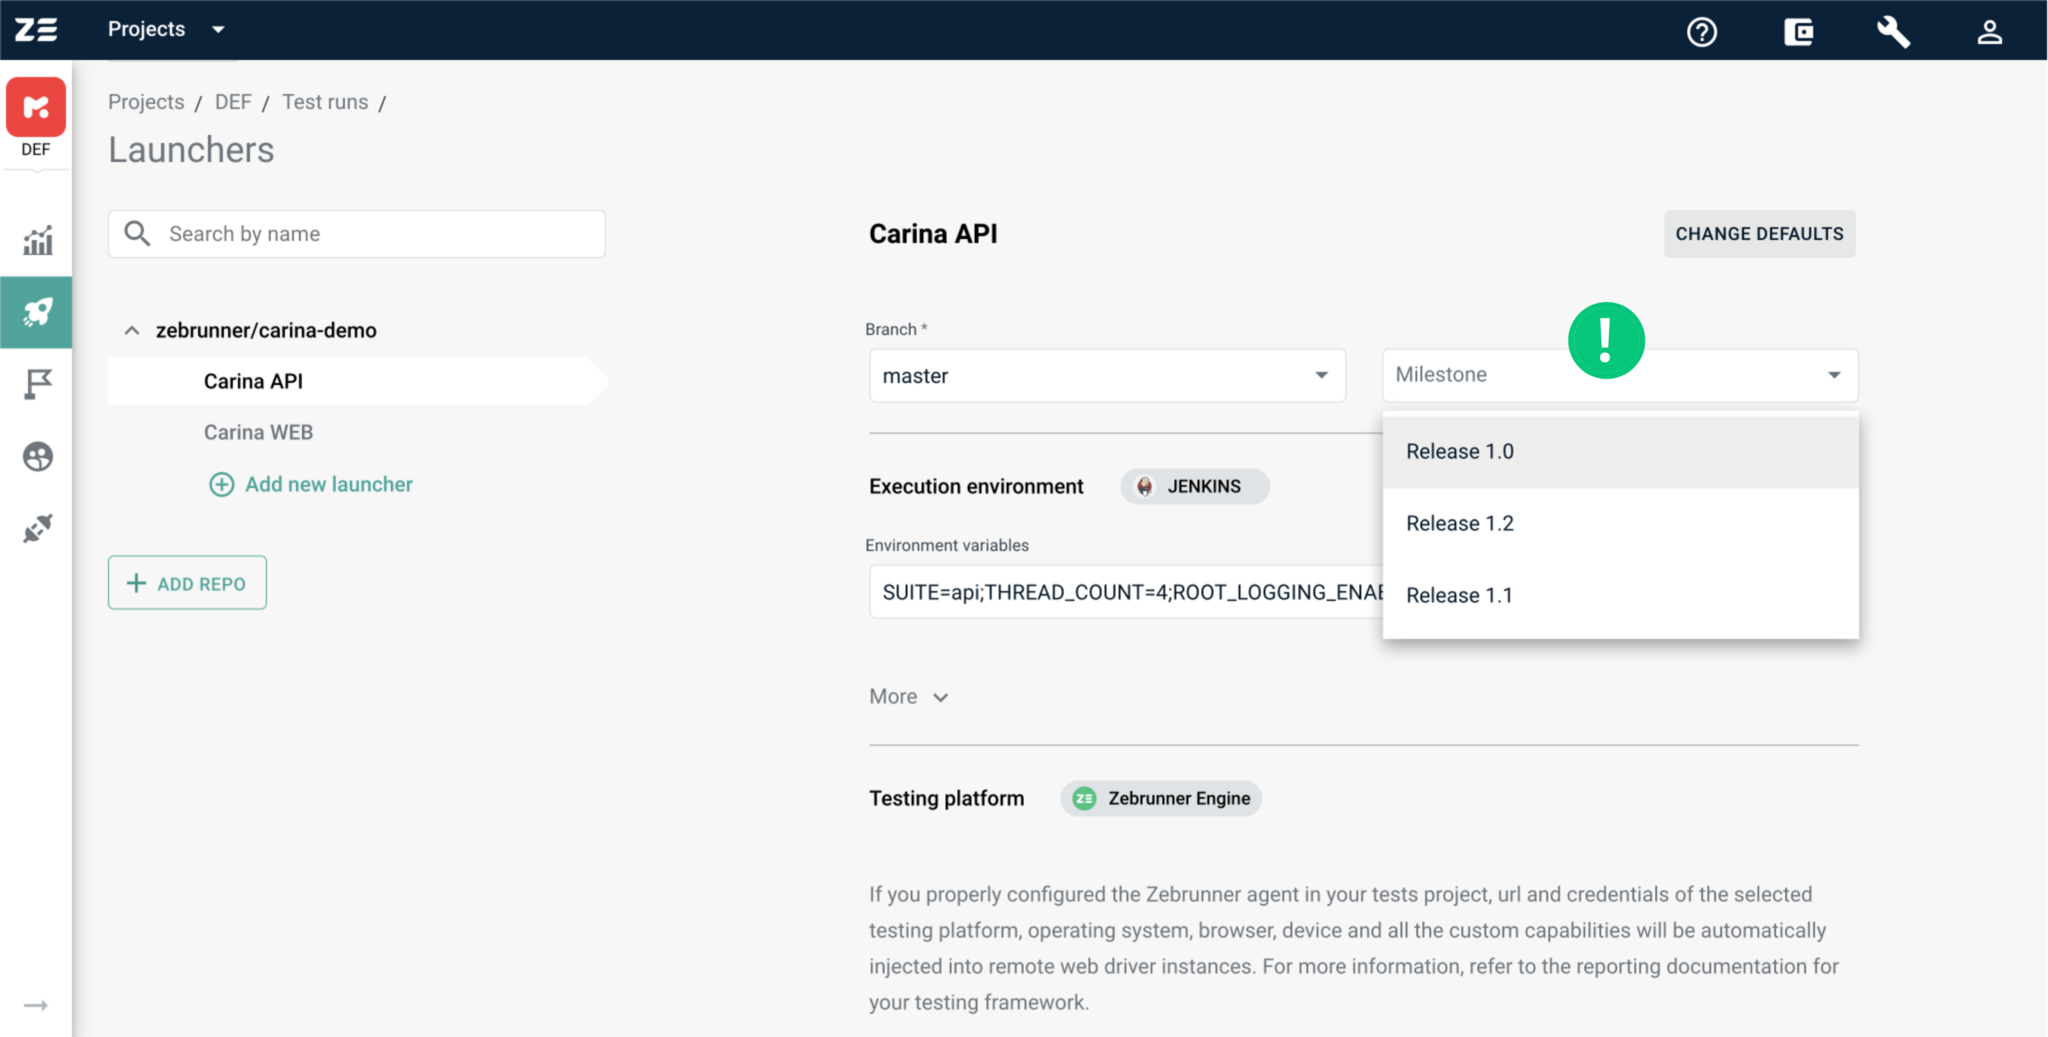
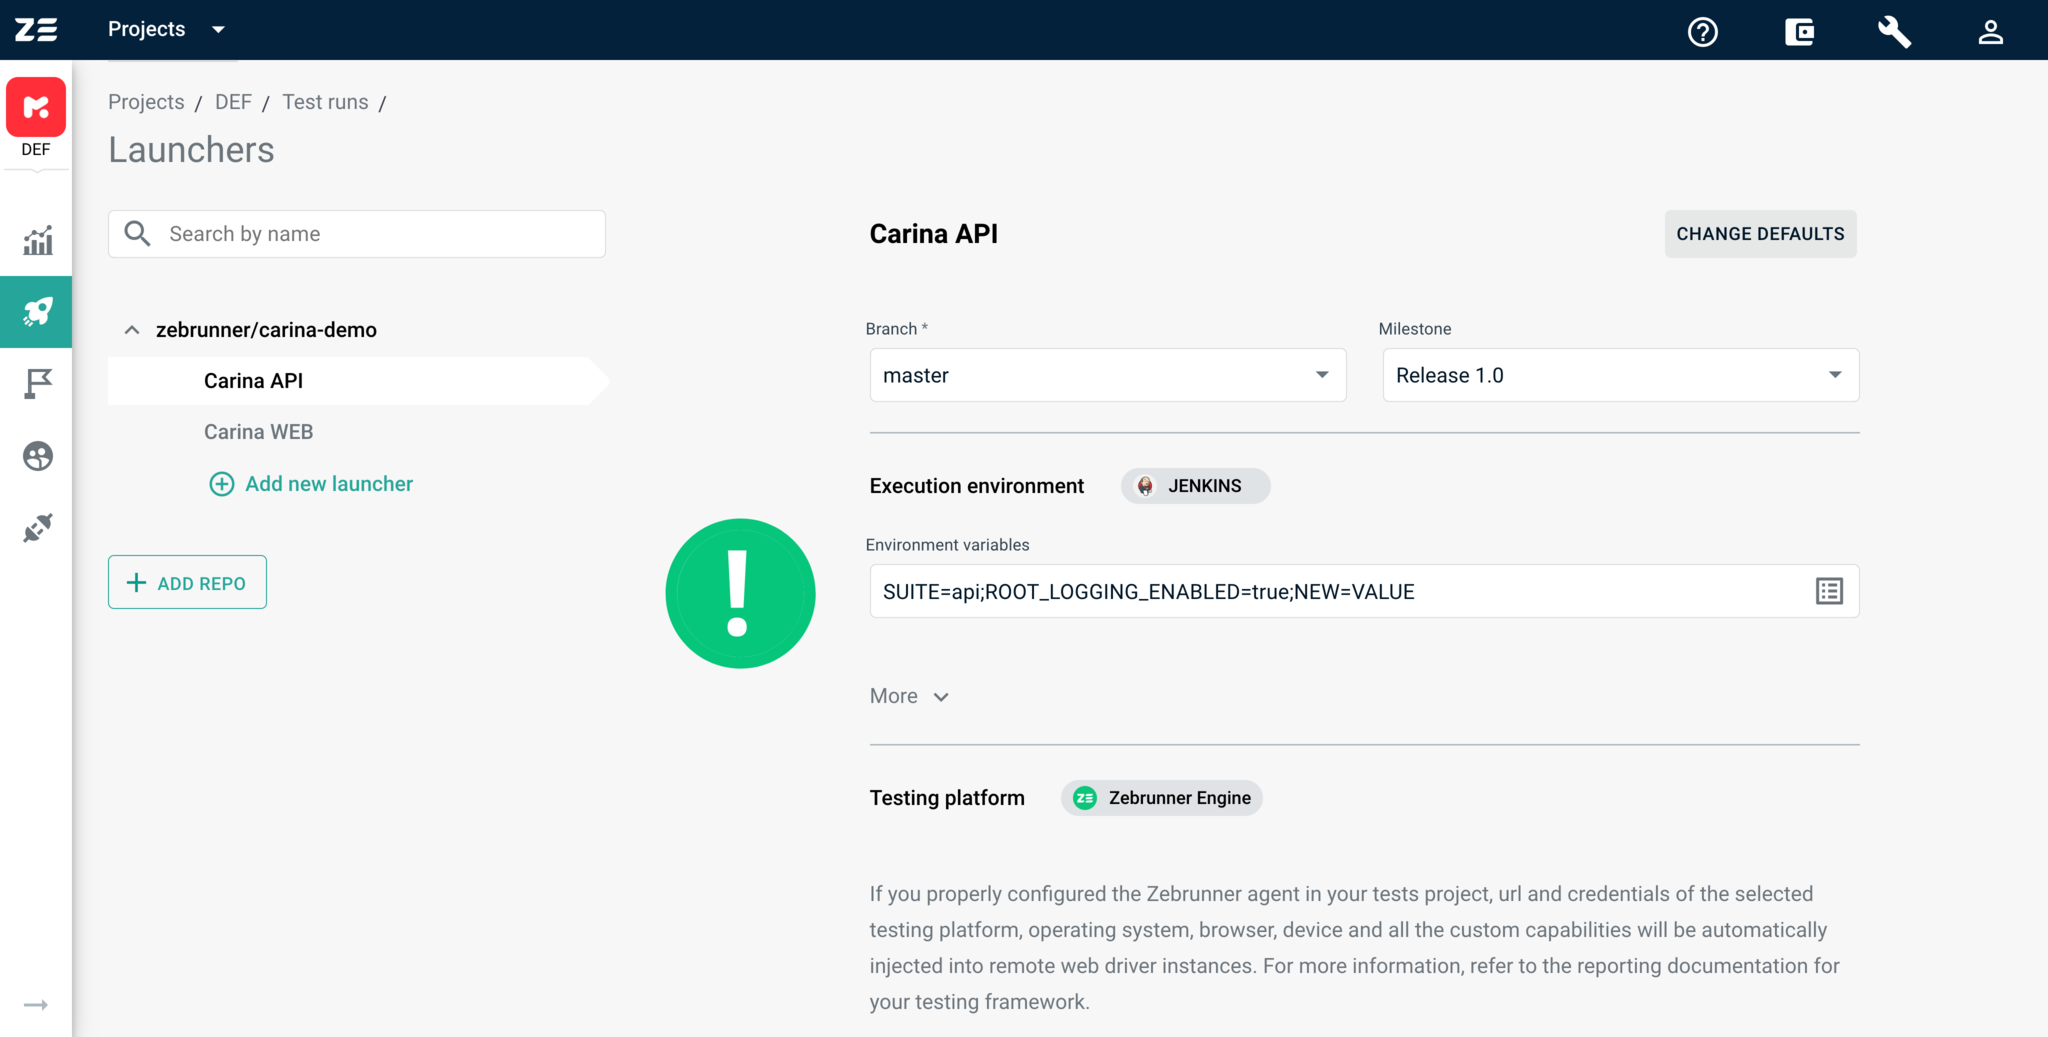
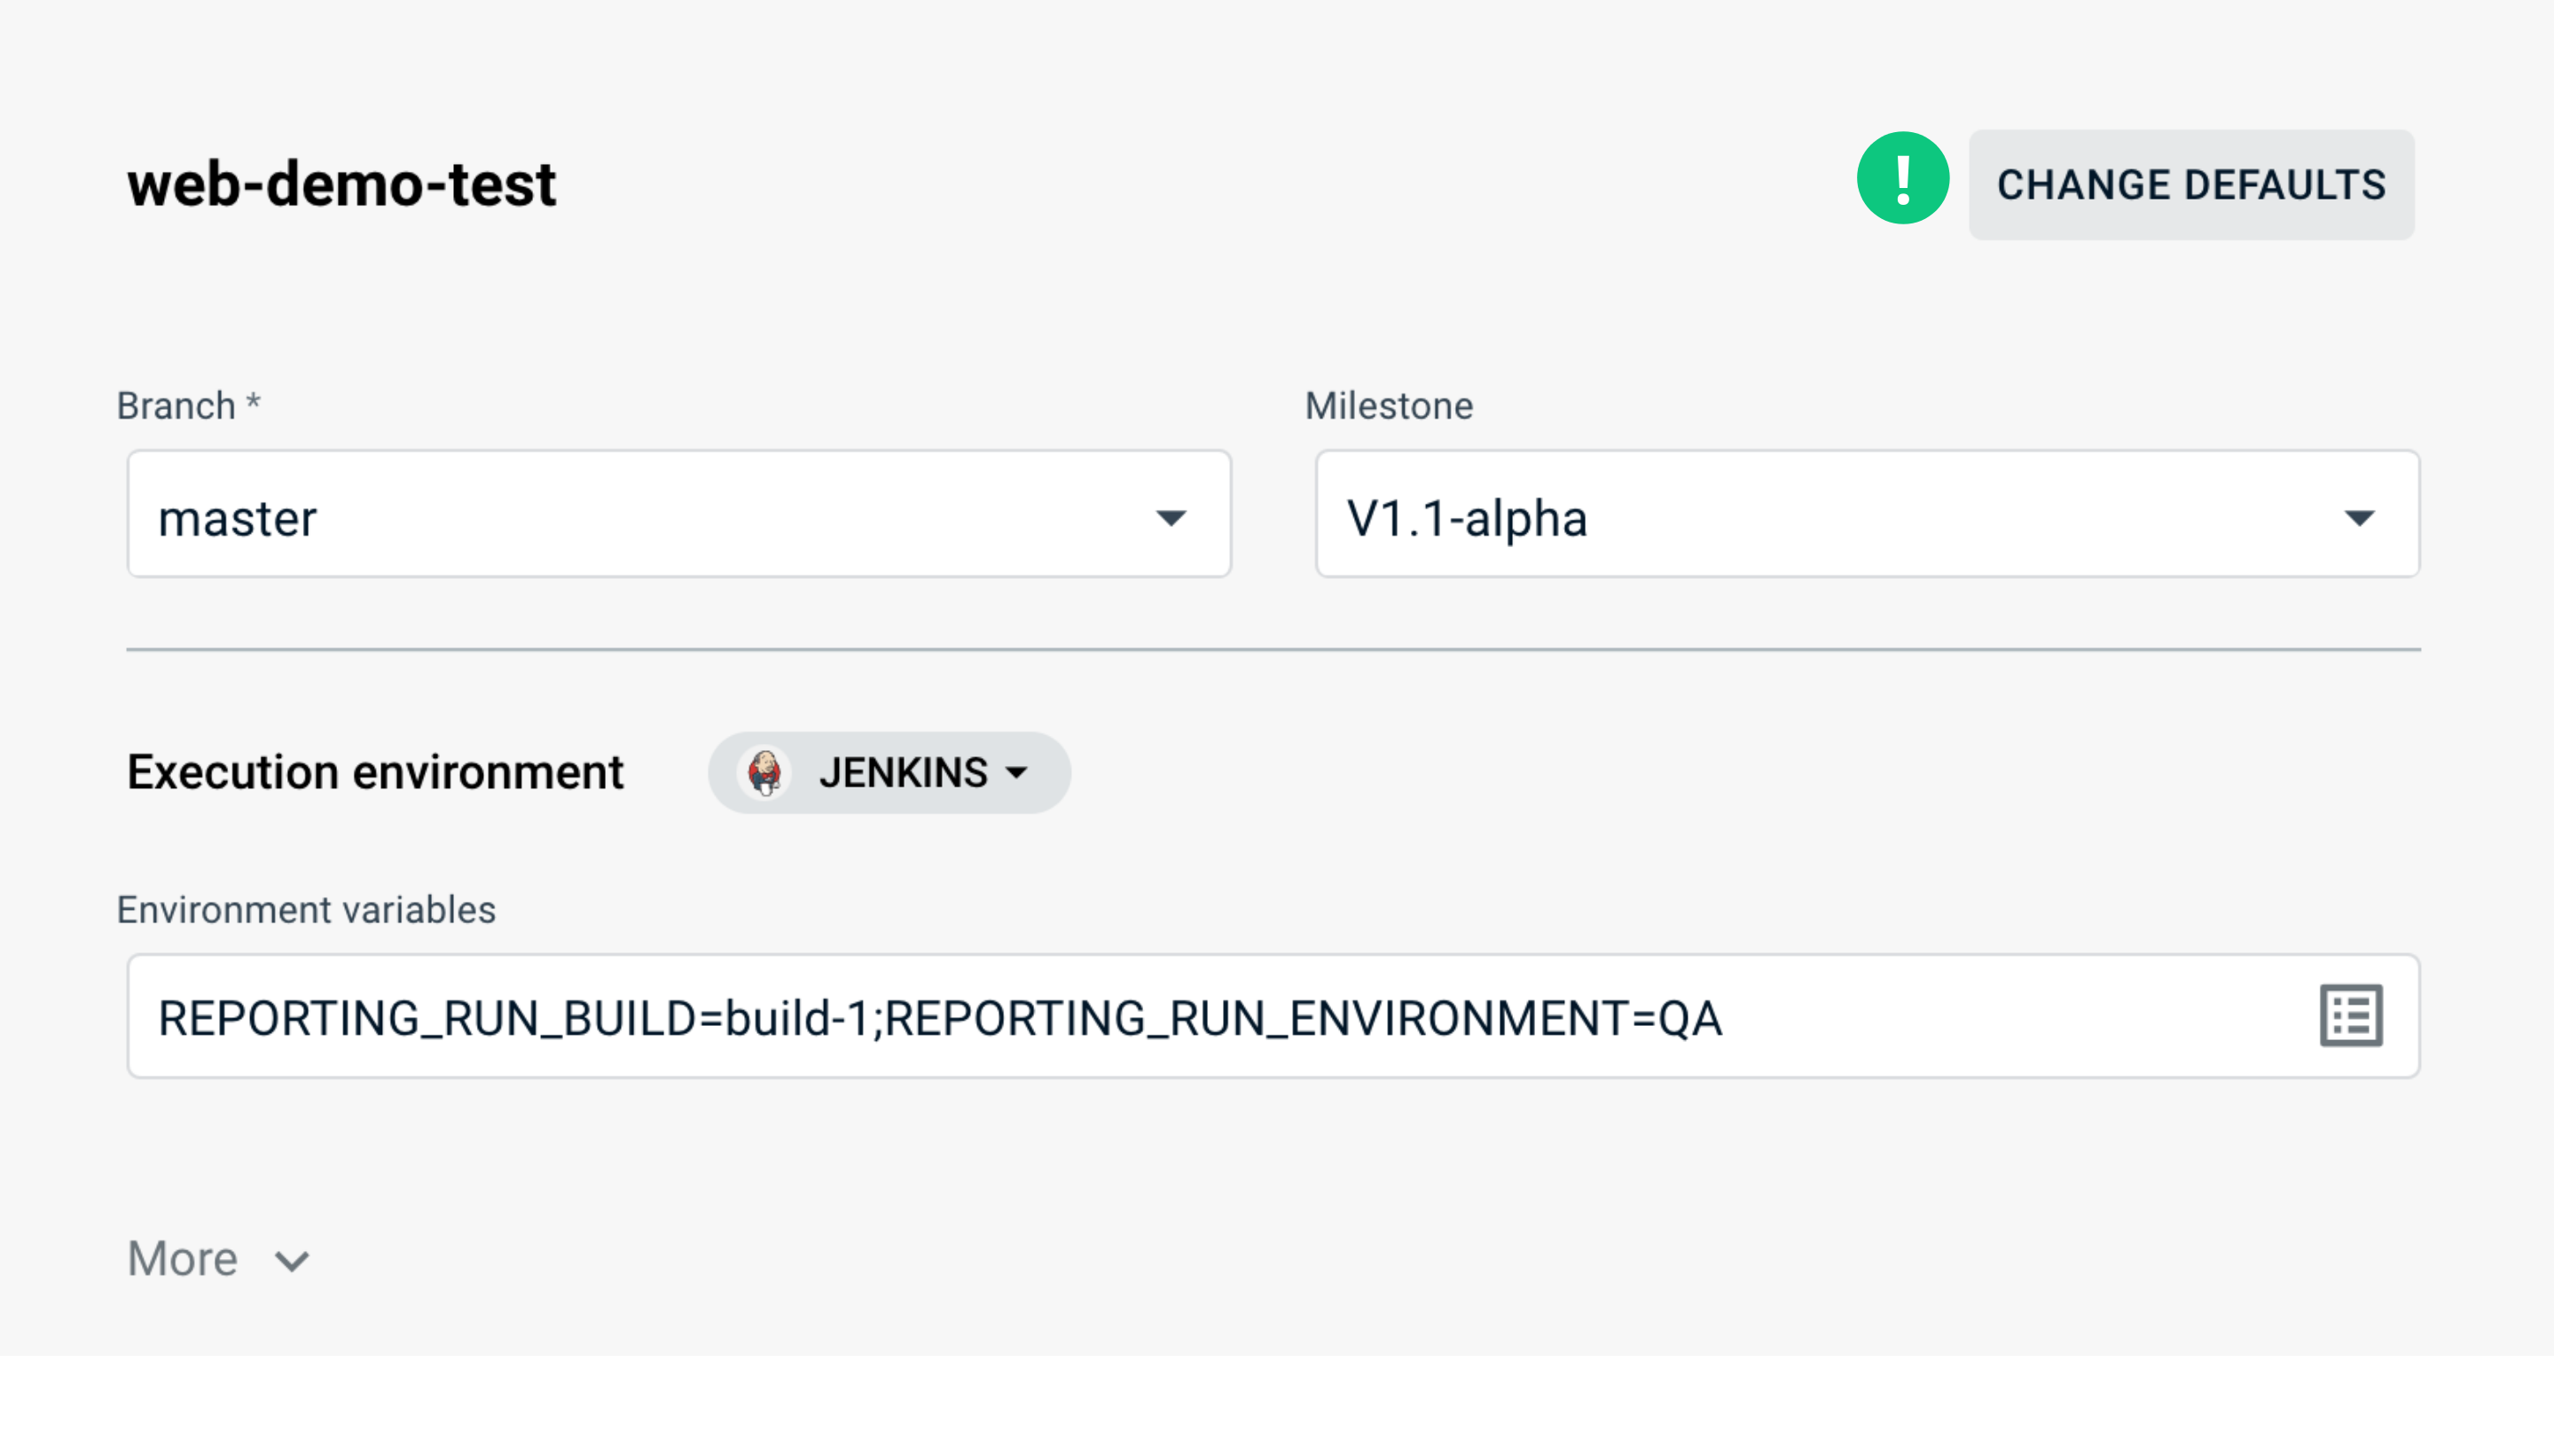
As the first step, choose the desired launcher from the list. Before clicking on the Launch button at the bottom of the page, you can update any of the available settings. The changes you make to the launcher at this point will not be automatically saved and will only be used for this specific launch. This might be useful if you want to do some experiments with the configuration and save it only if the changes work as expected.
Here you can find a setting at the top of the page which is not configurable from the Launcher Constructor — Milestone. This is the existing Zebrunner Milestone that the suite execution should be linked to.
Another useful feature isthe ability to edit environment variables and custom capabilities. To do this, you can either click on the icon on the right side of the input or edit the values manually as a plain string. Clicking on the icon opens a modal window with handy controls to change values.
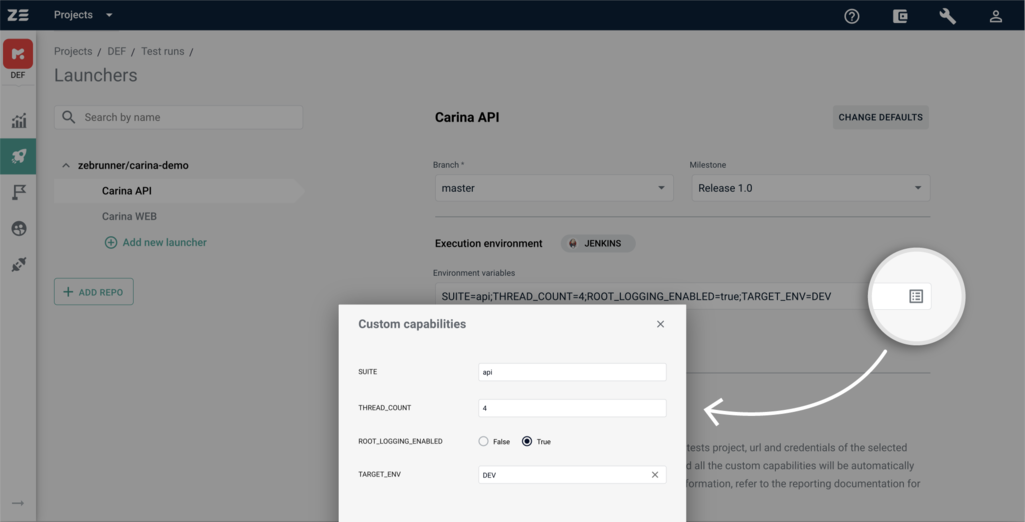
Manual editing of the values provides more possibilities:
- quick editing of a value without opening the modal window;
- removing of any name=value pair from the set of values;
- adding a new name=value pair ot the set;
- entering any value regardless of the original value type. This action changes the value type to String.
The only constraint to the manual editing is that the result string must have strict format. Name and value pair should be divided by = symbol; pairs should be divided by ; symbol.
When all the settings have desired values, you can launch the tests. For this, navigate to the bottom of the page and click on the Launch button. The Launch another checkbox to the left of the button controls the redirection behaviour. If the checkbox is unchecked, you will be redirected to the list of test suite executions. Otherwise, you will stay on the launcher's page and can do another launch (probably, with updated configs).
Note
Zebrunner does not automatically verify if the tests can actually be launched with the given config. You should deliberately choose the Docker image, the launch command, and the rest of configs
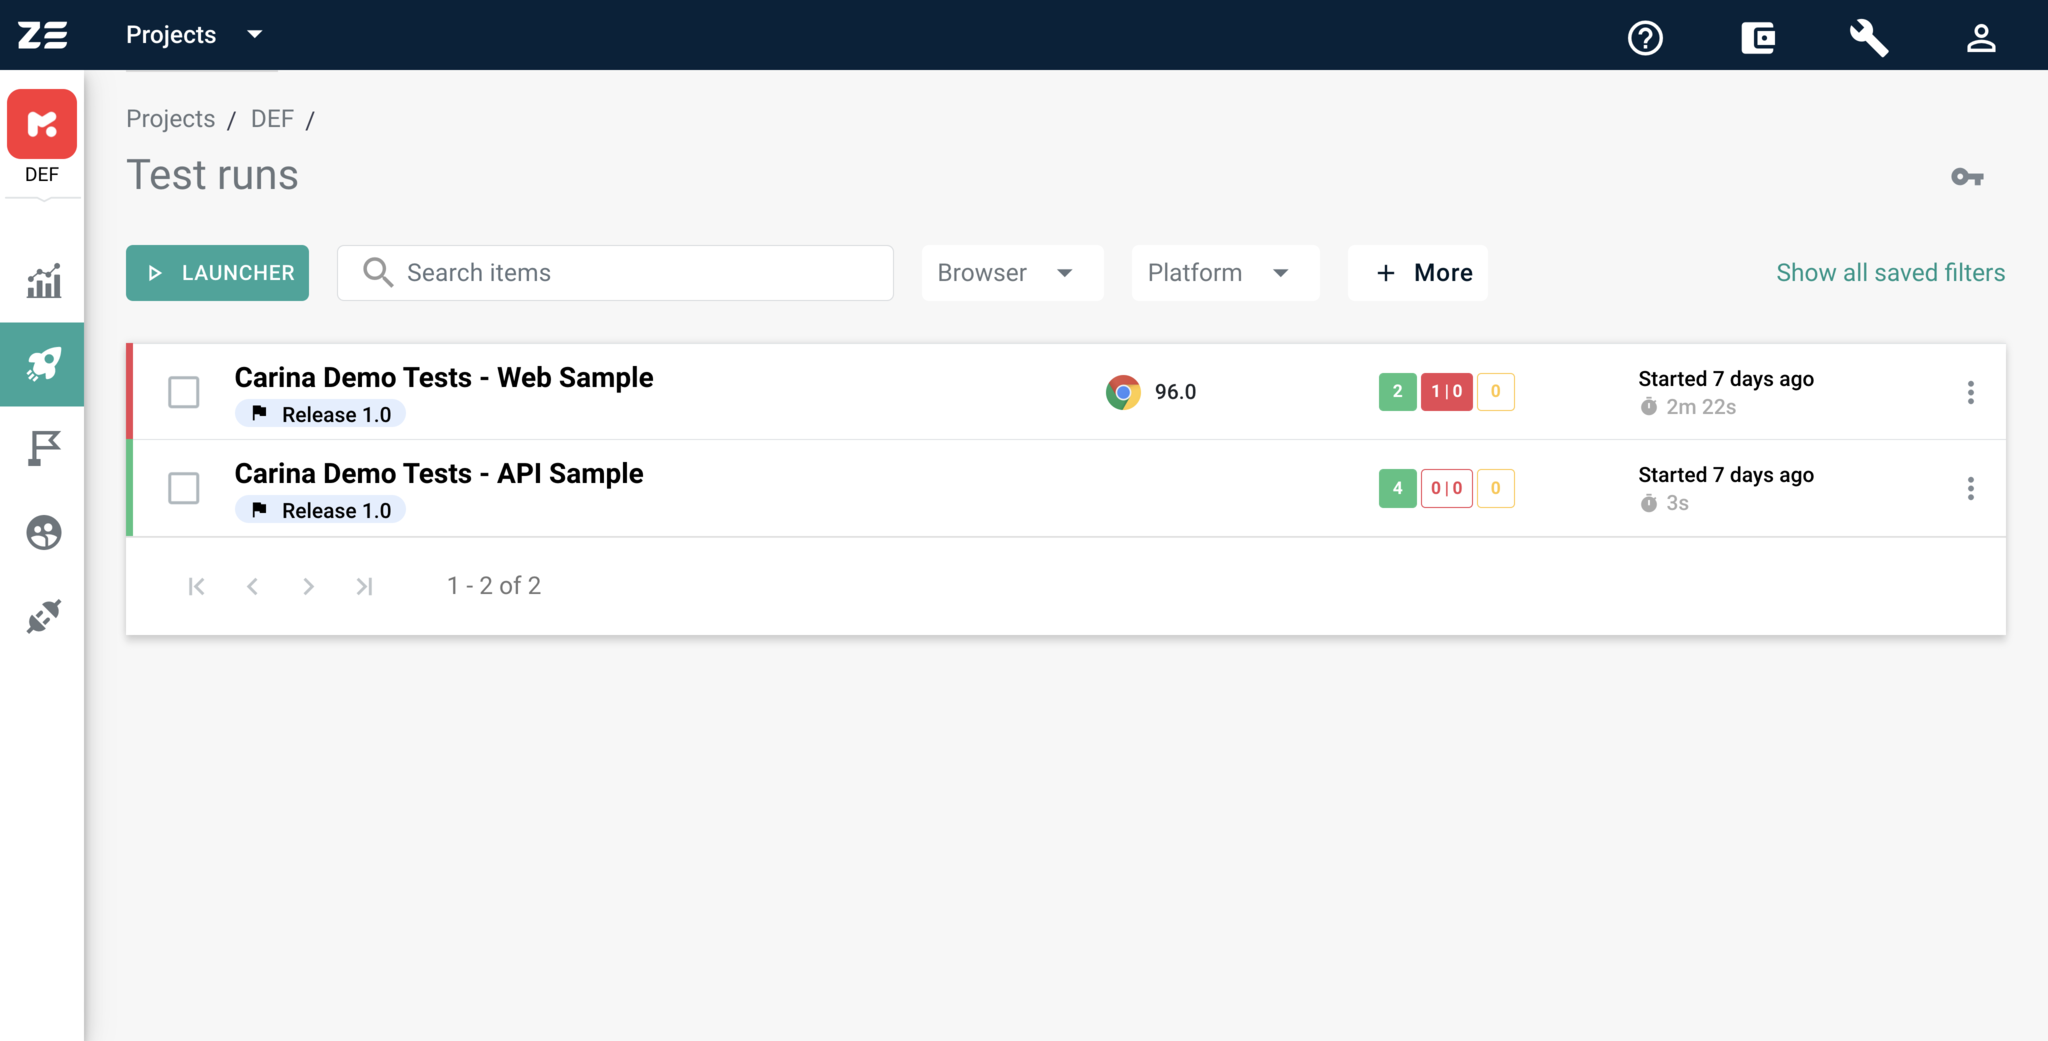
The just launched tests suite will have the name of the original launcher. Also, initially, it will be in queued status, because it takes some time to pull the source code of the tests and start the execution.
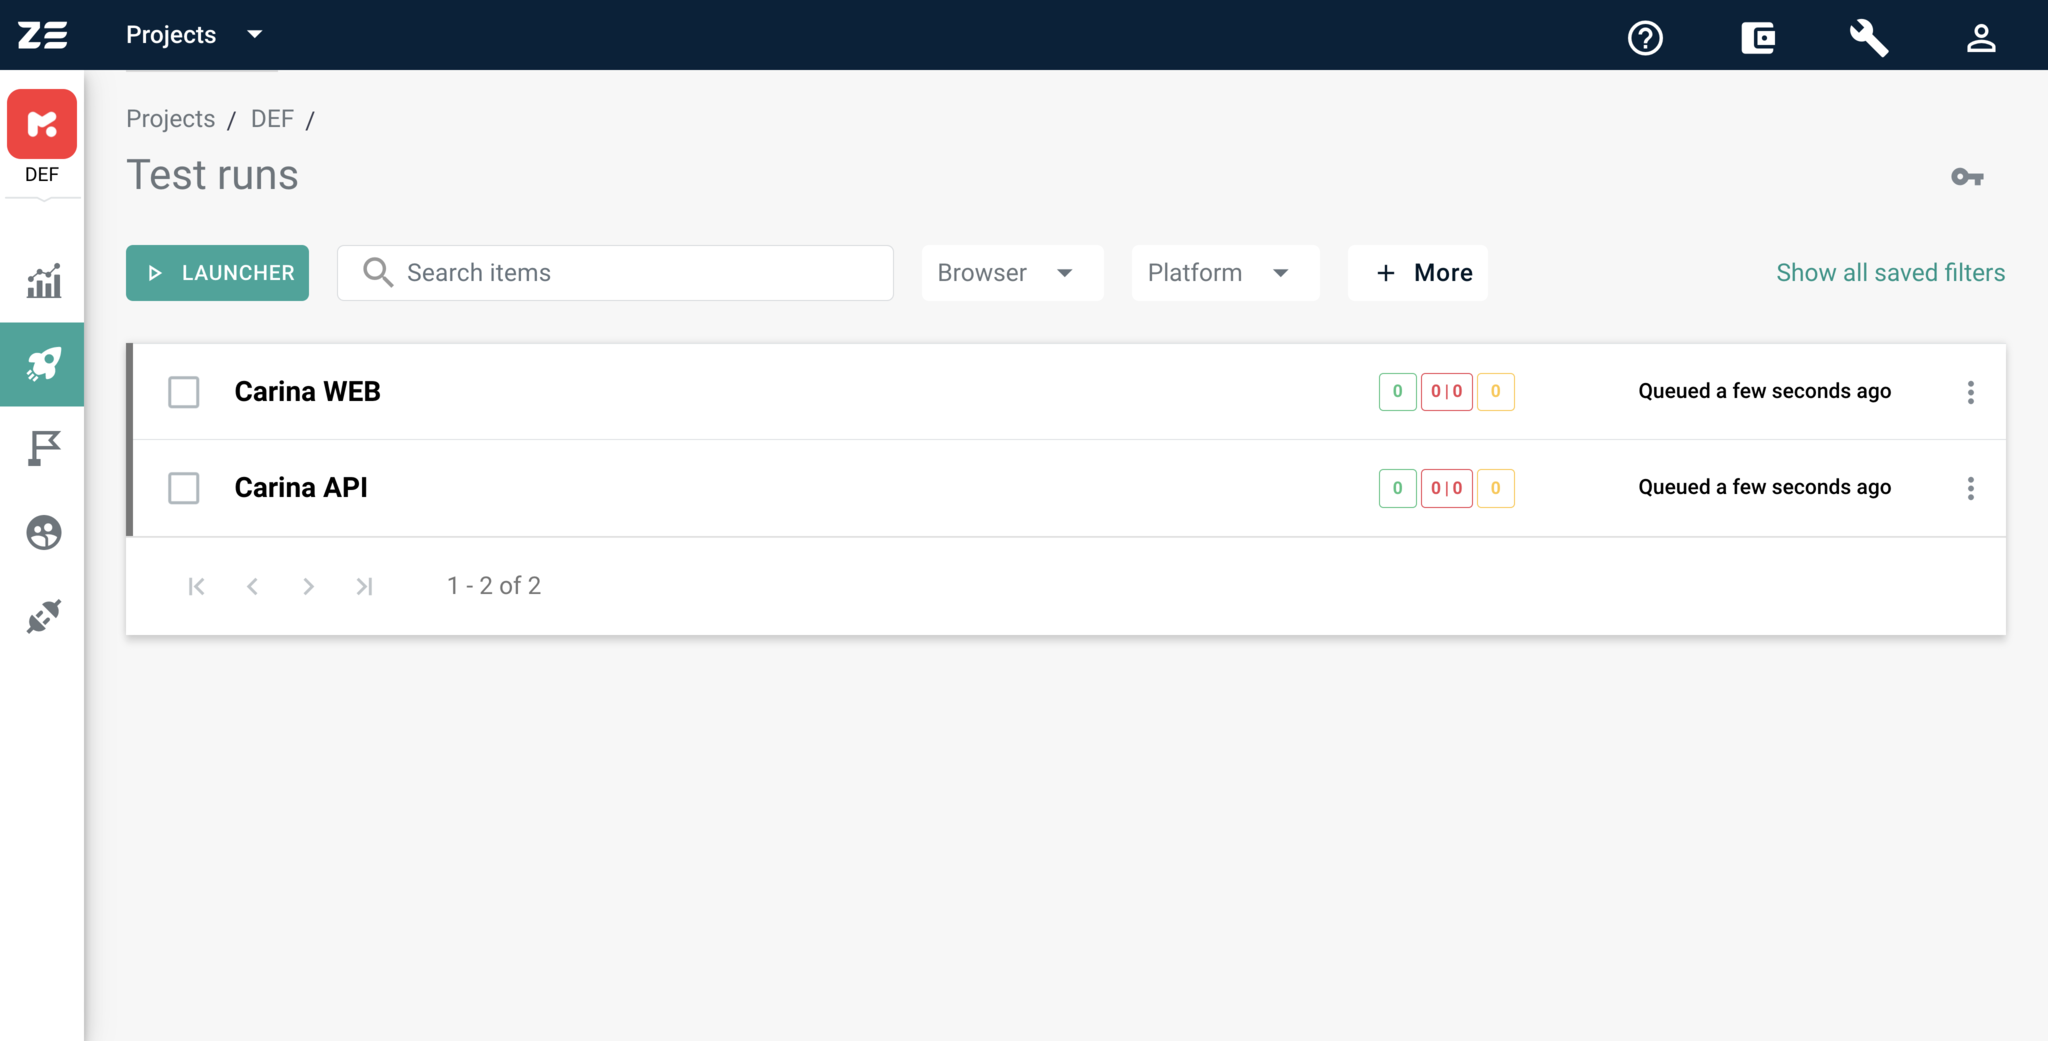
As soon as the tests start running, you will receive real-time updates about the progress without the need to reload the page.
Altering an existing Launcher#
If you want to change configuration of an existing launcher, you need to select the target launcher and click on the Change Defaults button at the top of the page. This will open the Launcher Constructor.
Here you can change any of the available settings. All the rules applicable for launcher creation are also valid for editing.
When you finish with the update, scroll to the bottom of the page and click the Save button. If you want to discard the changes, click on the Cancel button.
Deleting a Launcher#
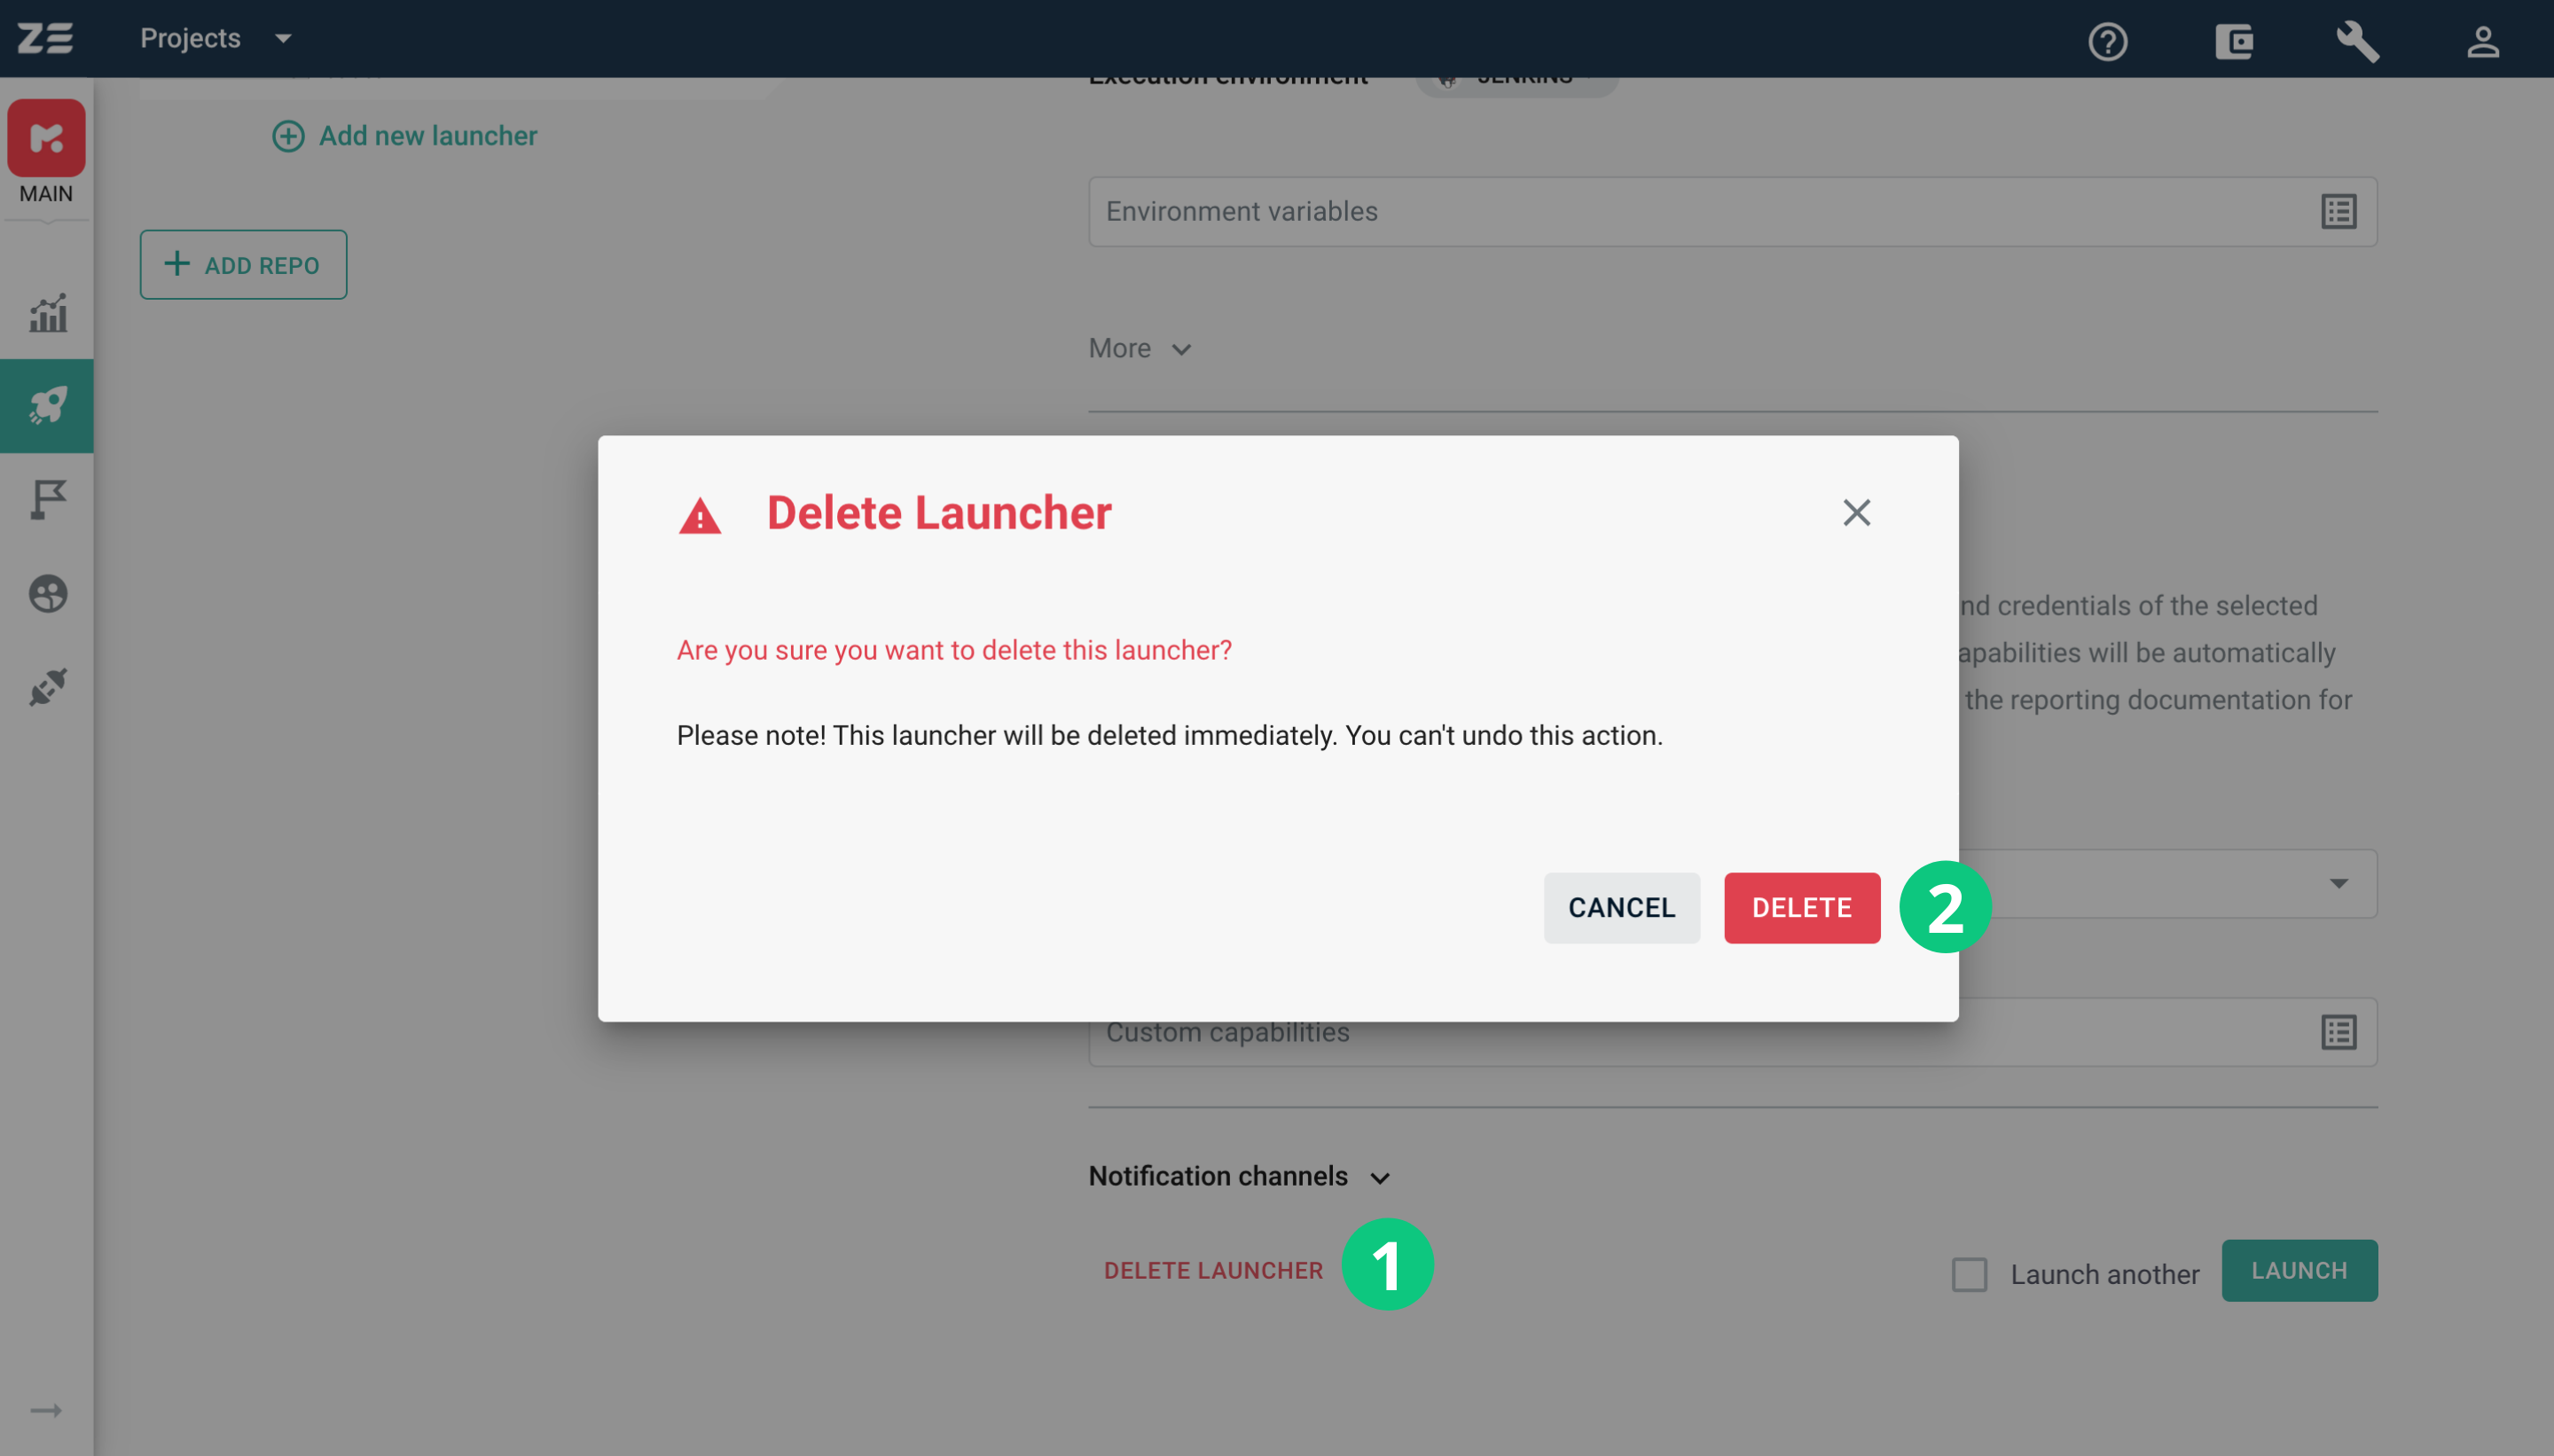
If a launcher becomes obsolete, it can be removed. For this, click on the obsolete launcher and scroll to the bottom of the launcher definition. Click on the Delete Launcher button will open a confirmation modal window.
To confirm the action, click Delete again.
Presets#
By nature, Launchers represent a dynamic configuration template for launching tests. It is allowed to change the template at any time and even run tests without persisting the configuration. However, sometimes you may need to trigger tests execution with predefined parameters. Launcher preset is a predefined configuration snapshot allowing to manually trigger text executions in one click or automatically according to schedule or via webhook.
In addition, presets may come in handy when your launchers tree becomes bloated. It may be much more convenient to store the launch configurations in a structured way - for example, having a launcher that describes base configuration for executing a test suite, and a set of logically related "auxiliary" launcher presets, each with a more specific configuration.
Persistent nature of the presets allows you to use them for cyclic automation executions (see scheduled executions) and in your CI/CD pipeline via webhooks.
Managing Presets#
In order to create a Preset, you need to perform the following steps:
- Select the Launcher you want to create a Preset for.
- Set all configurations of the Launcher to the desired values (e.g. choose another browser, change values of the environment variables, etc.).
- Click on the Save Preset button which is placed at the bottom of the Launcher configuration.
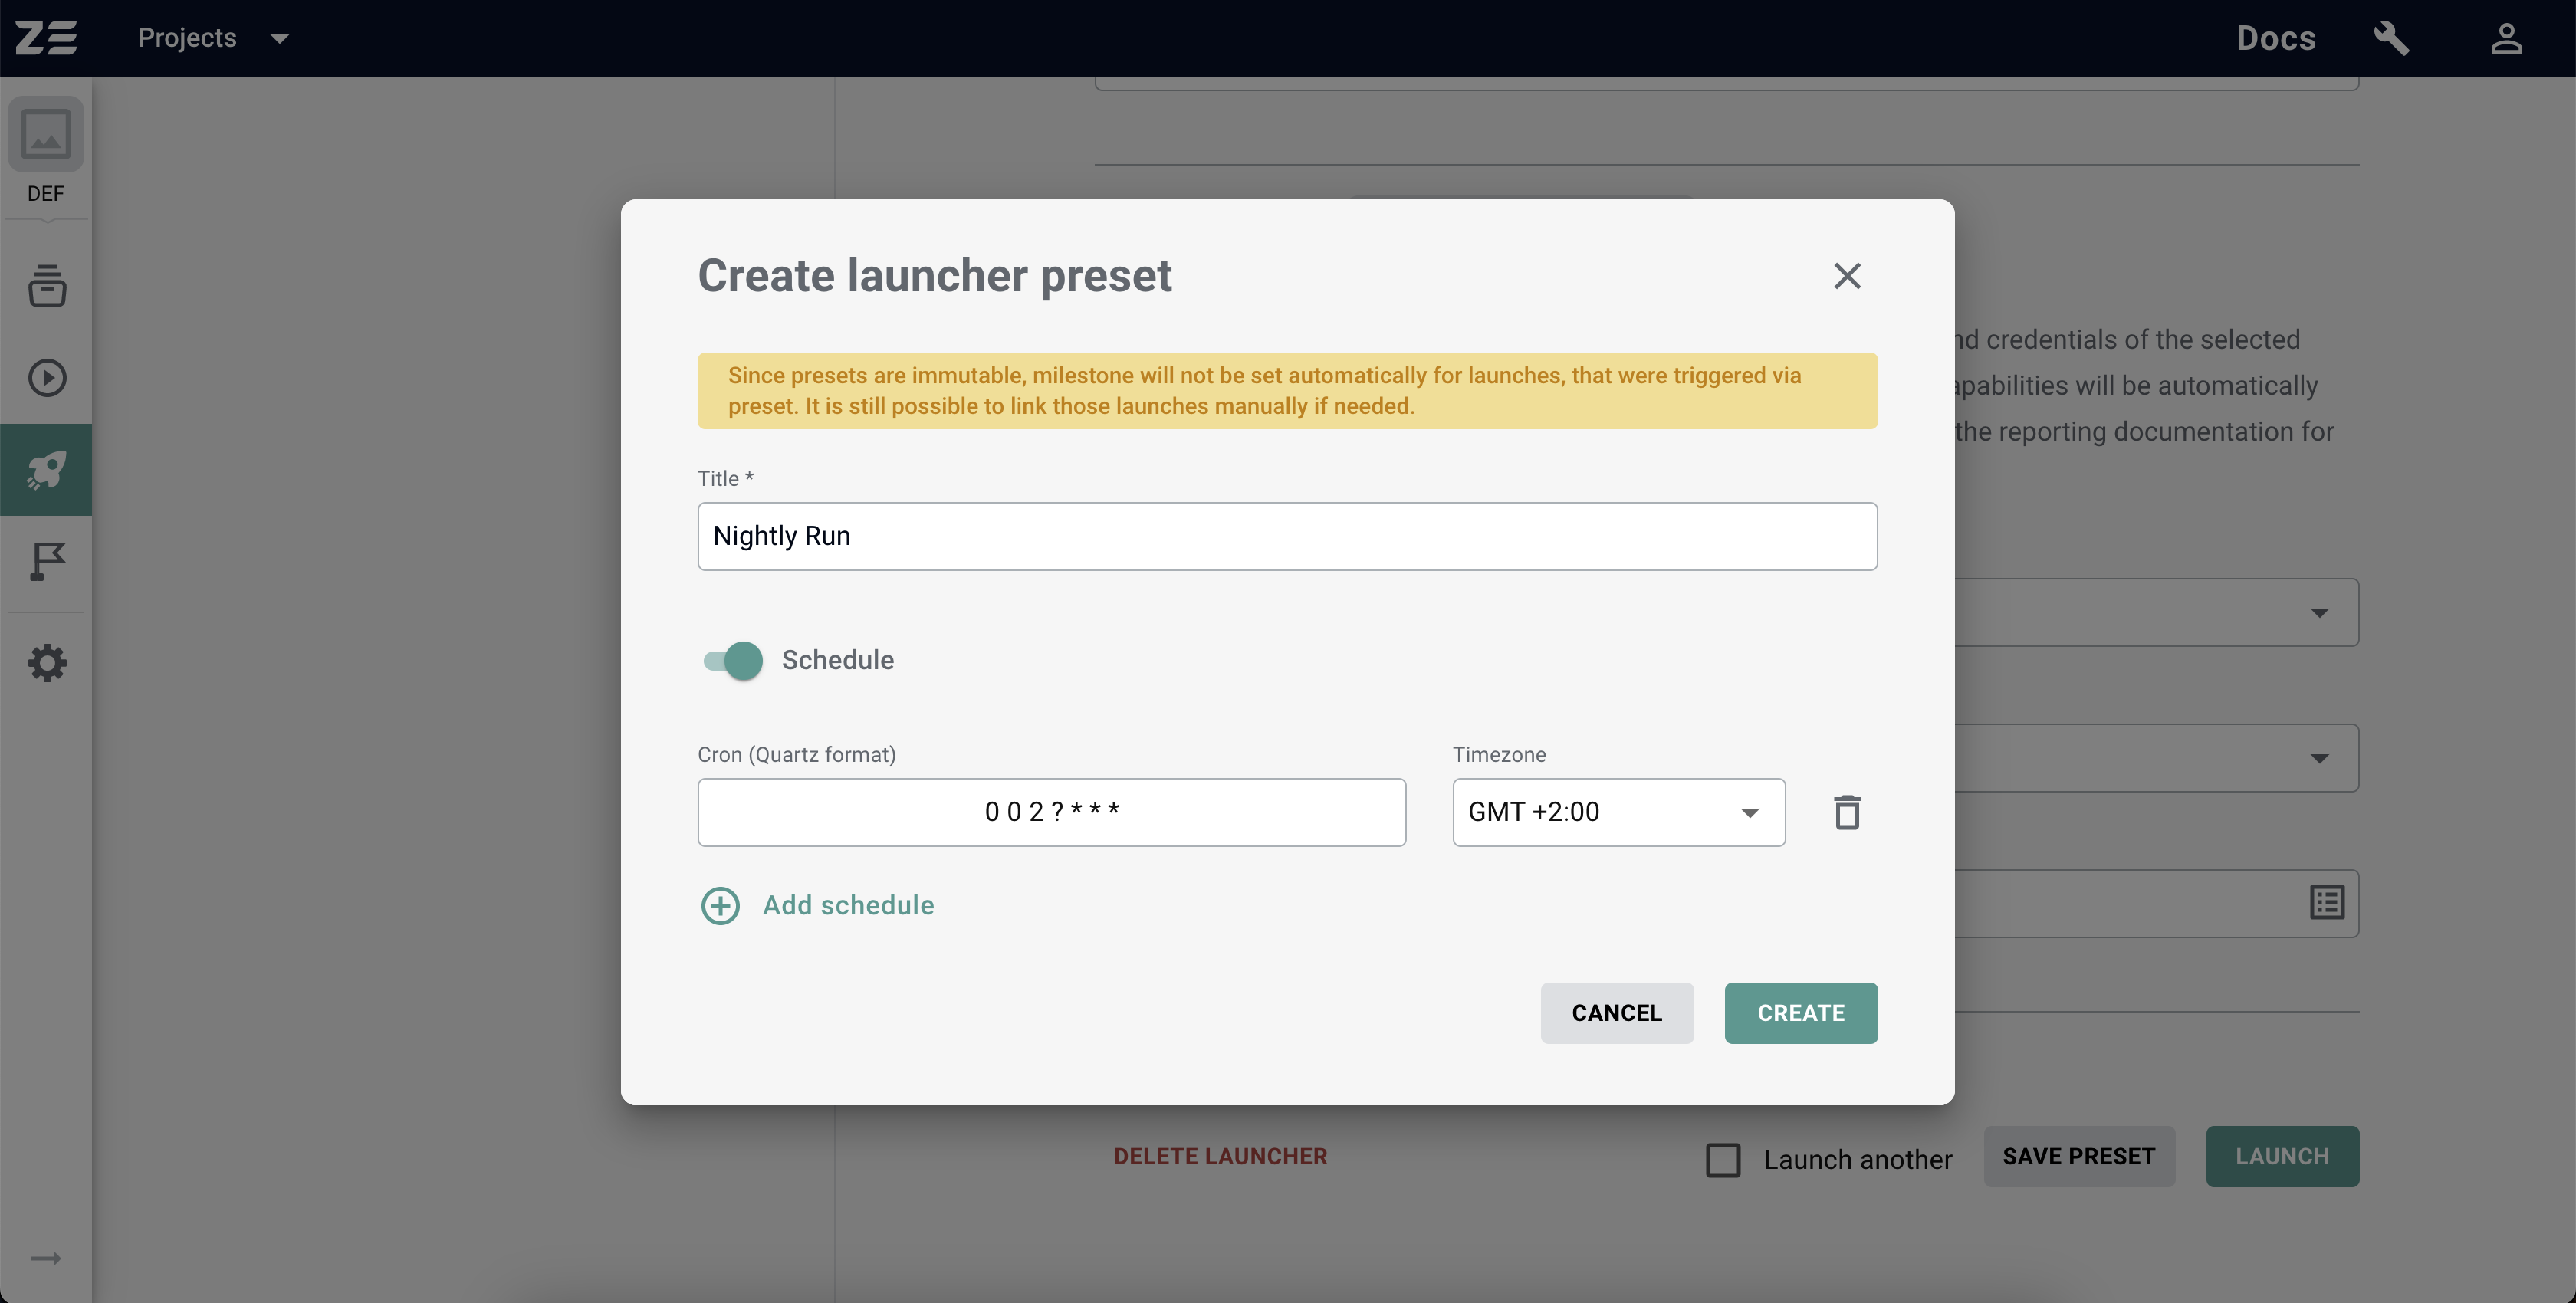
- In the appeared window, enter the name of the Preset. Optionally, you can set up one or more schedules for the Preset (more information about schedules can be found in the Scheduled executions section).
- Click on the Create button.
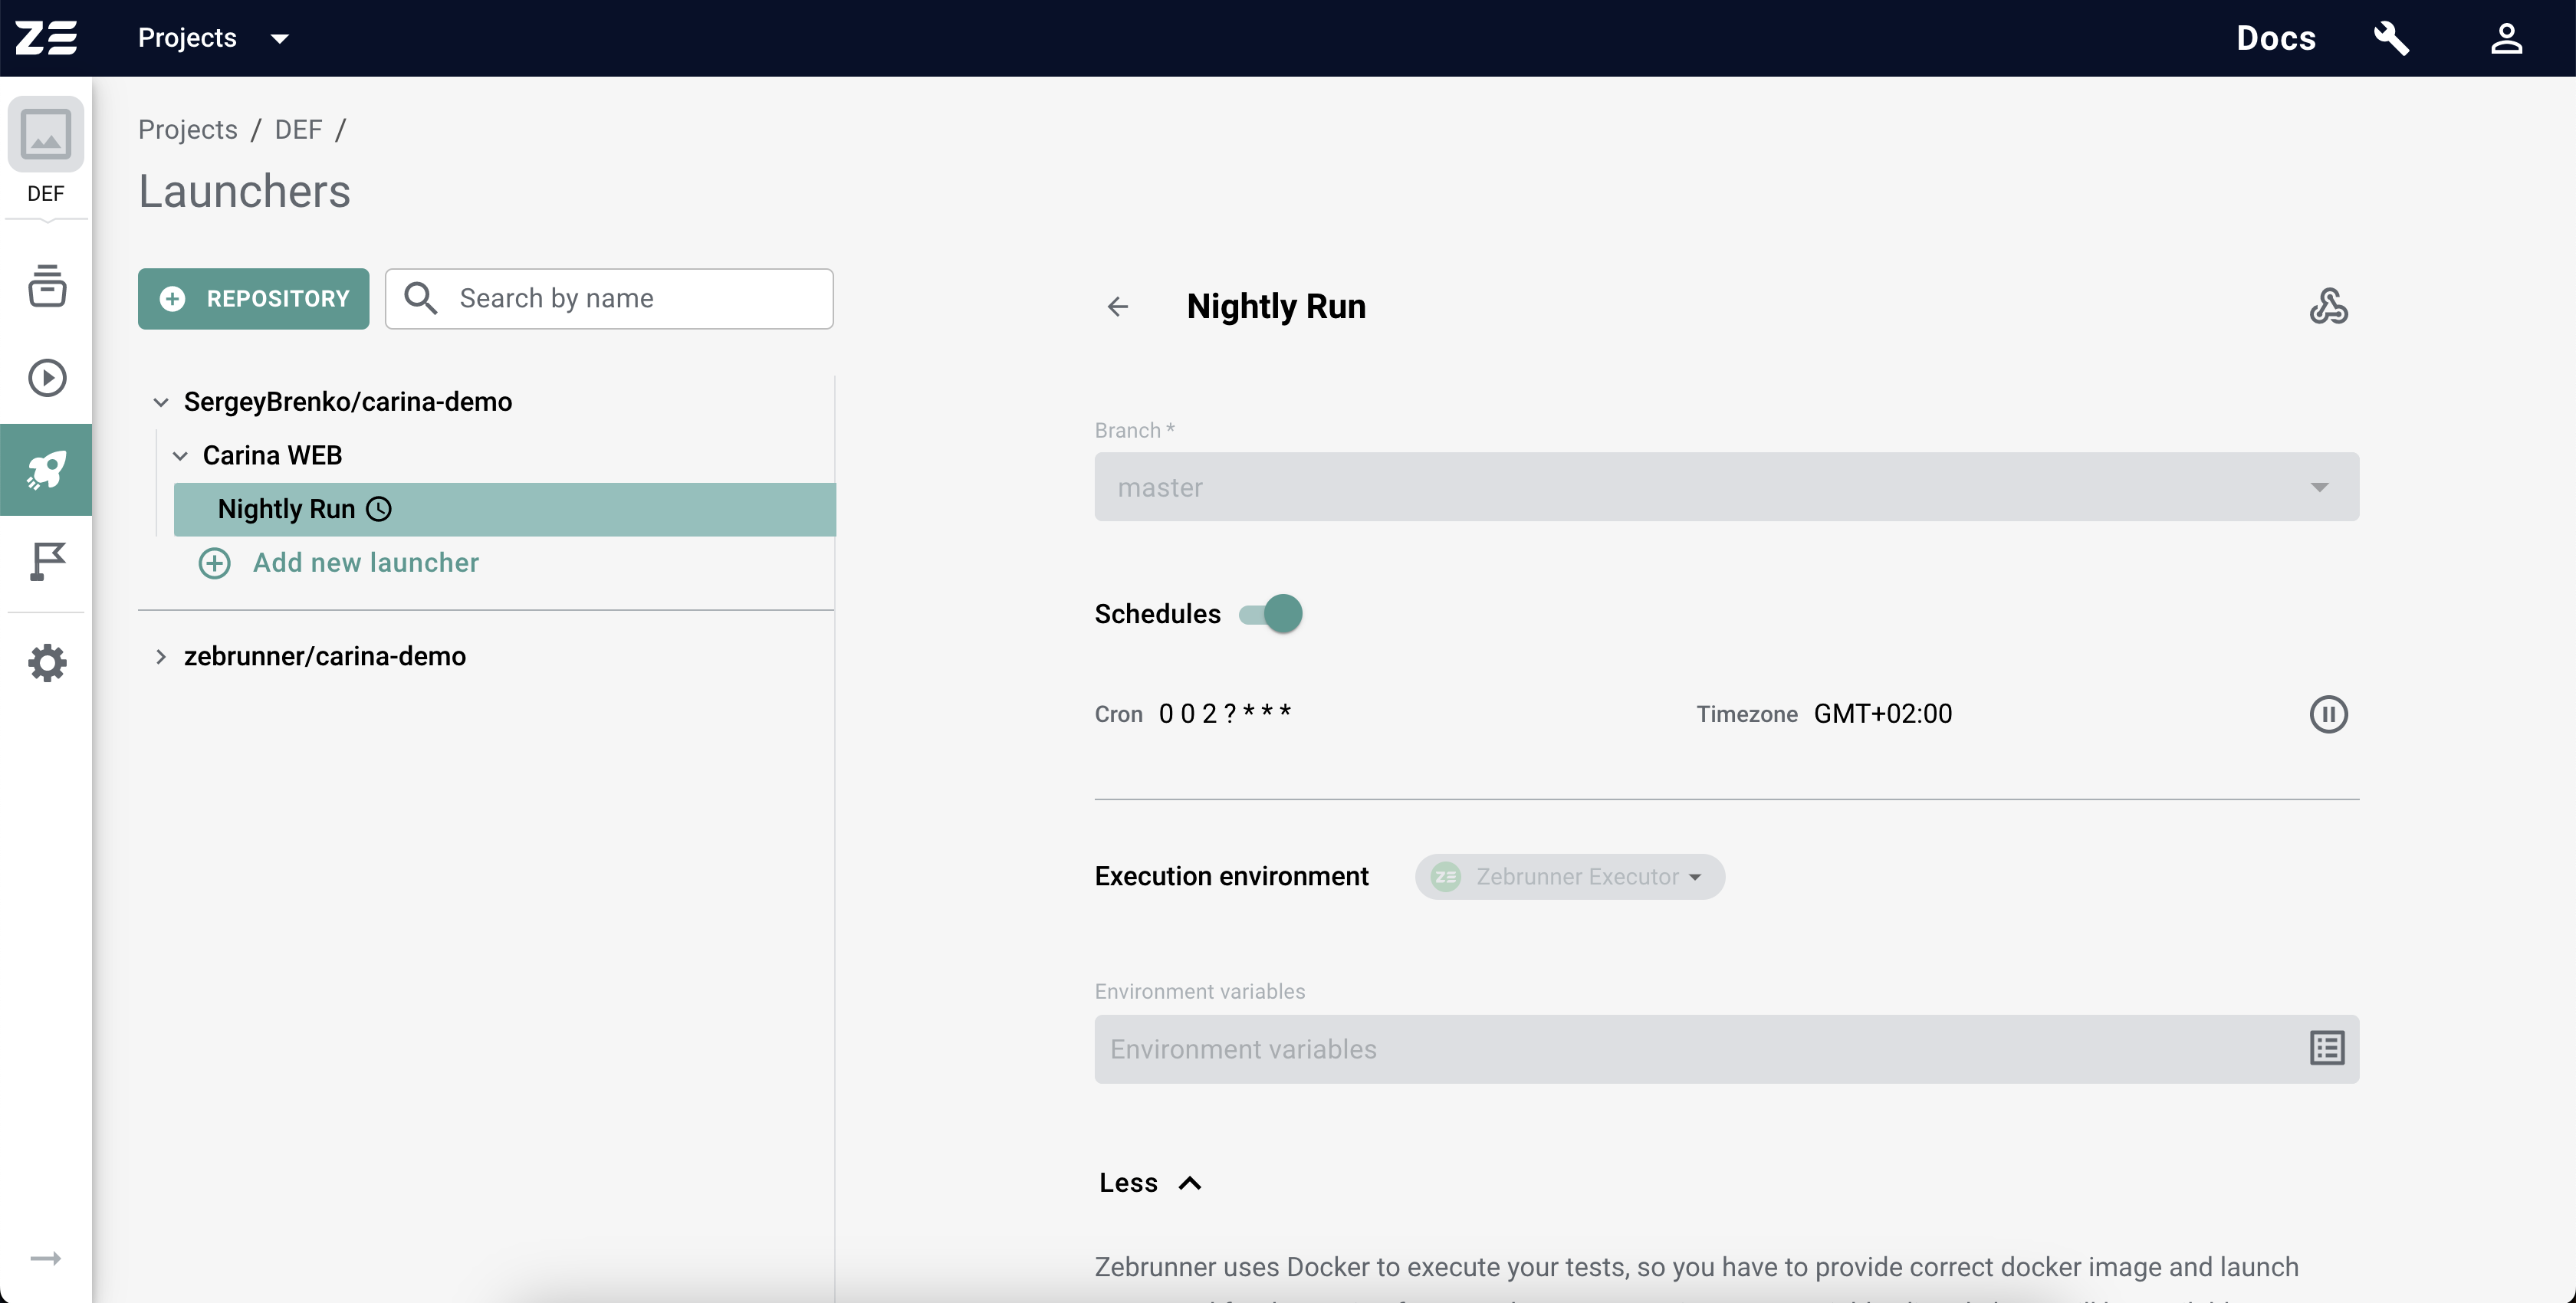
The newly created Preset will be added to the Launchers tree as a child item of the Launcher. The saved Preset looks almost the same as a regular Launcher, but with one new section - Schedules, and one new button for Webhooks management.
Info
To learn more about schedules, refer to the Scheduled executions section. More information about Webhooks you can find in Webhooks section.
Because of the persistent nature of Presets, all the configuration inputs are not editable, but it is still possible to change the Preset configs. For this, scroll to the bottom of the page and hit the Edit button. After clicking on this button, you will see the regular Launcher constructor, except for one new section under the branch selector - Schedules configuration. After applying the desired configuration, click on the Save button at the bottom of the page to persist the changes.
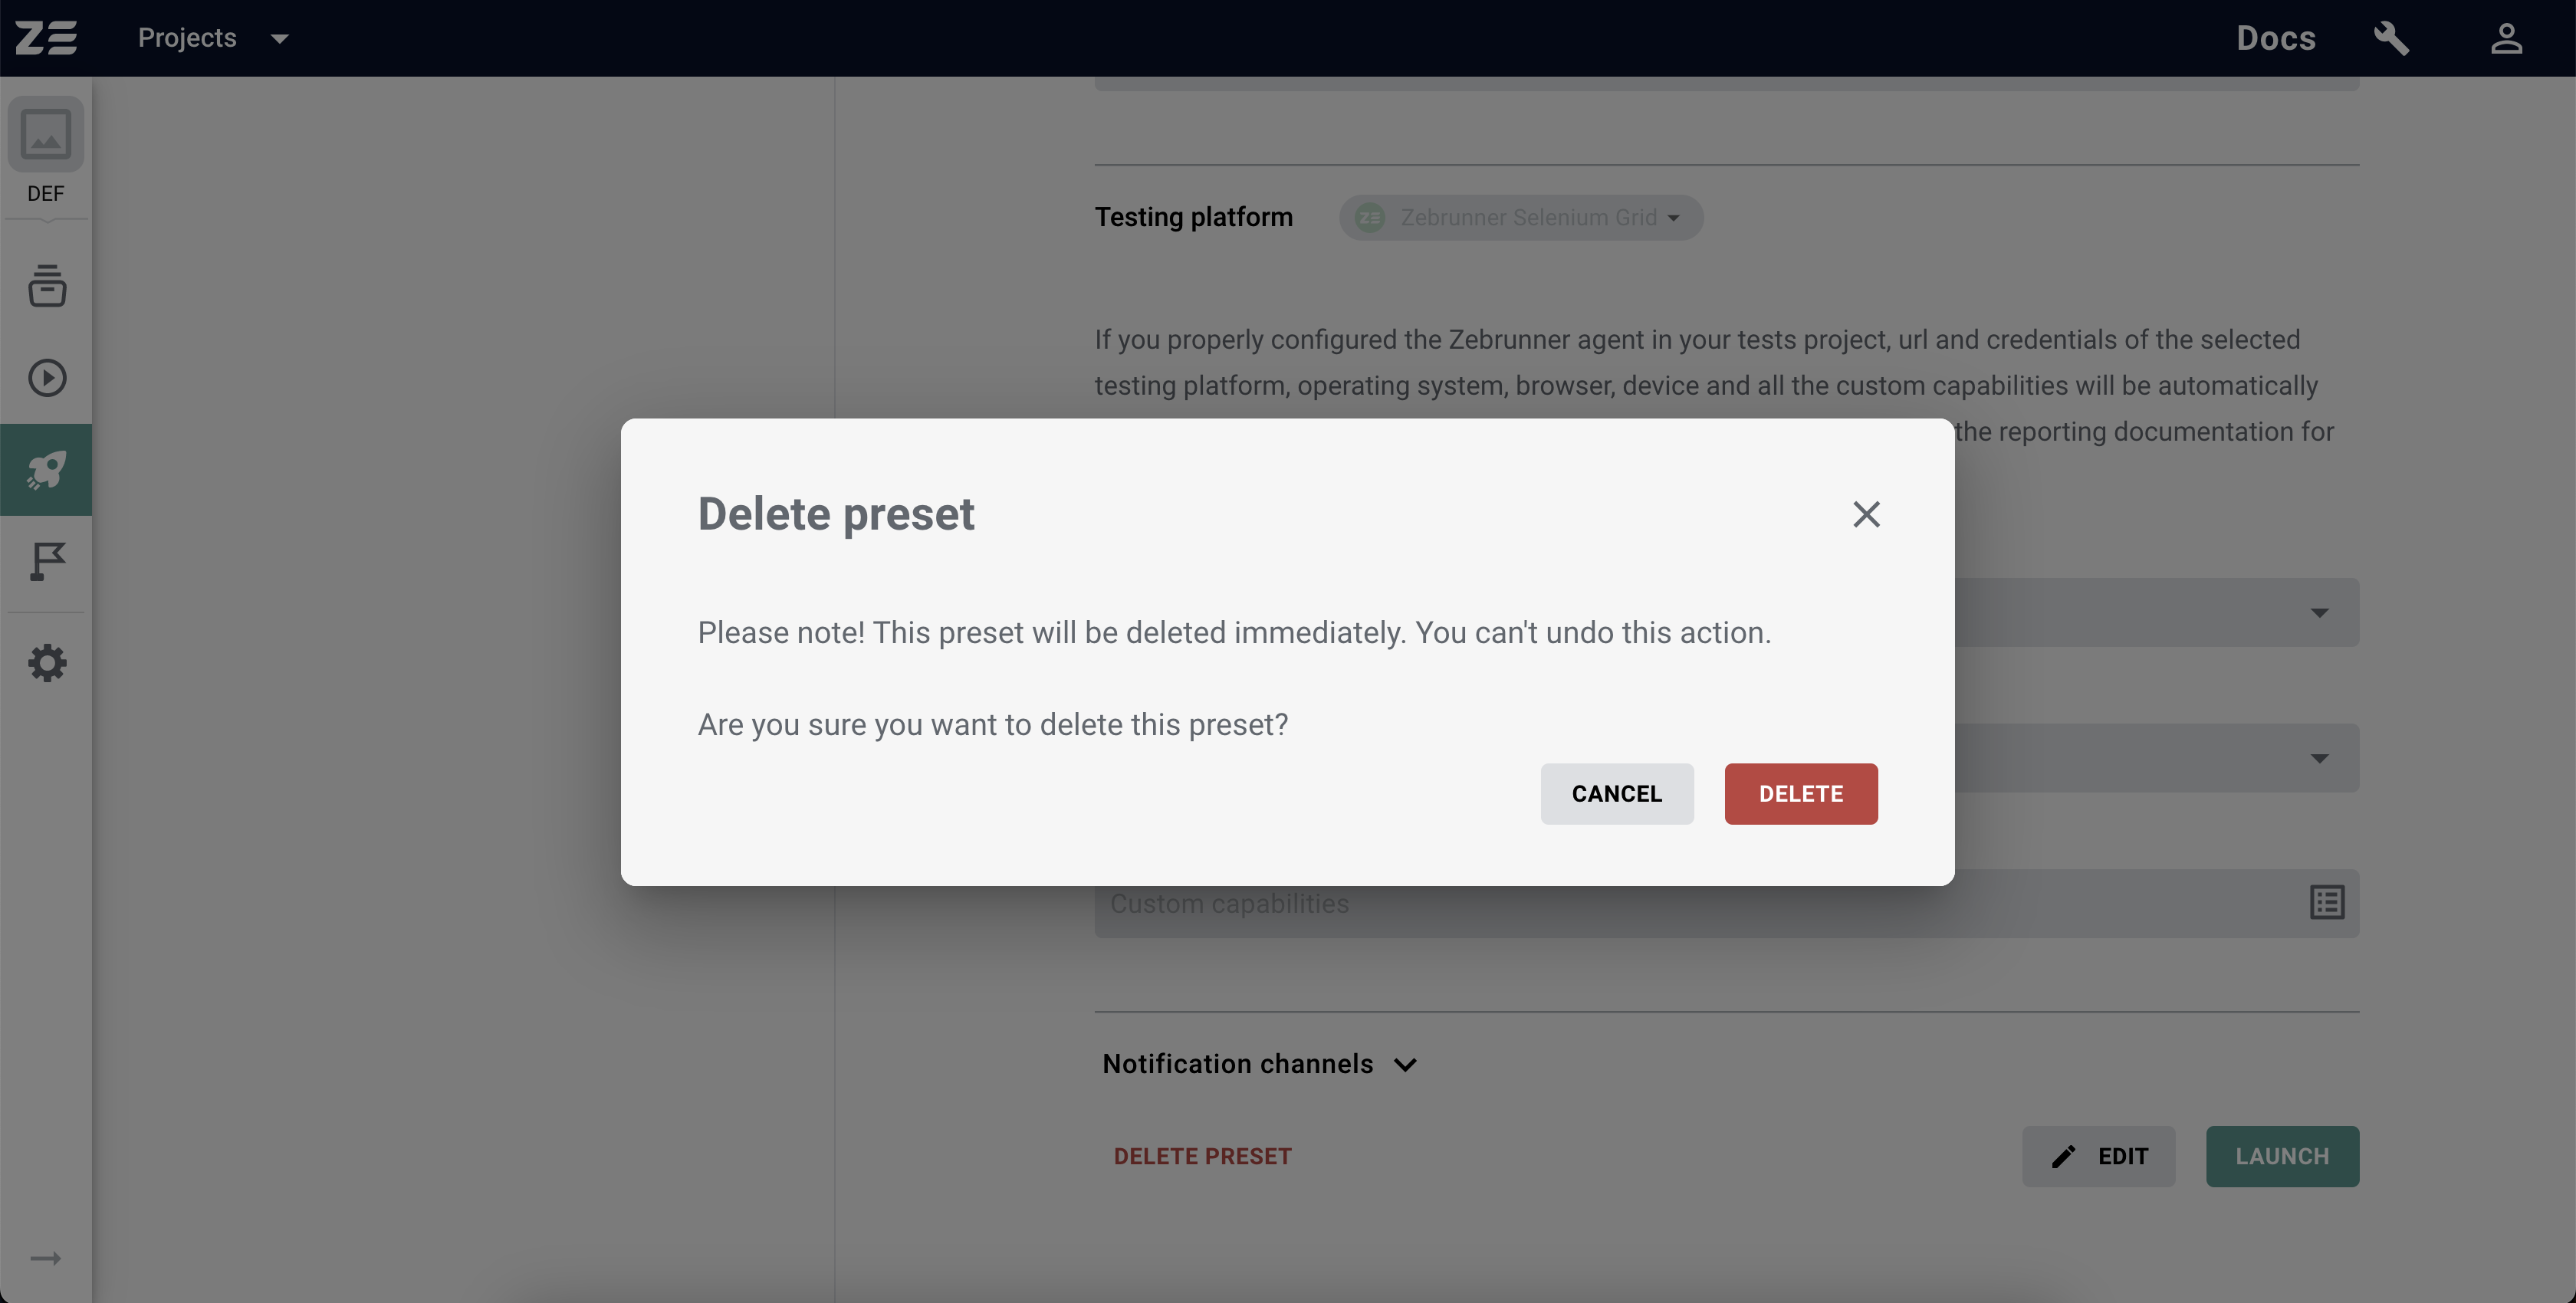
In order to delete a Preset, select it in the Launcher's tree, scroll to the bottom of the page, and click on the Delete Preset button. You must confirm your intention by clicking on the Delete button in the appeared modal window.
Note
When you delete a Preset, all of its Schedules and Webhooks will also be deleted.
Scheduled executions#
Zebrunner provides an ability to schedule test executions in order to run them on regular basis without manual triggering. This may be helpful if you want to run tests frequently (for example, every hour). Or if you wish to automatically trigger the tests at night so that automation engineers can review the results as soon as they start working.
Every Preset in Zebrunner Launcher can have one or more Schedules. You can add a Schedule both when creating a Preset and when editing an existing one.
Note
Zebrunner uses the extended cron expression format established by Quartz Scheduler. You can use any appropriate online tool to generate a cron expression in this format.
Warning
It is forbidden to provide a cron expression that triggers execution more than once every 5 minutes.
In order to add a Schedule when creating a Preset, you need to switch the Schedule toggle on and enter the cron expression along with the timezone at which the cron must be evaluated. If you want to add two or more Schedules for a Preset, use the Add schedule button.
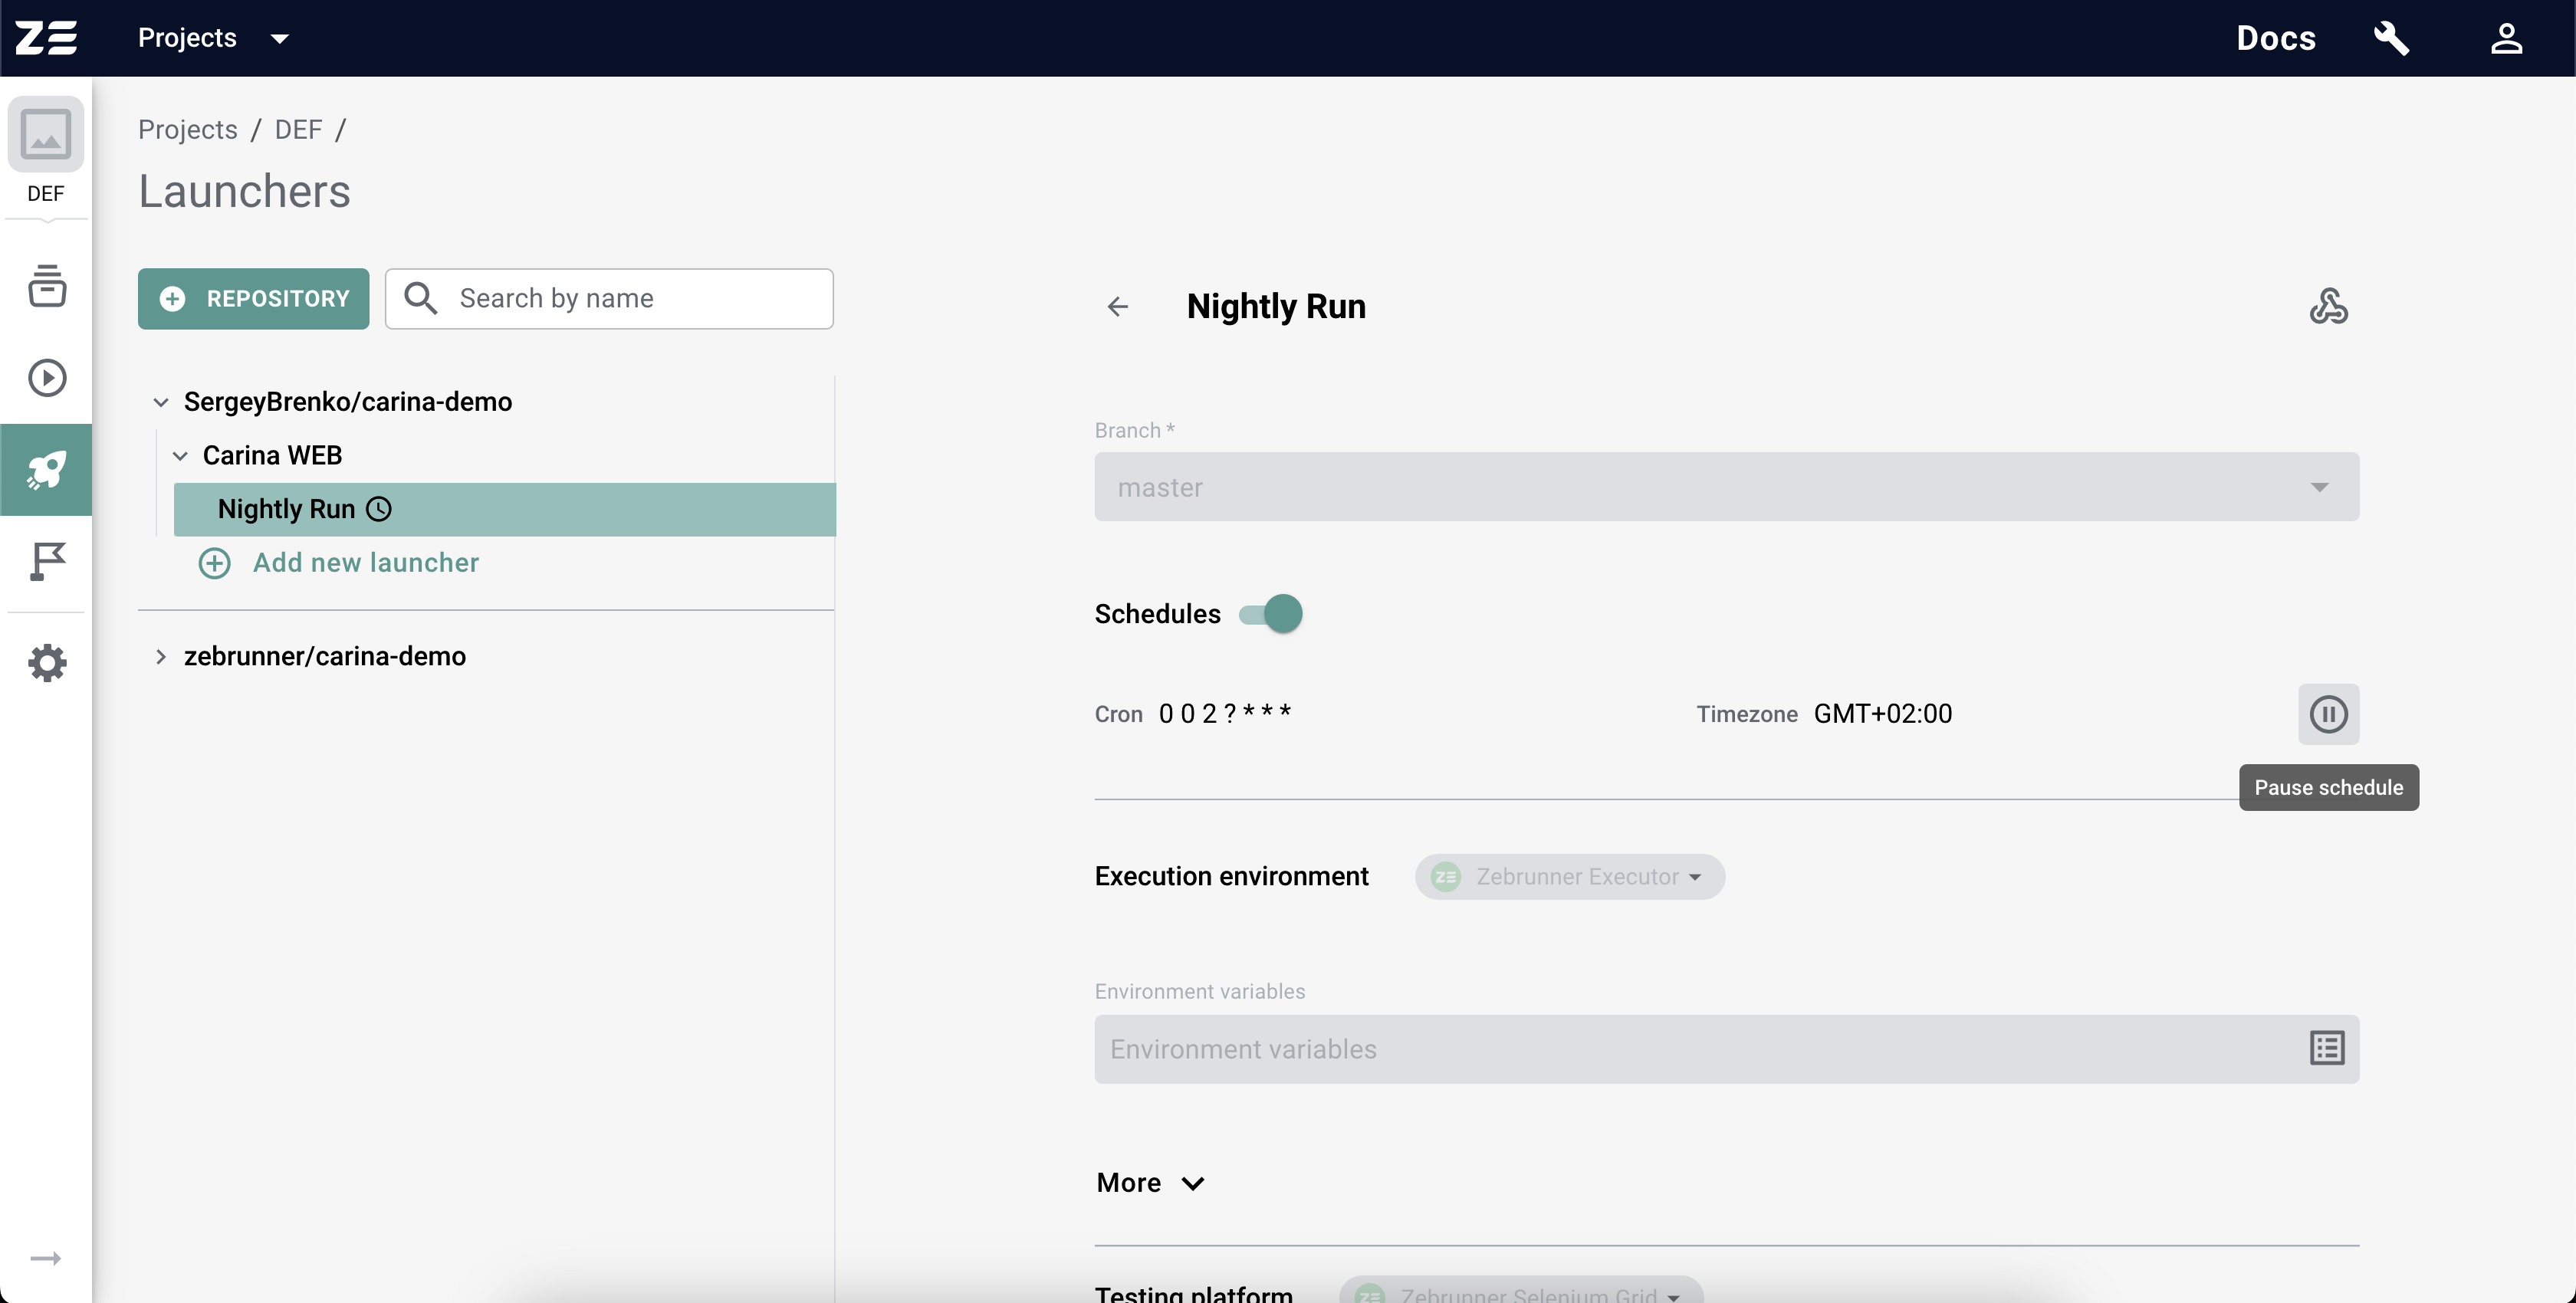
If a Preset has Schedules, they will be displayed right after the git branch. From there, you can deactivate all Schedules in one shot by turning off the Schedules toggle. Also, it is possible to deactivate a specific Schedule by clicking on Pause schedule button next to it.
When editing a Preset, you can change the list of its Schedules. The changes will be saved after clicking on Save button.
Deleting a Preset deletes all its Schedules.
Warning
Every Schedule has an author on whose behalf the tests will be triggered. If the user has been deactivated, or completely removed from Zebrunner, or has no access to the project in which the Schedule was created, then the Schedule will no longer work. This situation is not traceable using Zebrunner UI and may result in unexpected behavior. In this case, the simplest option is to recreate the Schedule. You can also ask Zebrunner Support for assistance.
Webhooks#
If you have an existing CI/CD pipeline or any other tool that allows you to launch tests (e.g. a chatbot), you can easily integrate Zebrunner Launcher with it using Webhooks.
Creating a Webhook#
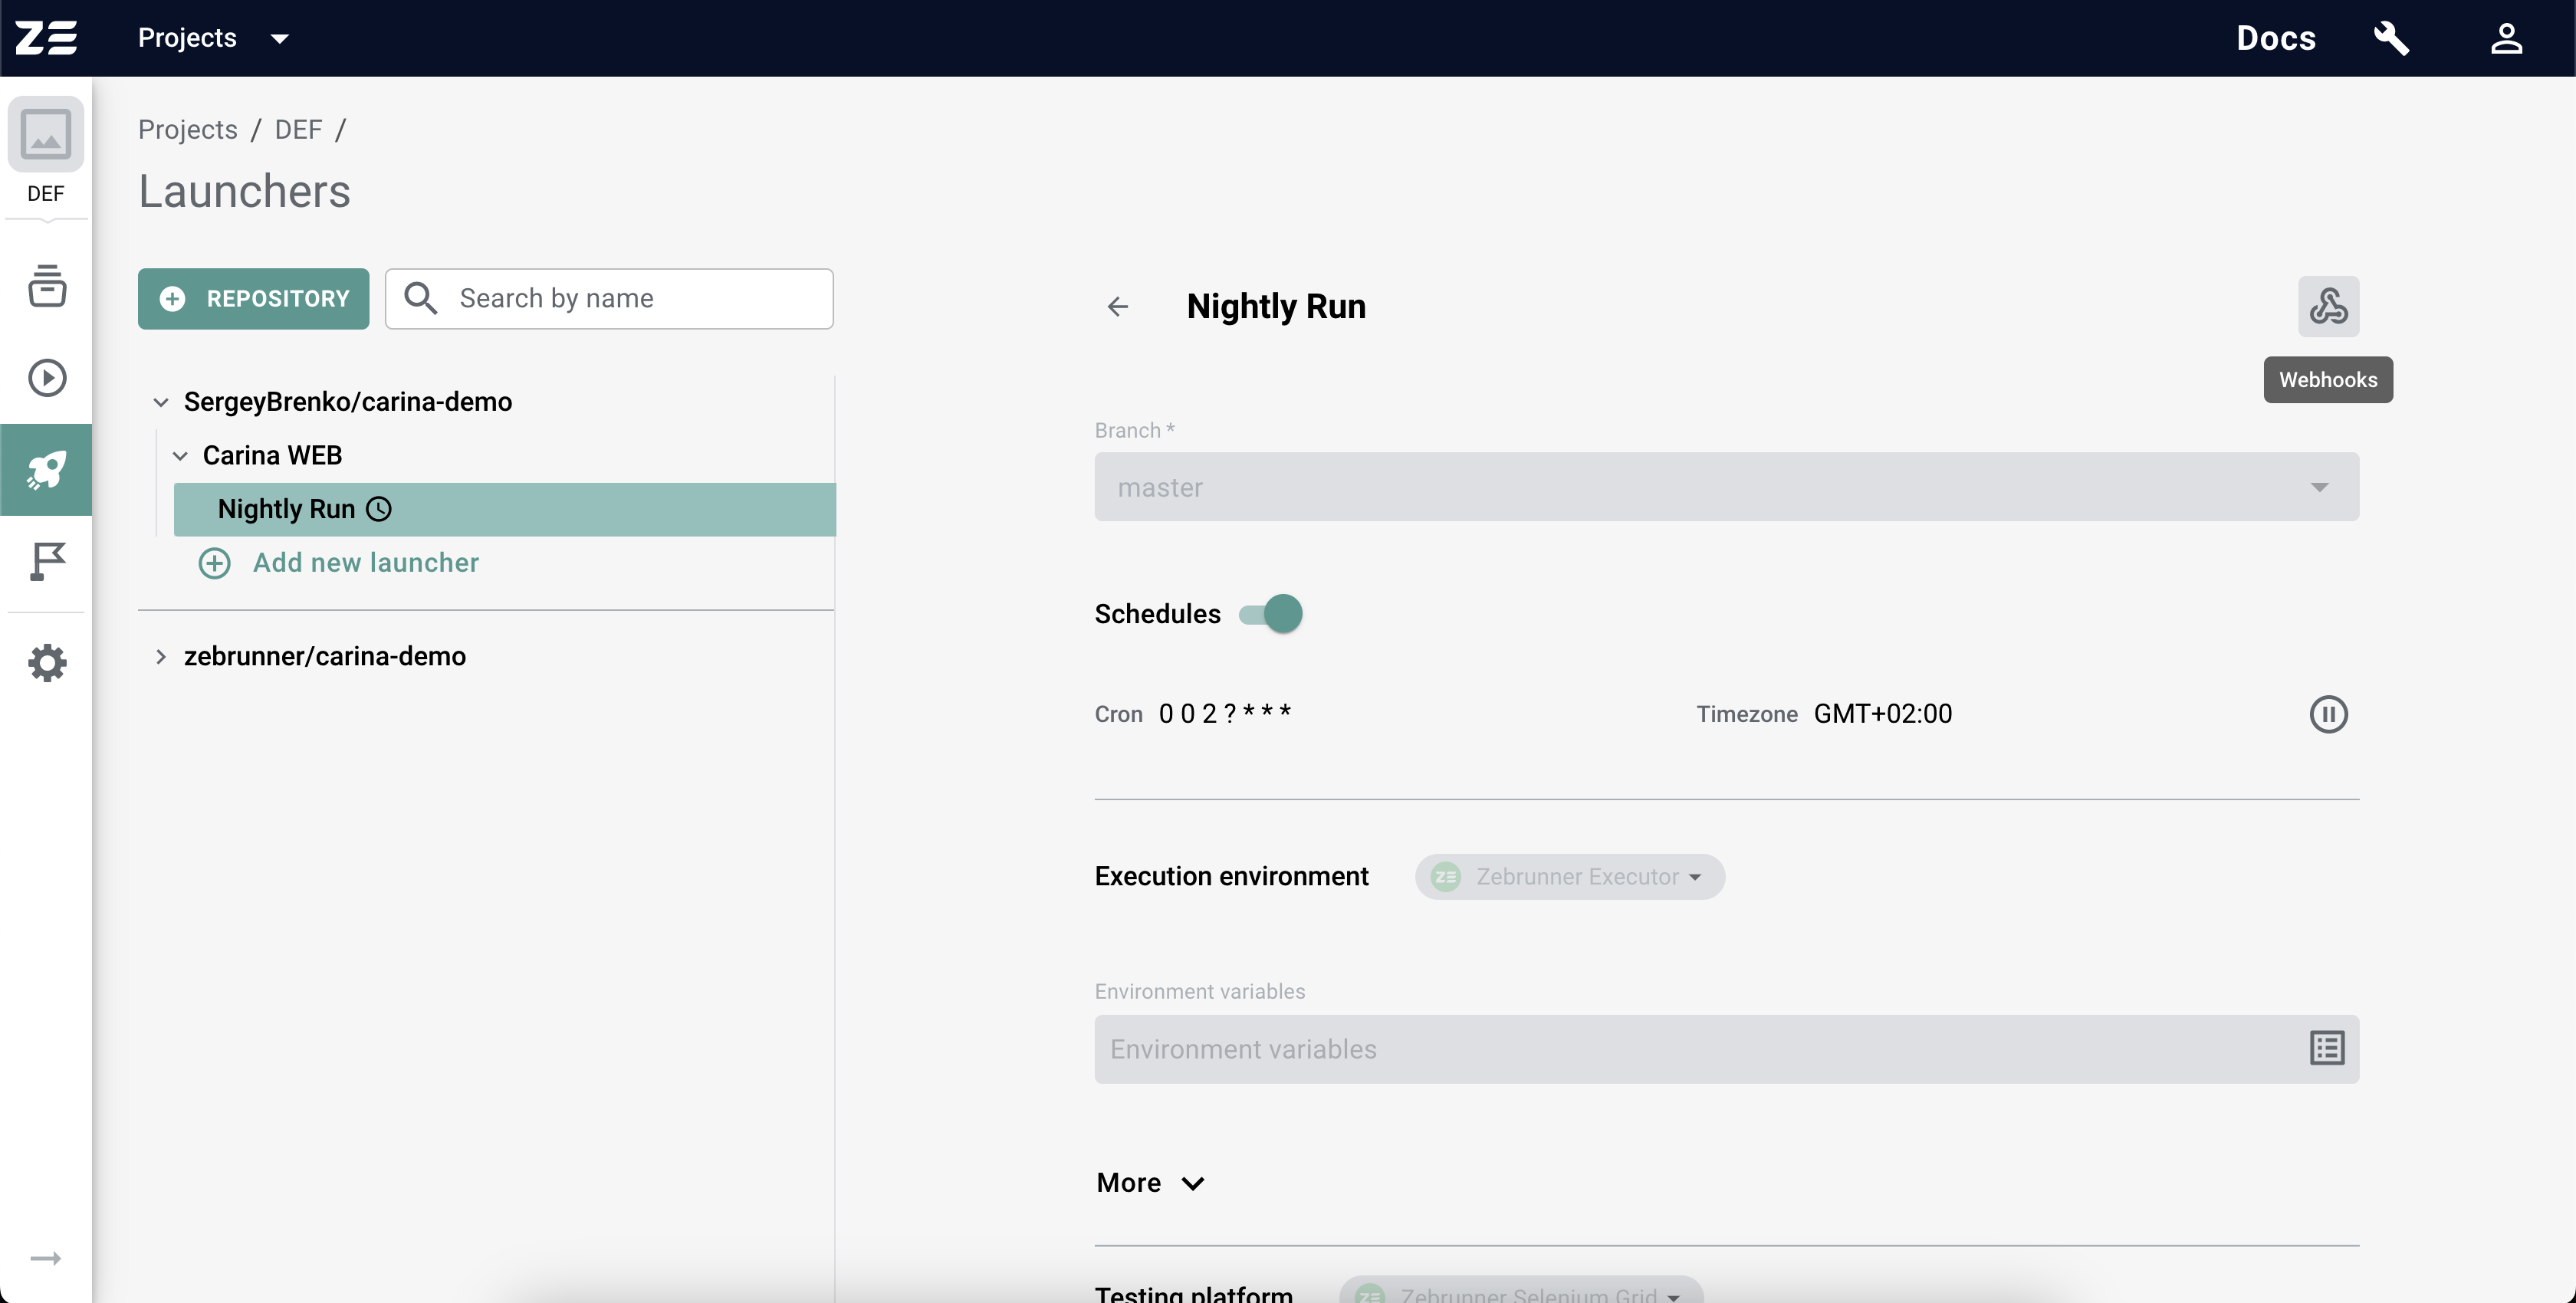
In order to create a Webhook, you need to select a Preset that will be triggered by this Webhook and hit the Webhooks button in the top right corner.
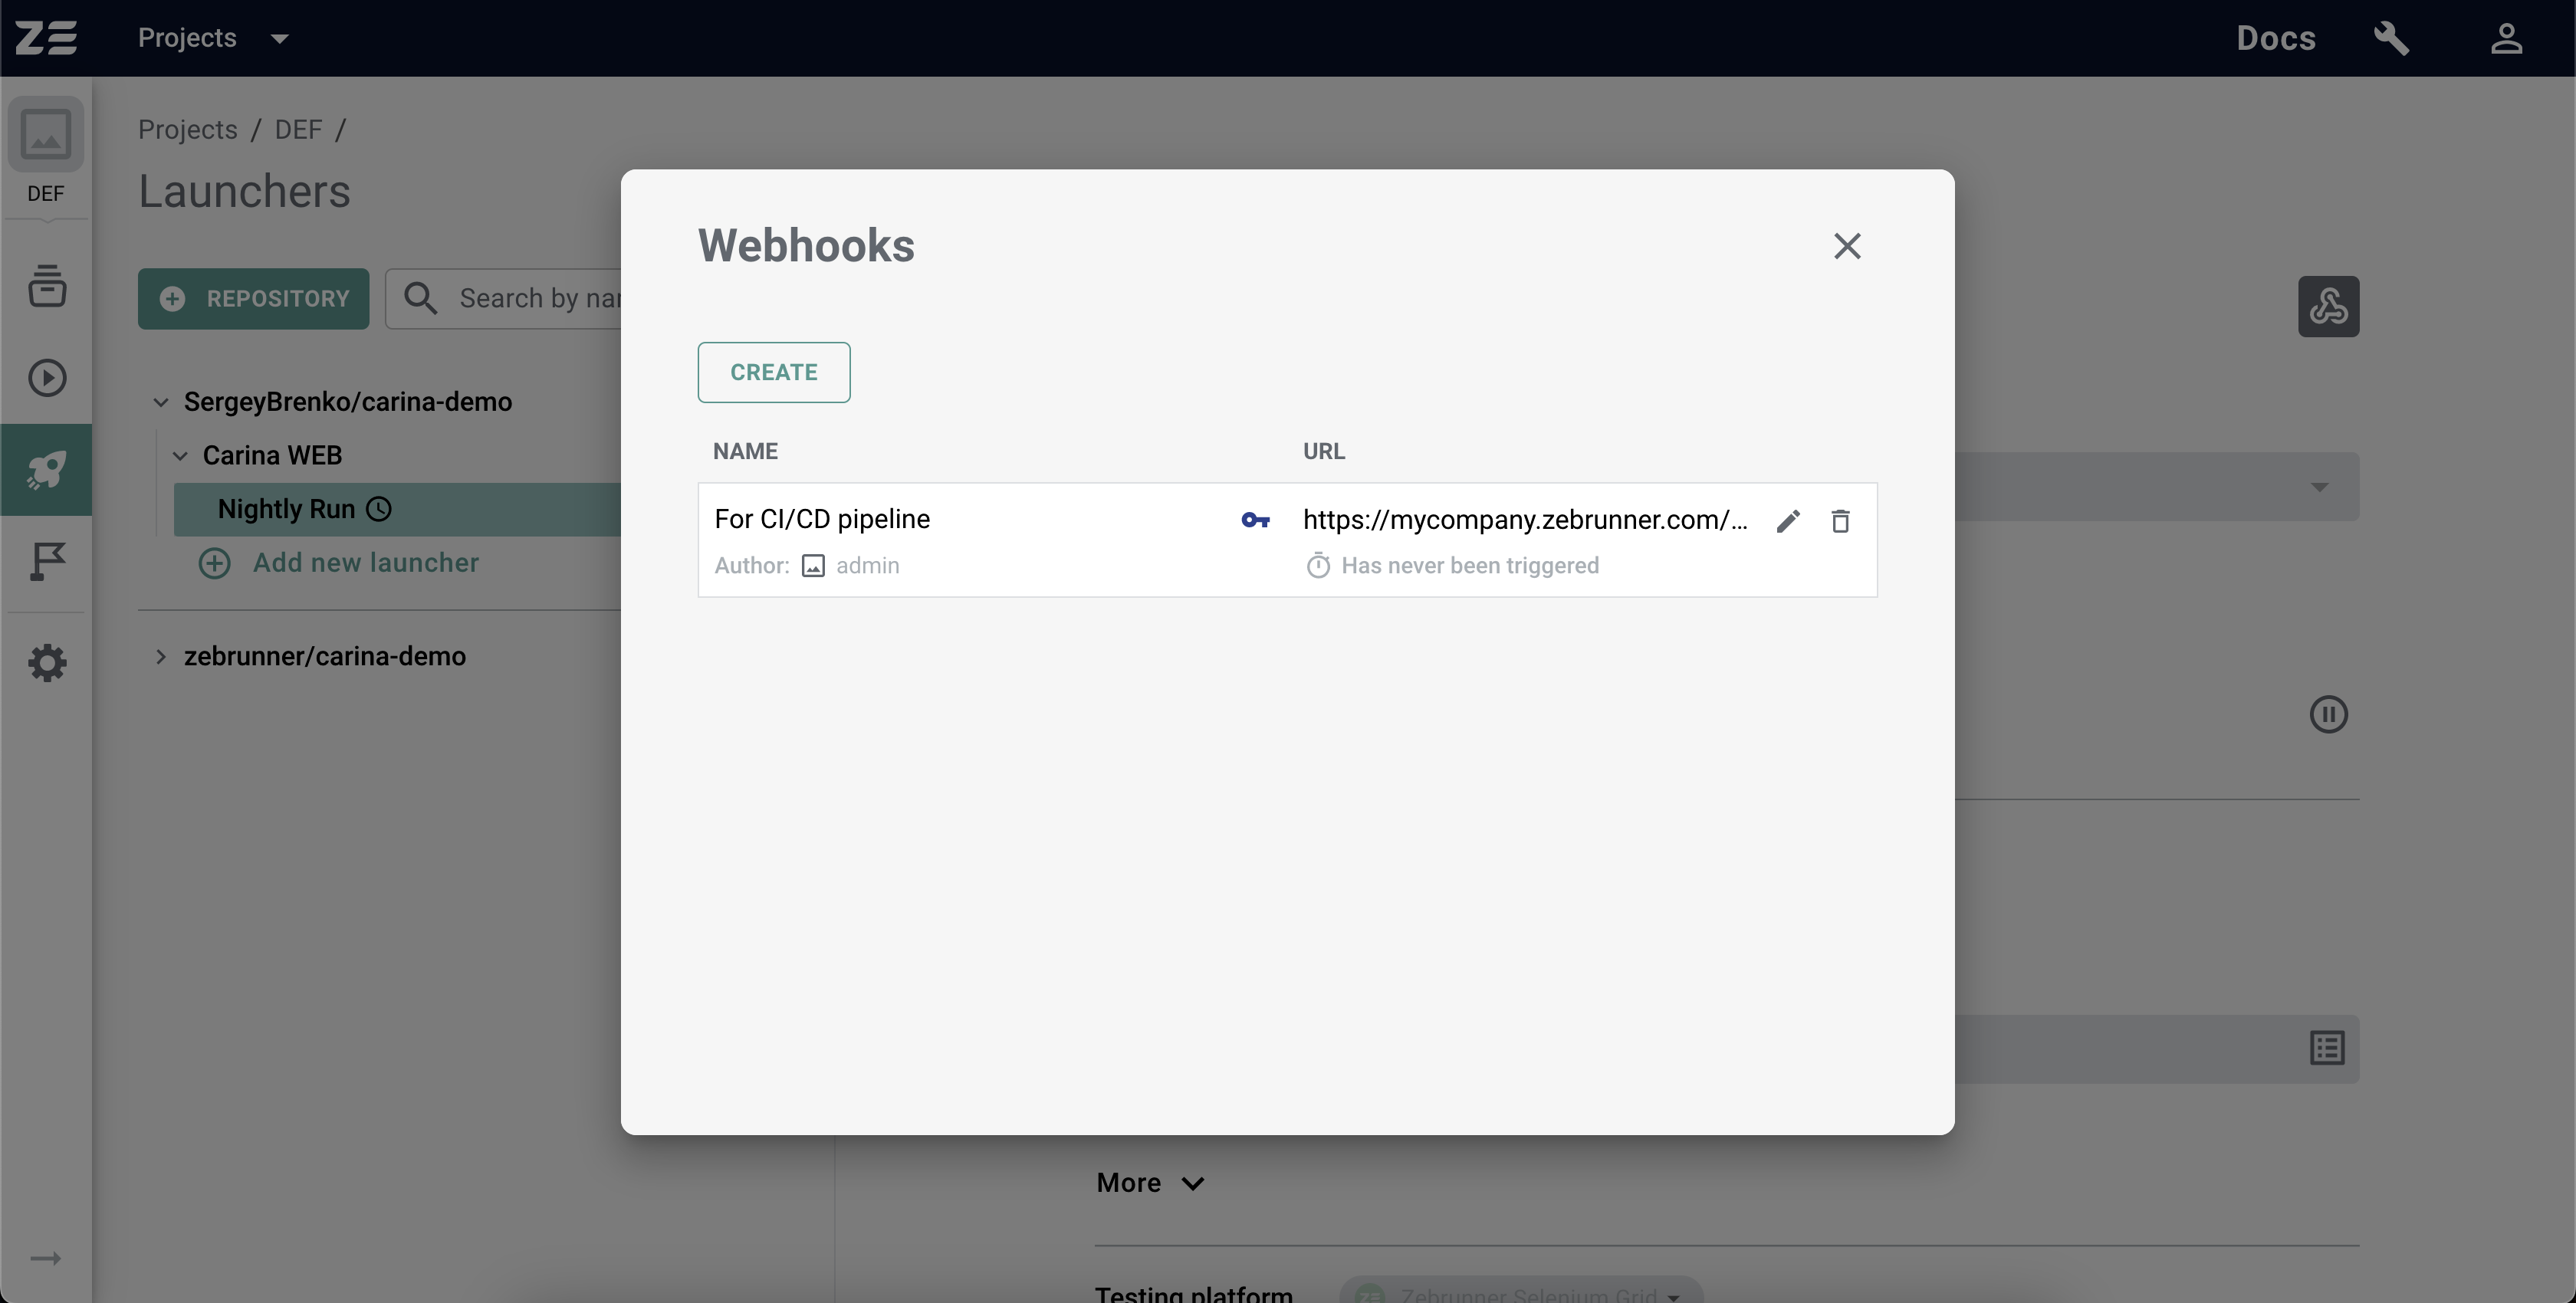
In the appeared modal window, click on Create button. Then you need to provide the Webhook display name and, optionally, the Secret Key that will be used for authentication. Every Webhook URL contains a random Webhook Id which can be considered as some kind of password. Generally, this "password" can not be treated as a strong security mechanism, since the Webhook URL can be stolen or intercepted. That is why we recommend to enforce authentication to the Webhook triggering and getting results, as it is described in Securing Webhooks section.

By clicking on the Save button, you will create a Webhook and see it in the list of Webhooks. The Webhook URL will always be accessible from the modal window. To copy it, click on the Copy button next to the URL. In this window, you can also edit a Webhook or delete it. The key symbol placed in front of the Webhook URL indicates that actions with the webhook require authentication.
Triggering a Webhook#
Once created, a Webhook is ready to be used. Webhooks that were created without a Secret Key can be triggered by sending a simple POST request to the Webhook URL. If the Webhook was configured with Secret Key, you must also provide the computed request signature in request body. To learn more about this, refer to the Securing Webhooks section.
By default, if the tests were launched successfully, you will receive in response a JSON object with the link to the execution results:
{
    "data": {
        "resultsLink": "https://mycompany.zebrunner.com/webhooks/<webhook-id>/launches/<launch-id>/results"
    }
}
GET request to this link will return the current state of the execution in JSON format. If the Webhook is used by your CI/CD pipeline, you can periodically poll the results until the run completes.
Here is an example of the default response body for a completed run:
{
    "data": {
        "finished": true,
        "status": "FAILED", // QUEUED, IN_PROGRESS, PASSED, FAILED, SKIPPED, ABORTED
        "testExecutions": {
            "passed": 8,
            "failed": 2,
            "failedAsKnown": 1,
            "skipped": 1,
            "aborted": 0,
            "inProgress": 0,
            "total": 11
        }
    },
    "_links": {
        "htmlUrl": "https://mycompany.zebrunner.com/projects/DEF/automation-launches/13"
    }
}
Overriding git branch#
To override the git branch specified for a Preset when triggering a Webhook, you can provide the desired branch in the branch field of the config object in the request body.
Here is an example of the request body:
Providing environment variables#
By default, all the environment variables specified for the Webhook's Preset will be passed to the tests runtime of the launch triggered using the Webhook. In some cases, it may be necessary to redefine some of them or even add new ones.
When triggering a Webhook, you can provide a list of environment variables in the request body. These variables will also be passed to the tests runtime, but will take precedence over environment variables specified for the Preset.
Here is an example of such a request body:
{
    "config": {
        "envVars": [
            {
                "name": "preset_env_var",
                "value": "new_value"
            },
            {
                "name": "new_env_var",
                "value": "value"
            }
        ]
    }
}
Configuring notification channels#
In addition to providing new environment variables and overriding existing ones, you can override the notification channels specified for the Preset.
Here is an example of the request body:
{
    "config": {
        "notifications": {
            "slackChannels": "comma, separated, list, of, slack, channels",
            "teamsChannels": "comma, separated, list, of, teams, channels",
            "emails": "comma, separated, list, of, emails"
        }
    }
}
If the config.notifications object contains a property with non-null value, then it will override corresponding value specified for the Preset.
Configuring execution results response body#
The default JSON object with the execution results should suit most API client. It contains everything that can be exposed by the API, but the response structure is steady. If your API client can only accept data in another format, you can configure it in the Webhook trigger request body.
Here is an example of such a request:
{
    "pollResponse": {
        "headers": {
            "Content-Type": "application/xml",
            "custom-header": [
                "value 1",
                "value 2"
            ]
        },
        "bodyTemplate": "<result><finished></result>"
    }
}
The .pollResponse.headers is a JSON object whose keys are header names, and values are the corresponding header values that should be returned by Zebrunner API.
The .pollResponse.bodyTemplate contains string representation of the response body that should be returned when getting the execution results. The template string may contain the following placeholders which will be replaced with actual values:
<finished>- boolean property describing if the launch has been completed;<status>- current status of the launch. Possible values: QUEUED, IN_PROGRESS, PASSED, FAILED, SKIPPED, ABORTED;<passed-amount>- number of passed tests;<failed-amount>- number of failed tests;<failed-as-known-amount>- number of failed tests which are known issues;<skipped-amount>- number of skipped tests;<aborted-amount>- number of aborted tests;<in-progress-amount>- number of in-progress tests;<total-amount>- total number of tests;<html-url>- html link to the launch in Zebrunner
For the above example, if the launch has been completed, the response will contain 2 headers (Content-Type: application/xml and custom-header: value 1, value 2) and the following response body:
Pushing results when the launch is complete#
Periodic polling is not the only way to get results of a finished launch. Another option is to configure the callback URL to be called after the launch is completed. Zebrunner will send an HTTP POST request to this URL with the information about launch results in request body.
Note
This feature is currently in beta.
Here is an example of the Webhook trigger request body that configures sending request to https://example.com/results:
{
    "pushRequest": {
        "url": "https://example.com/results",
        "headers": {
            "Content-Type": "application/xml"
        },
        "bodyTemplate": "<result><finished></result>"
    }
}
The .pushRequest.headers and .pushRequest.bodyTemplate fields are processed the same way as the .pollResponse.headers and .pollResponse.bodyTemplate fields described in Configuring execution results response body section but used in request instead of response.
The default request body has completely the same structure as the default get execution results response that is described in Triggering a Webhook section.
Securing Webhooks#
The Webhook URL generated by Zebrunner contains the unique Webhook id. This id can be considered as some kind of password, because it is a unique non-predictable string. In practice, this "password" can not be treated as a strong security mechanism, since the Webhook URL can be stolen or intercepted. That is why Zebrunner offers a more robust authentication mechanism which is based on request signatures. This approach allows to authenticate the origin of the request, ensures data integrity, protects against data forgery, replay attacks, timing attacks.
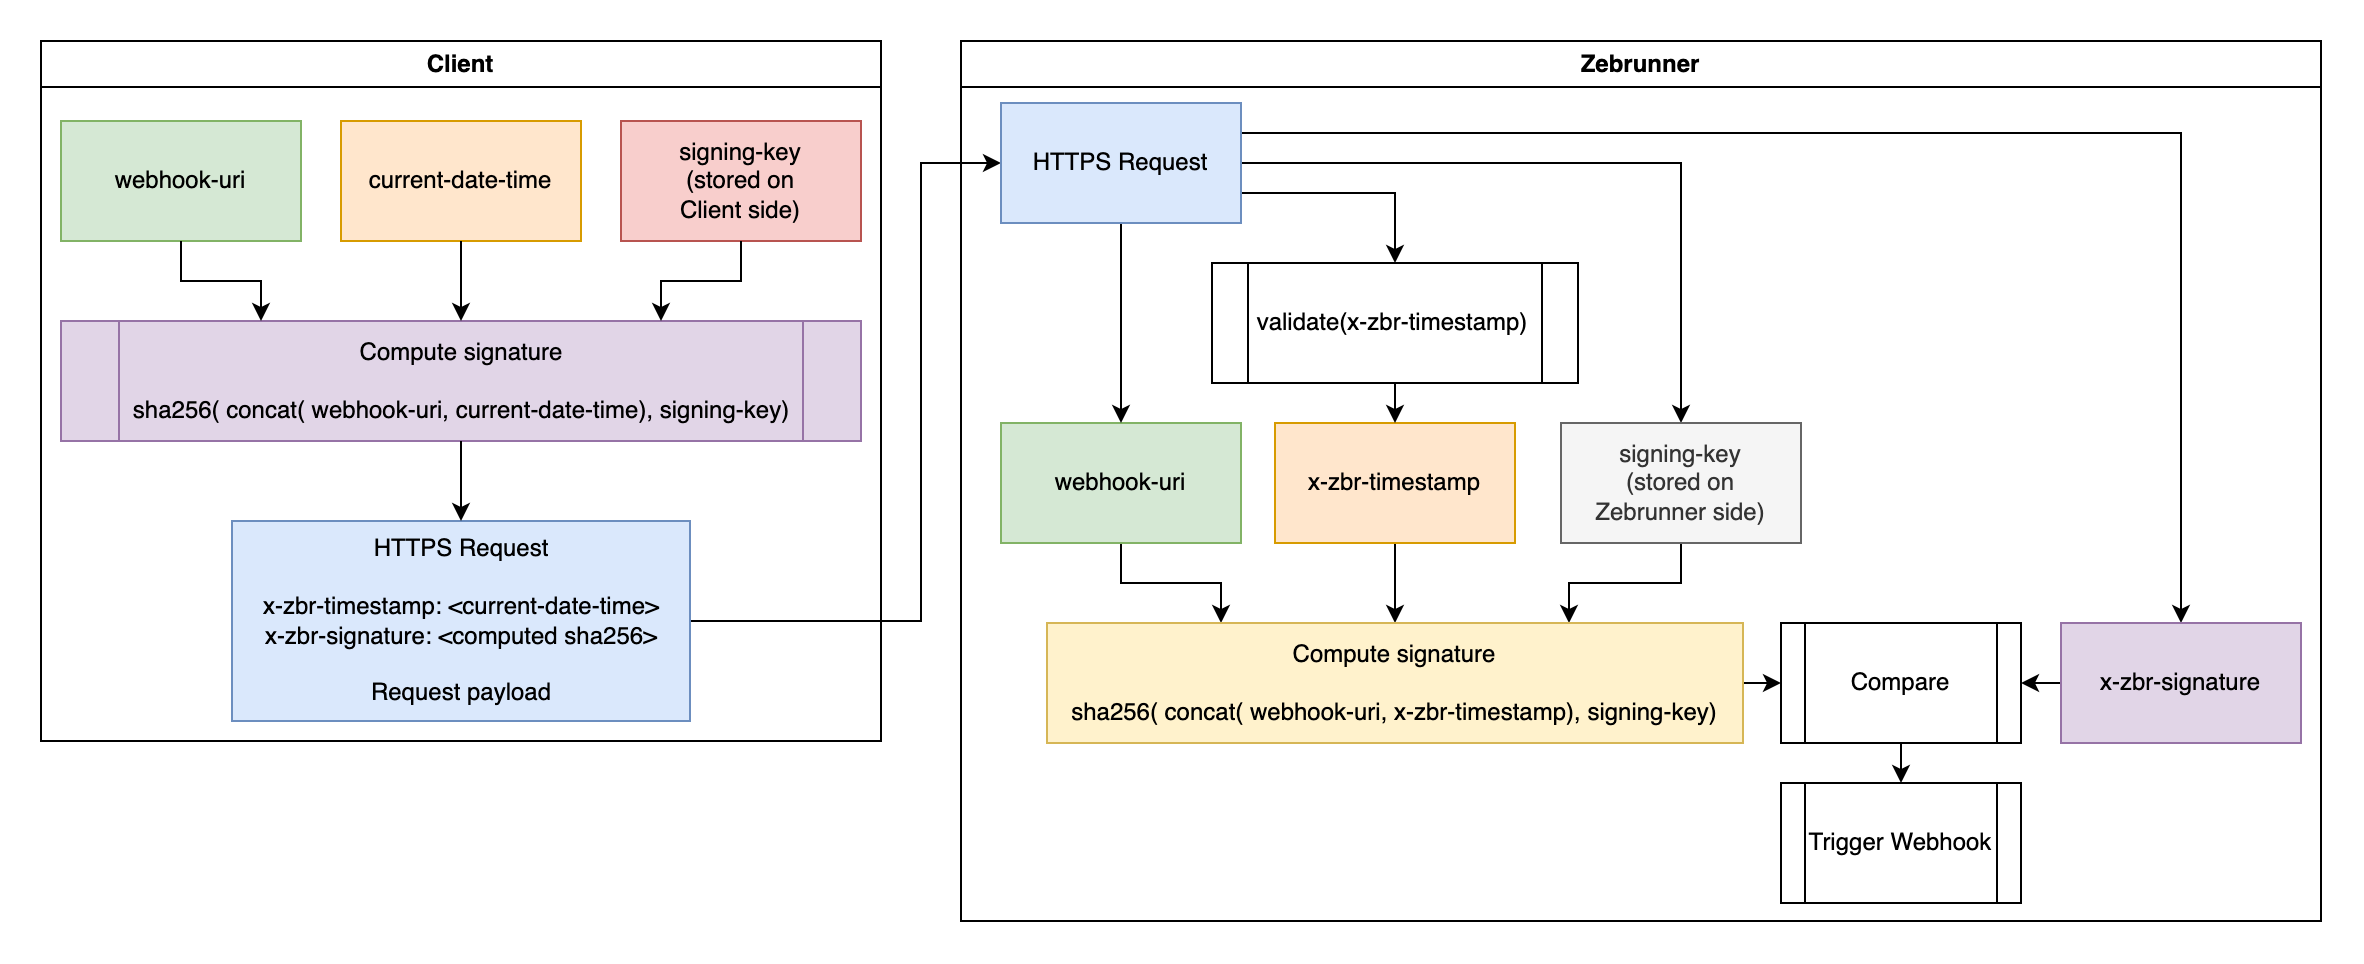
The following figure describes how the authentication works
Signature components#
The first thing you need is the Secret Key for calculating request signatures. It must be a base64-encoded string representing up to 64 random bytes with high entropy. We strongly recommend to generate the string using secure random. In terminal, this can be done using the following command:
This Secret Key must be both securely stored on your side (since it is used for every request to Zebrunner) and set to the target Webhook in Zebrunner. For this, you can either specify this secret key when creating the Webhook or when editing.
The second component is the string representation of the current timestamp in UTC timezone. It must be formatted according to the yyyy-MM-dd'T'HH:mm:ss'Z' pattern, e.g. "2023-01-01T00:00:00Z". The timestamp must be passed to Zebrunner in x-zbr-timestamp request header.
Warning
The x-zbr-timestamp header will be validated against the current timestamp. Zebrunner tolerates up to a 5 minutes difference between the current server time (in UTC timezone) and the provided x-zbr-timestamp value. This allows to protect your webhooks against replay attacks.
The third (and the last) component is the request URL. For Webhook triggering it is the Webhook URL, for getting results it is the link returned when you trigger the Webhook.
Signing Request#
With these three components, you can calculate the request signature. Below you can see the pseudo-code of the signing algorithm. The concat function means that you need to concatenate the Webhook URL and the value of the x-zbr-timestamp header. Note that the hmacsha256 function accepts byte array representation of your secret key, not a hex or base64 encoded string. Request payload is not used by the signature calculation algorithm.
base64.encodeToString(
    hmacsha256(
        (concat(webhook-url, x-zbr-timestamp-header)).toUtf8Bytes(),
        base64.decode(your-secret-key-string)
    )
)
The resulted string must be sent to Zebrunner in x-zbr-signature request header. For each action on secured Webhook, Zebrunner will calculate the expected request signature and compare it with the provided one. If the provided signature does not match, the request will be rejected.
Note
If a Secret Key is specified for the Webhook, then requests to trigger the Webhook and to get launch results must contain a request signature.
The following code snippet is a utility class written in Java which contains methods for generating a Secret Key and for calculating request signature.
ZebrunnerWebhookUtils.java
import javax.crypto.Mac;
import javax.crypto.spec.SecretKeySpec;
import javax.validation.constraints.NotNull;
import java.nio.charset.StandardCharsets;
import java.security.InvalidKeyException;
import java.security.Key;
import java.security.NoSuchAlgorithmException;
import java.security.SecureRandom;
import java.util.Arrays;
import java.util.Base64;

public final class ZebrunnerWebhookUtils {

    public static final String SIGNING_ALGORITHM = "HmacSHA256";

    public static String generateSecretKey() throws NoSuchAlgorithmException {
        byte[] secretKey = new byte[64];

        SecureRandom.getInstanceStrong().nextBytes(secretKey);

        return Base64.getEncoder().encodeToString(secretKey);
    }

    public static String calculateSignature(@NotNull String webhookUrl,
                                            @NotNull String secretKeyBase64,
                                            @NotNull String requestTimestamp) throws NoSuchAlgorithmException, InvalidKeyException {
        byte[] secretKeyBytes = Arrays.copyOf(Base64.getDecoder().decode(secretKeyBase64), 64);
        Key secretKey = new SecretKeySpec(secretKeyBytes, SIGNING_ALGORITHM);

        Mac mac = Mac.getInstance("HmacSHA256");
        mac.init(secretKey);

        byte[] messageBytes = (webhookUrl + requestTimestamp).getBytes(StandardCharsets.UTF_8);

        byte[] signatureBytes = mac.doFinal(messageBytes);
        return Base64.getEncoder().encodeToString(signatureBytes);
    }

}